How To Set Up Time Attendance Software
time attendance software No CommentsThe punch clock is so 20th century.
There are computers and electronics now to make the work of keeping track of daily matters like payroll automated.
Unfortunately they take a little more time to install and set up, especially when it comes to inserting all the data you need into the included software.
So as a result we are going to look at how to set up the software so that you don’t have to worry about keeping an eye on attendance.
In this page we are going to cover the following things:
- The initial software setup
- Creating an Excel file for staff information
- Importing information about staff
- Creating shift settings
- Processing and analyzing the data
Setting Up The Software
Installation of this software on your computer is relatively easy and just requires you to put a disk into the computer and then follow the standard installation method.
The next thing to do is to enter the necessary information about the company and the departments in it.
This is a vital step as, without it, the software will not work properly.
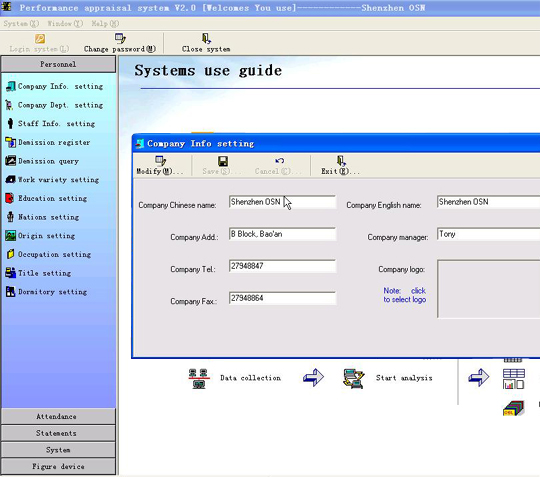
When you are filling out the company information panel ensure you put your company name in BOTH the company Chinese name section AND the company English name section.
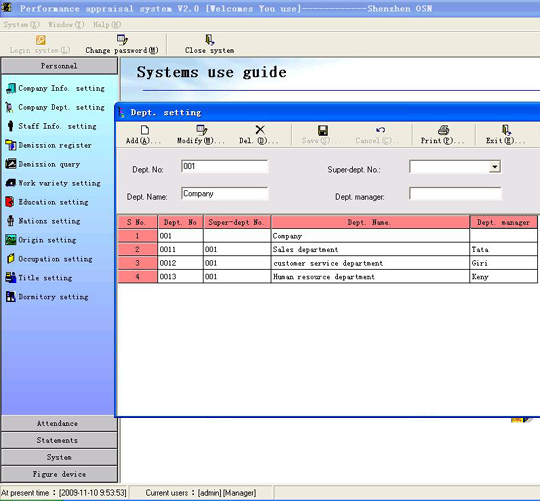
The department setting is the section of code in the software designed to interact with Excel.
You need at least one department for the program to work but increasing the number of departments is as easy as selecting the add function at the top of the file.
Ensure when creating a department that you include:
- A department number
- The department name
- The Department’s manager name
As I mentioned before it is vital that you finish this and the previous steps before entering staff information.
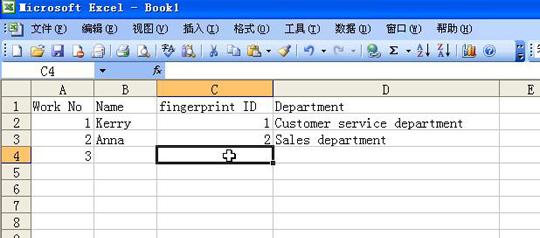
The main purpose of the Excel sheets is to make it easy for you add and remove information staff without having to pull down a number of menus and press a lot of buttons.
To work an Excel document needs to be set up in the same way as you can see above.
There has to between four and six categories with the first four being set up as follows:
- In cell A1 put the title ‘Work No’
- In cell B1 put the title ‘Name’
- In cell C1 put the title ‘Fingerprint ID’
- In cell D1 put the title ‘Department’
Putting any more than six columns and entering any information that you do not select in the next step may prevent you from using the software properly.
You can then enter staff names into the system ensuring that you assign them a work number and a fingerprint number.
After you have entered their names you can then import the chart into the software.
You do this by going to Staff info settings and selecting the Data Import option then choosing the right file.
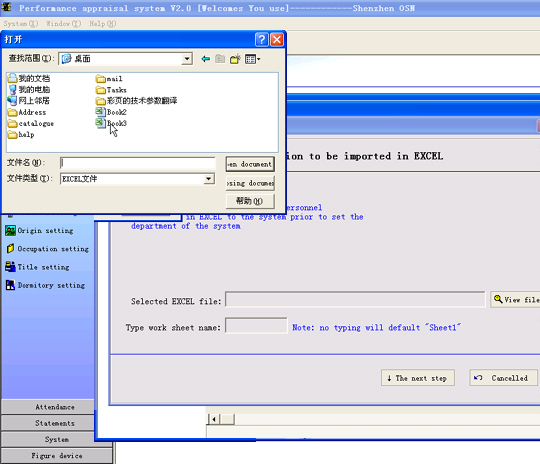
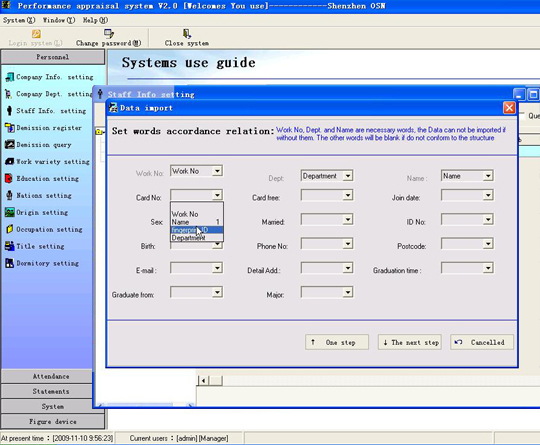
The next thing to do is to select the three main parameters that will be used in the recording of data.
As you can see from the drop down list above, you are presented with different heads to categories. This is only possible after you have created you Excel document.
There are three factors which must be selected and three one that you can select for yourself.
In the first three fields to make the software work correctly you must select ‘Work NO.’ for the work number field, í░NAMEí▒ for the name field and í░Departmentí▒ for the department field and Fingerprint ID in the “Card No:” field.
Any other column headings will be able to be selected from the fields below.
Any of the additional fields that you leave blank will be ignored by the software, however if you have entered an extra column into the Excel spreadsheet it is important to put it into the software as it could prevent it from working.
If there appears to be an error with the optional details select only the three compulsory options (work number, name and department), remove the extra data from the spreadsheet, re-import the spreadsheet and fill in the missing blanks within the software later.
Once you have done that select next or í░On Step Upí▒ and you will receive a conformation pop up window.
If everything looks like it’s working and all the information looks like it was imported correctly press the “Exit” button.
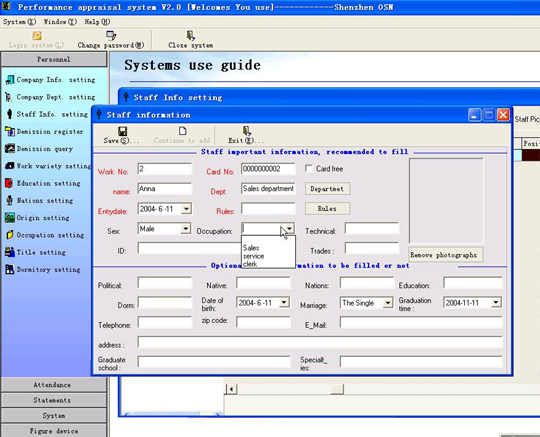
Now, if you go to the staff info section, you will be able to add extra details about staff.
You might be able to see that the name, work number and department have been imported from the Excel sheet.
It is important that you save any changes you make to save before exiting so that information is saved in the system.
With all that done it’s time to set up your shifts.
Setting Up Shifts
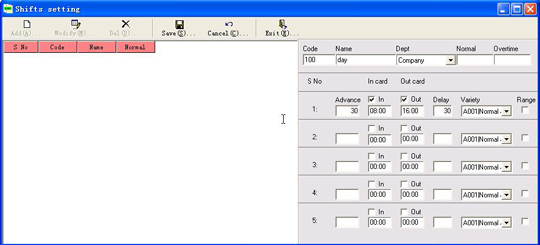
Setting up shifts is quite easy and can be found in the attendance menu under Shift Settings.
All that is required is to set the correct code, user name and department and then enter in an approved clock in and clock out time and an approved amount of overtime that they can work.
(The software will not record their check-out time if the staff member works over the allotted period of overtime)
Analyzing And Exporting data
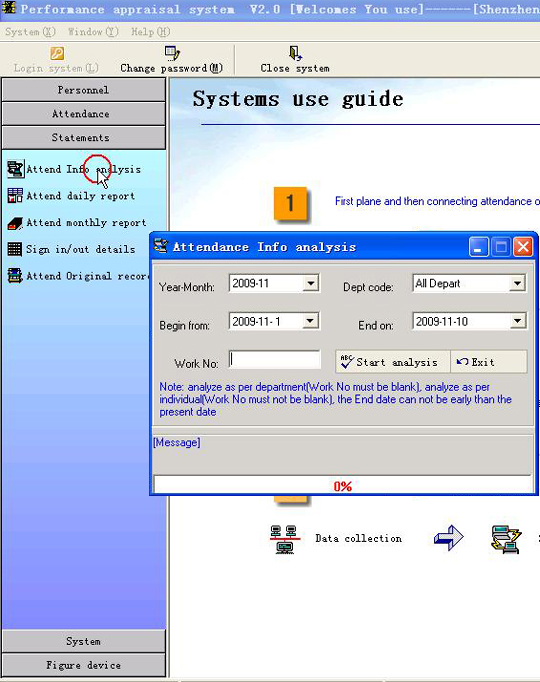
By going to the “statements” menu and selecting “Attendance info. Analysis” you will be able to retrieve and analyze attendance records from any department from any time.
To view sign in records of employees within every department, select the sign in/out details, in this section you will also be able to view attendance daily reports and monthly reports.
If you are analyzing the attendance records of the whole department then leave the work number area blank.
If you are analyzing the attendance records of an individual then enter their work number into the work number field.
You will be able to export sign in/out details, attendance monthly report or daily report to an Excel file just by clicking on the export button in the results panel.
And that’s it.
This is just a taste of what our fingerprint time attendance software is capable of. For a better look why don’t you check out our wide range of fingerprint locks and other biometric security devices.
All the rights of this article is reserved by E-Focus Industrial, it's not allowed to copy or use without permission.
If any question, please contact us!
 Live Chat
  Order
status
