
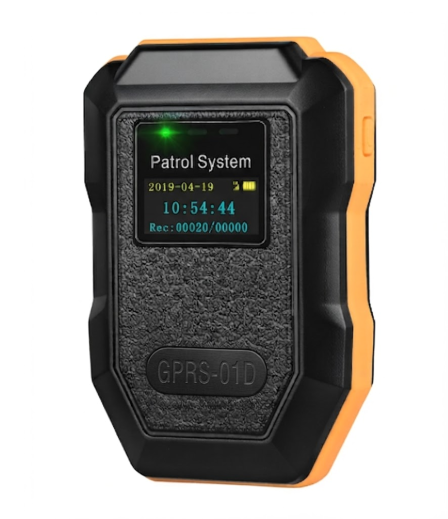
GPRS-01D
Mini GPRS Guard Tour System
User Manual (English)
Contents
1. System composition
1.1 Supplied accessories
- GPRS-01D patrol reader
- USB charger
- Magnetic / Pogo Pin USB cable
1.2 Recommended accessories
- Cloud / web-based software account (provided by EPORDO)
- Checkpoints (RFID address tags)
- Staff ID tags (optional)
- PC / laptop
- Printer (optional, for reports)
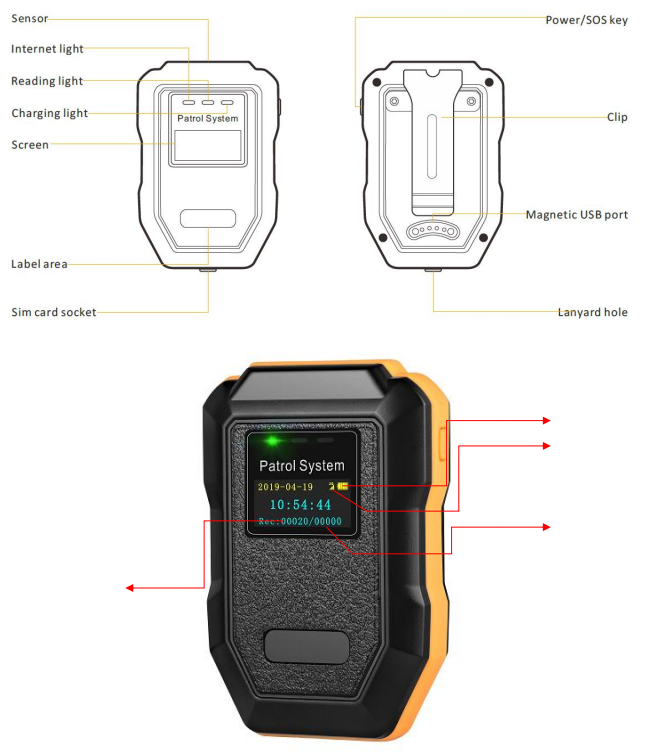
2. Technical data
| Reading method | Auto-induction (no button press required while scanning) |
|---|---|
| Communication | USB cable (settings / sync); GPRS (automatic data transfer) |
| Sensor frequency | 125 kHz EM ID tag |
| SOS | Press power button once to open device info page, then long-press about 4.5 seconds to send alarm (orange light + on-screen message) |
| Material | ABS plastic + rubber handle |
| Successful tag scan | Screen prompt + vibration (blue light feedback) |
| Data send failed | Rec: 000021 / 0000X — number after “/” = unsent records (example: 00021/00005 → 5 records not sent) |
| Data transferred OK | Rec: 000021 / 00000 — number after “/” is 0 → all records sent successfully |
| Working consumption | About 60 mA |
| Status feedback | LED (green / blue / red / orange) + vibration |
| Working temperature | −20 °C to 70 °C |
| Storage capacity | 80,000 records |
| Auto data delete | If all data has been sent successfully, about 78,000 records can be auto-removed when memory is full. If any record is still unsent, scanning will show 3× red flash + 3× vibration — connect to software and clear data. |
| Automatic time sync | Can synchronize device clock with server when network is available |
| Reset / reboot | Long-press power button about 3 seconds on home page to reboot (required after settings update or SIM change) |
| Working humidity | 30% to 95% |
| Impact record capacity | 32,000 records |
| IP rating | IP67 |
| Battery | 1200 mAh built-in rechargeable Li-ion |
| USB | Magnetic Pogo Pin USB port |
| Dimension | 82 × 52 × 22 mm |
| Net weight | 73 g |
3. Power button operations
| Start device | Press power button once |
|---|---|
| Check device info | Press power button once on home page (shows device ID and network settings) |
| Shutdown / reboot | Long-press about 3 seconds on home page |
| Send SOS alarm | Long-press about 4.5 seconds on the device info page |
4. Device operation
4.1 Scan tags
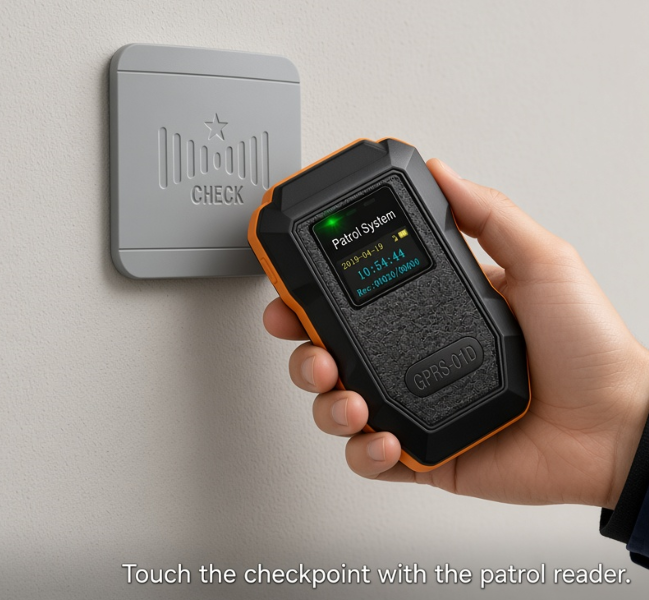
Hold the reader within about 3 cm of the checkpoint. A blue light flash with one vibration means the scan succeeded.
4.2 Data transferring
After a successful scan, records are sent automatically via GPRS.
00020/00000— 20 records stored; all sent successfully00020/00001— 20 records stored; 1 record still unsent
The number after “/” must become 00000 for a full successful transfer.
4.3 Send SOS alarm
- Press the power button once to open the device info page.
- Long-press the power button for about 4.5 seconds.
- Orange light flashes briefly; screen shows messages such as “alarming” / “sent successfully”.
- Supervisor can view the SOS event in software.
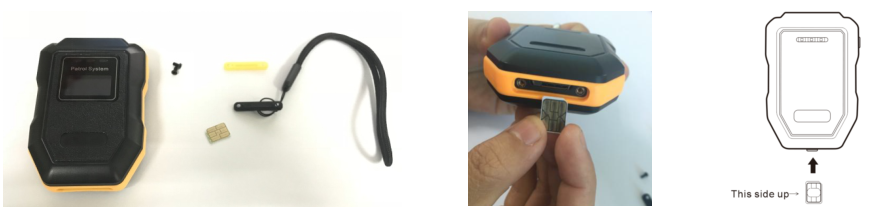
4.4 Insert SIM card
Nano SIM is supported. Insert with the contact side facing as shown in the diagram (“This side up”).
5. Software operation
Cloud software link (example):
http://89.117.53.190:16880/Home/Index#
Log in with the account provided by SHENZHEN EPORDO CO.,LTD, then complete basic settings.
5.2 Settings in software
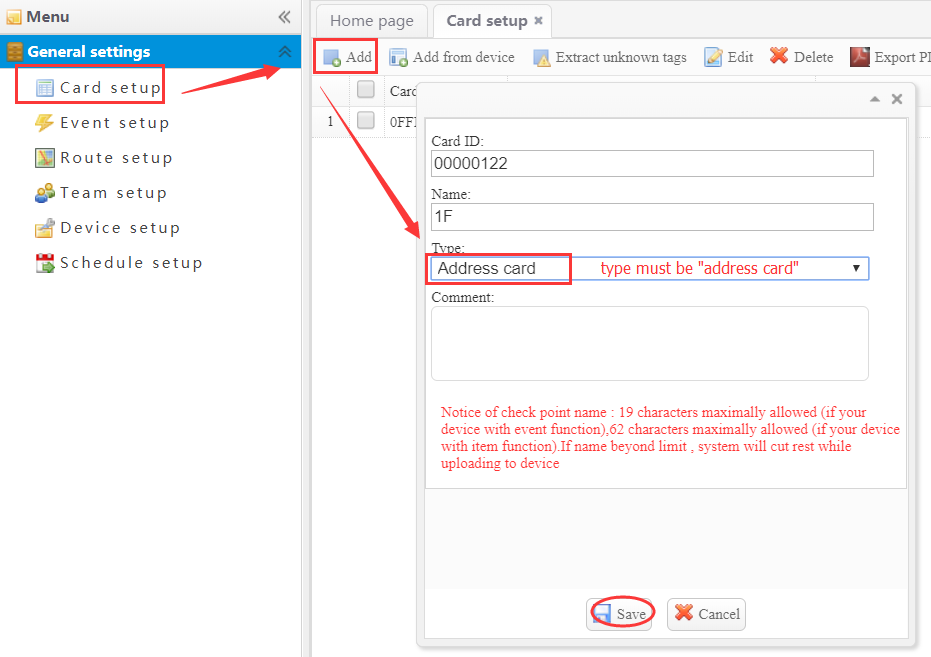
5.2.1 Card setup — Address card / Checkpoint
Each checkpoint has a globally unique ID. Enter the 8-digit Card ID and a clear name. Type must be Address card.
5.2.2 Card setup — Staff card (optional)
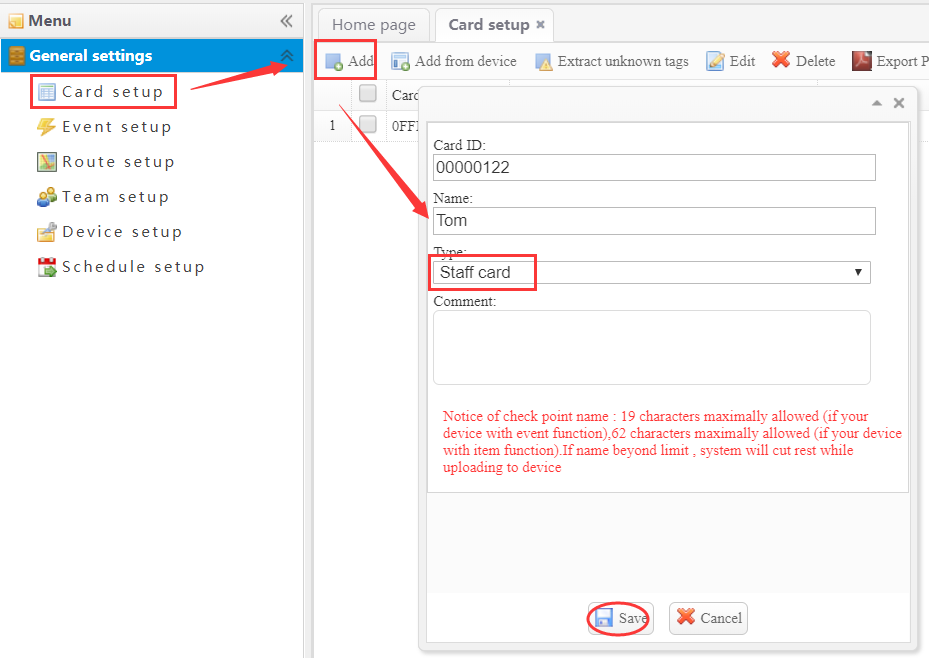
If you do not use staff cards (or the device has no fingerprint function), skip this step.
For staff binding: Card ID can be an 8-digit ID (can be a logical ID), enter staff name, and set Type to Staff card.
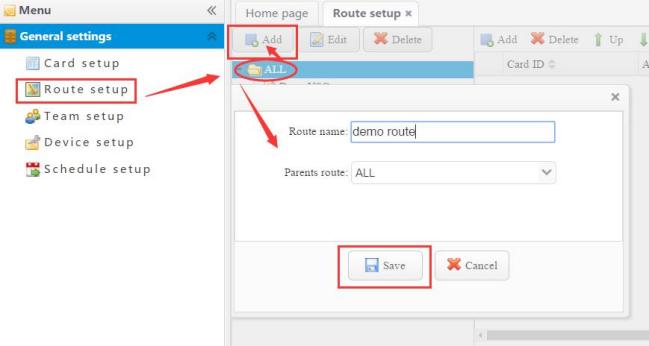
5.2.3 Create patrol route
Go to Route setup → select ALL → Add → enter route name → Save.
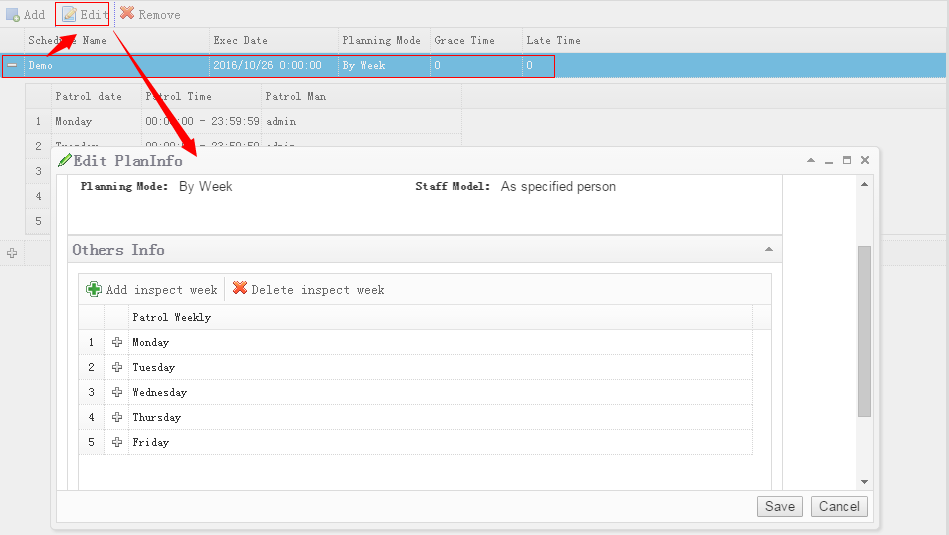
5.2.4 Schedule setup
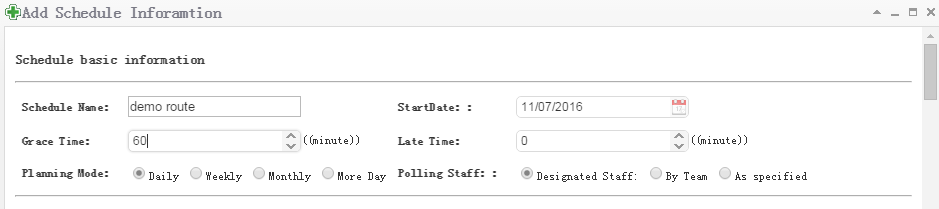
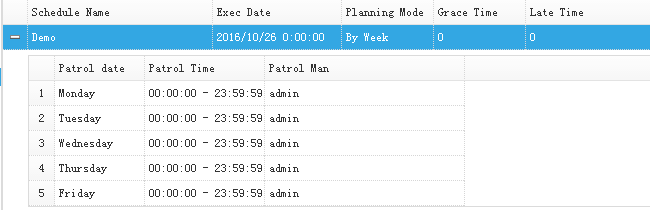
A schedule defines when the selected route must be completed (working periods and rounds).
- Schedule name — required
- Start date — first execution date
- Grace time — extra minutes still counted as qualified (example: 08:00–10:00 with 5 min grace → 08:00–10:05 still OK)
- Late time — must be larger than grace time; records in the late window are marked Late
- Planning mode — multiple plan types supported
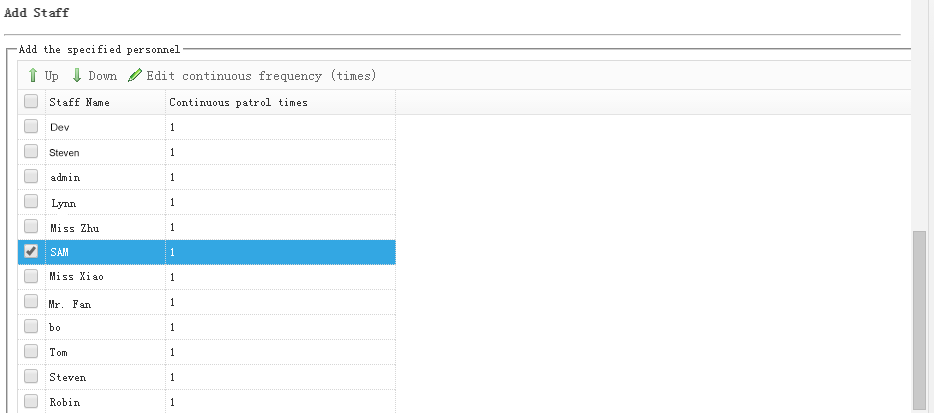
- Patrol staff — assign one or more officers
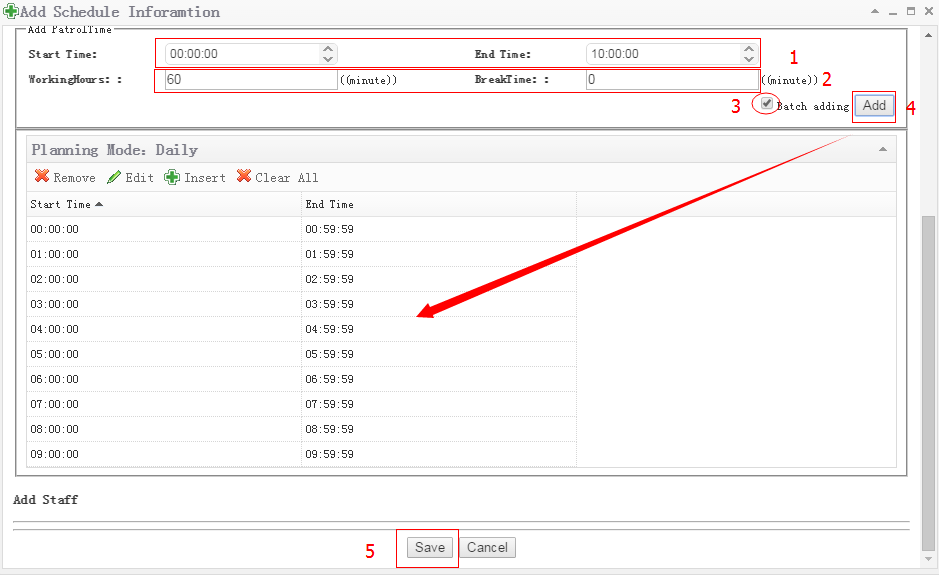
Batch adding working periods: If rounds are regular, use Batch adding — set start/end range, working minutes per round, and break time, then Add.
5.2.5 Communication (USB)
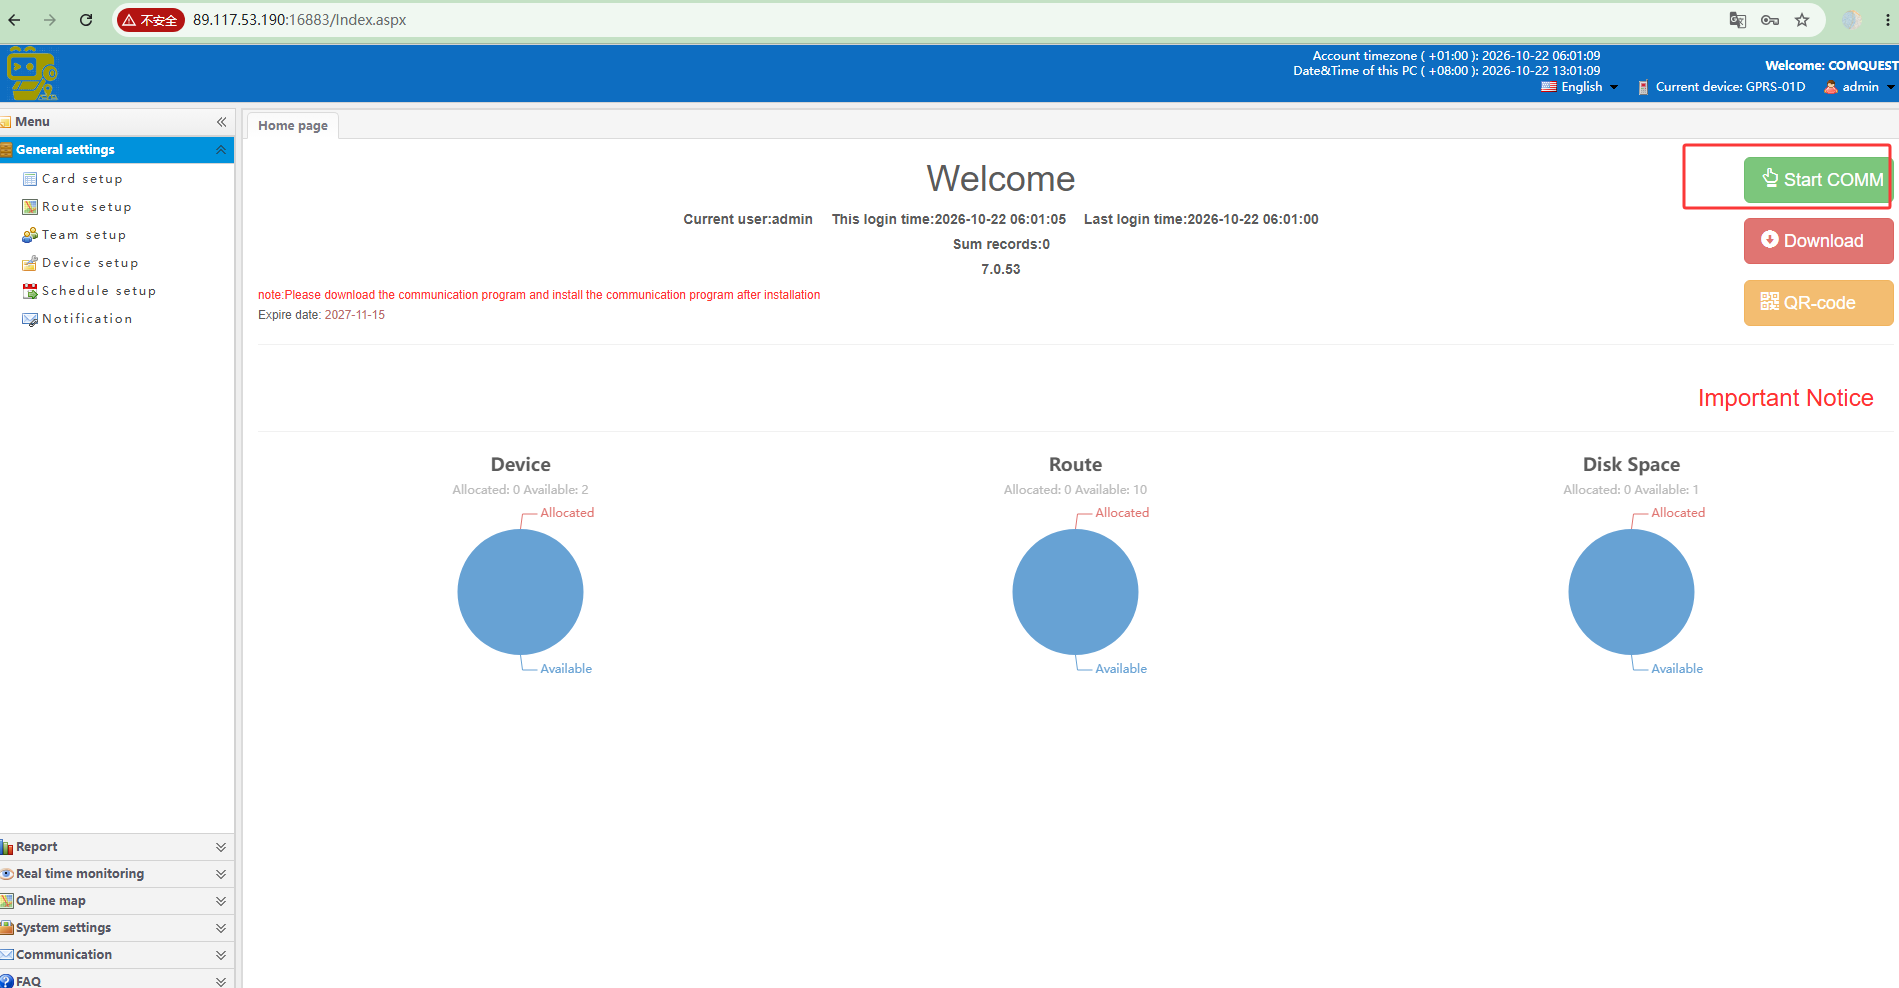
Connect the device with the USB cable, open the software, and click Start COMM.
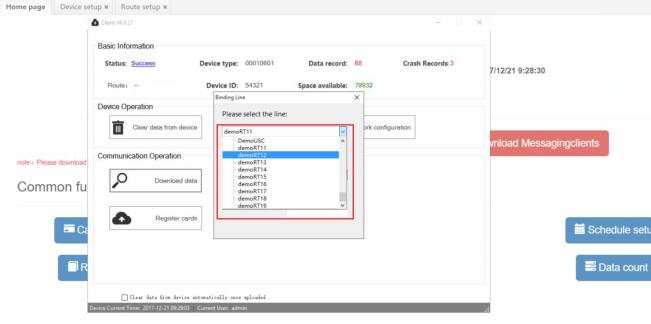
Bind the device to a patrol route and enter the device serial number (unique ID, usually labeled on the device body or packing box).
5.2.6 Configure network parameters
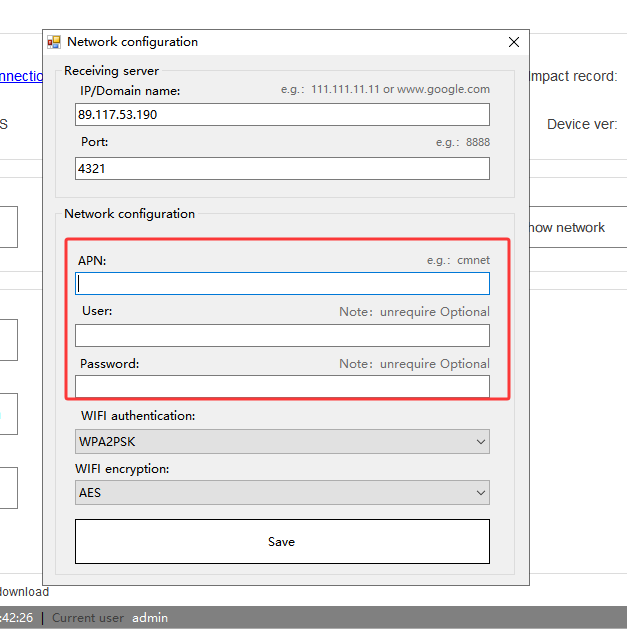
Network parameters tell the device where to send real-time data.
| Server IP | Public IP of the server where the software is installed (same host you use to open the software) |
|---|---|
| Port | Usually default 4321 |
| APN / User / Password | APN information of the SIM card (from your mobile network provider) |
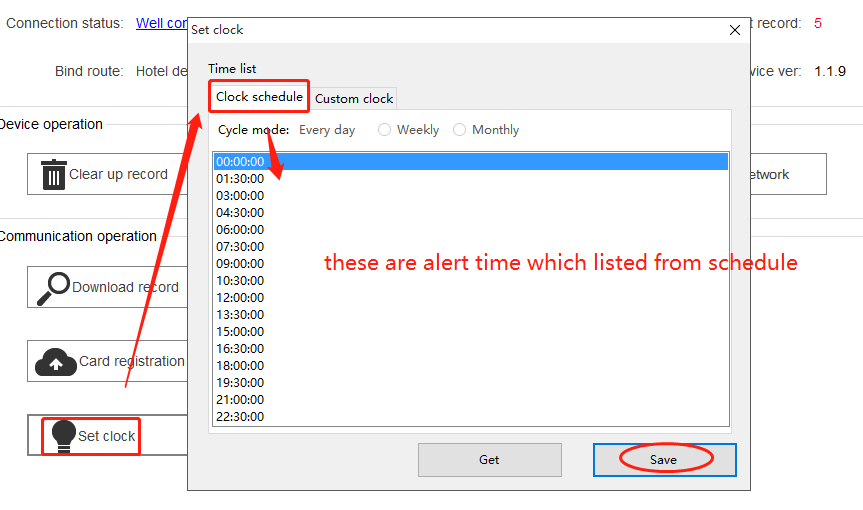
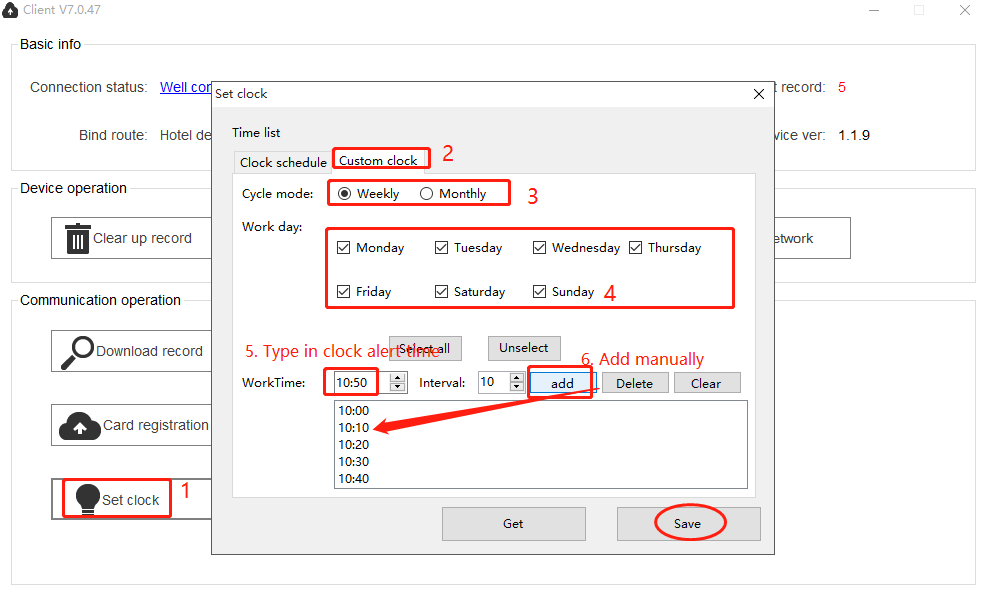
5.2.7 Set alarm clock on device
Device clocks can remind guards to start patrol. Two methods:
- Follow schedule — use alert times generated from the schedule
- Define manually — custom clock list
5.2.8 Sync device clock with server
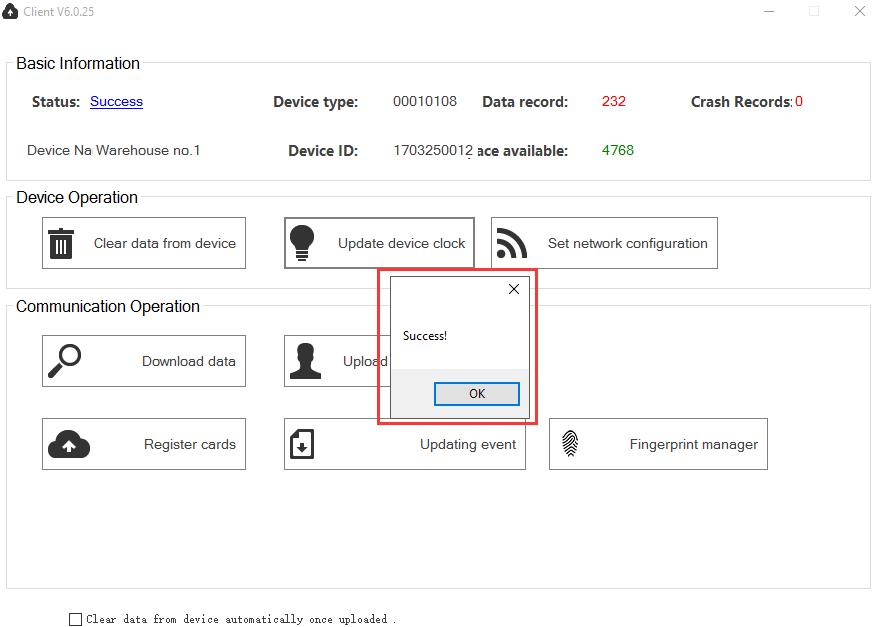
Use Sync clock / update device clock so the reader time matches the server.
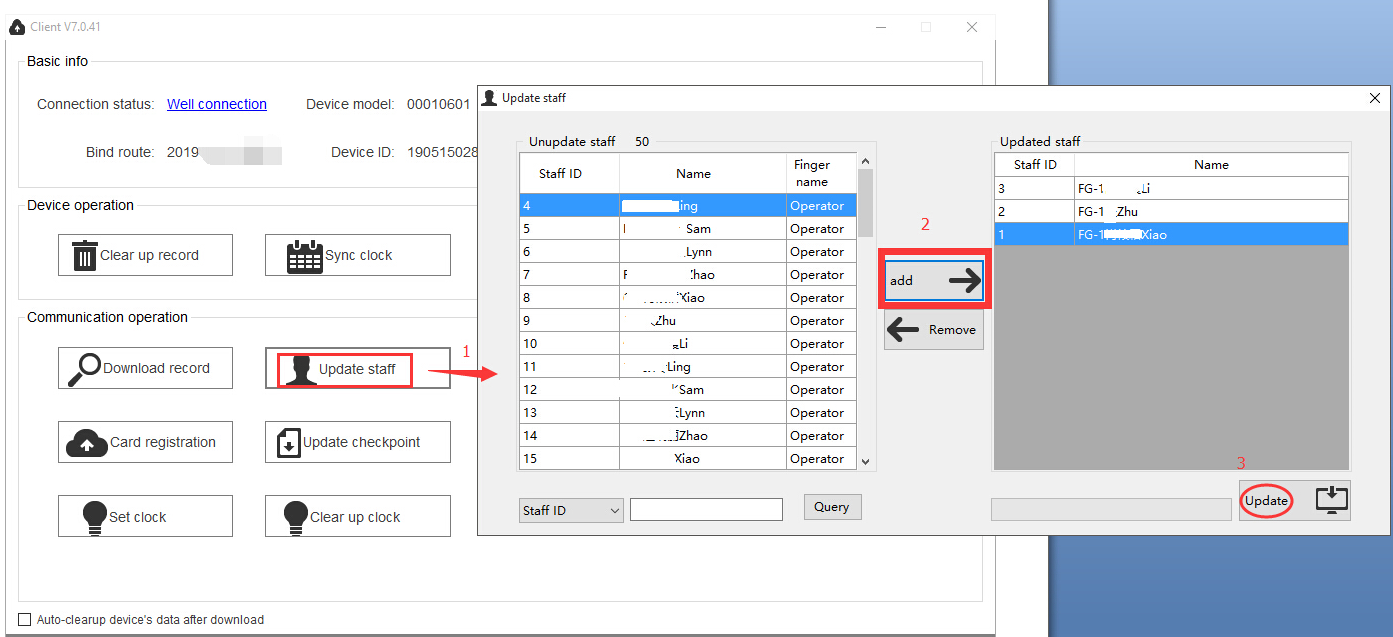
5.2.9 Synchronize checkpoint & staff info to device
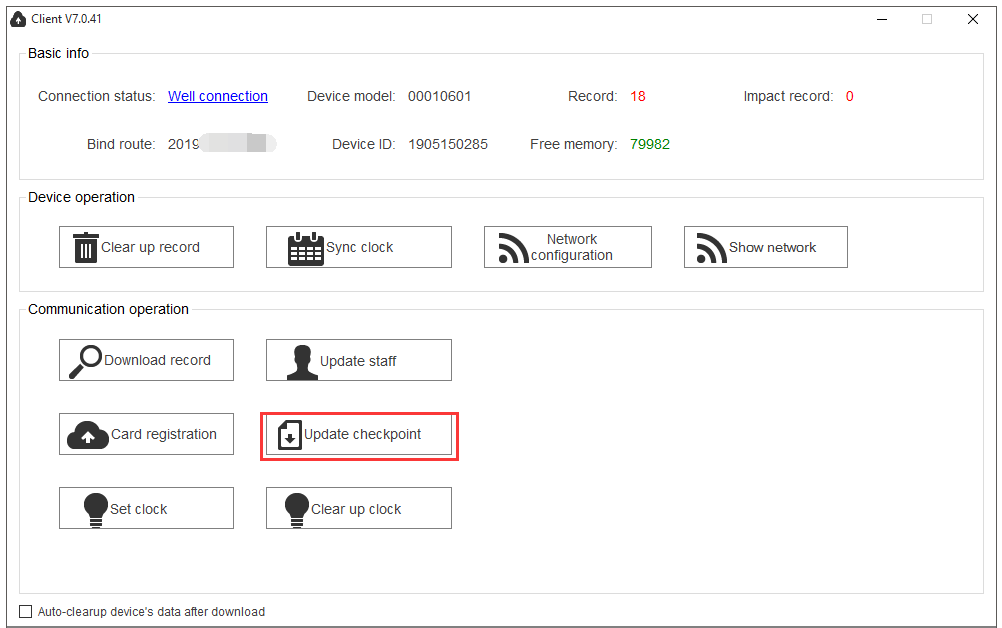
- Click Update checkpoint so registered checkpoint names appear on the device when scanned (otherwise “Unknown point”).
- Click Update staff so registered staff names appear when a staff card is scanned (otherwise “Unknown staff”).
6. Online testing
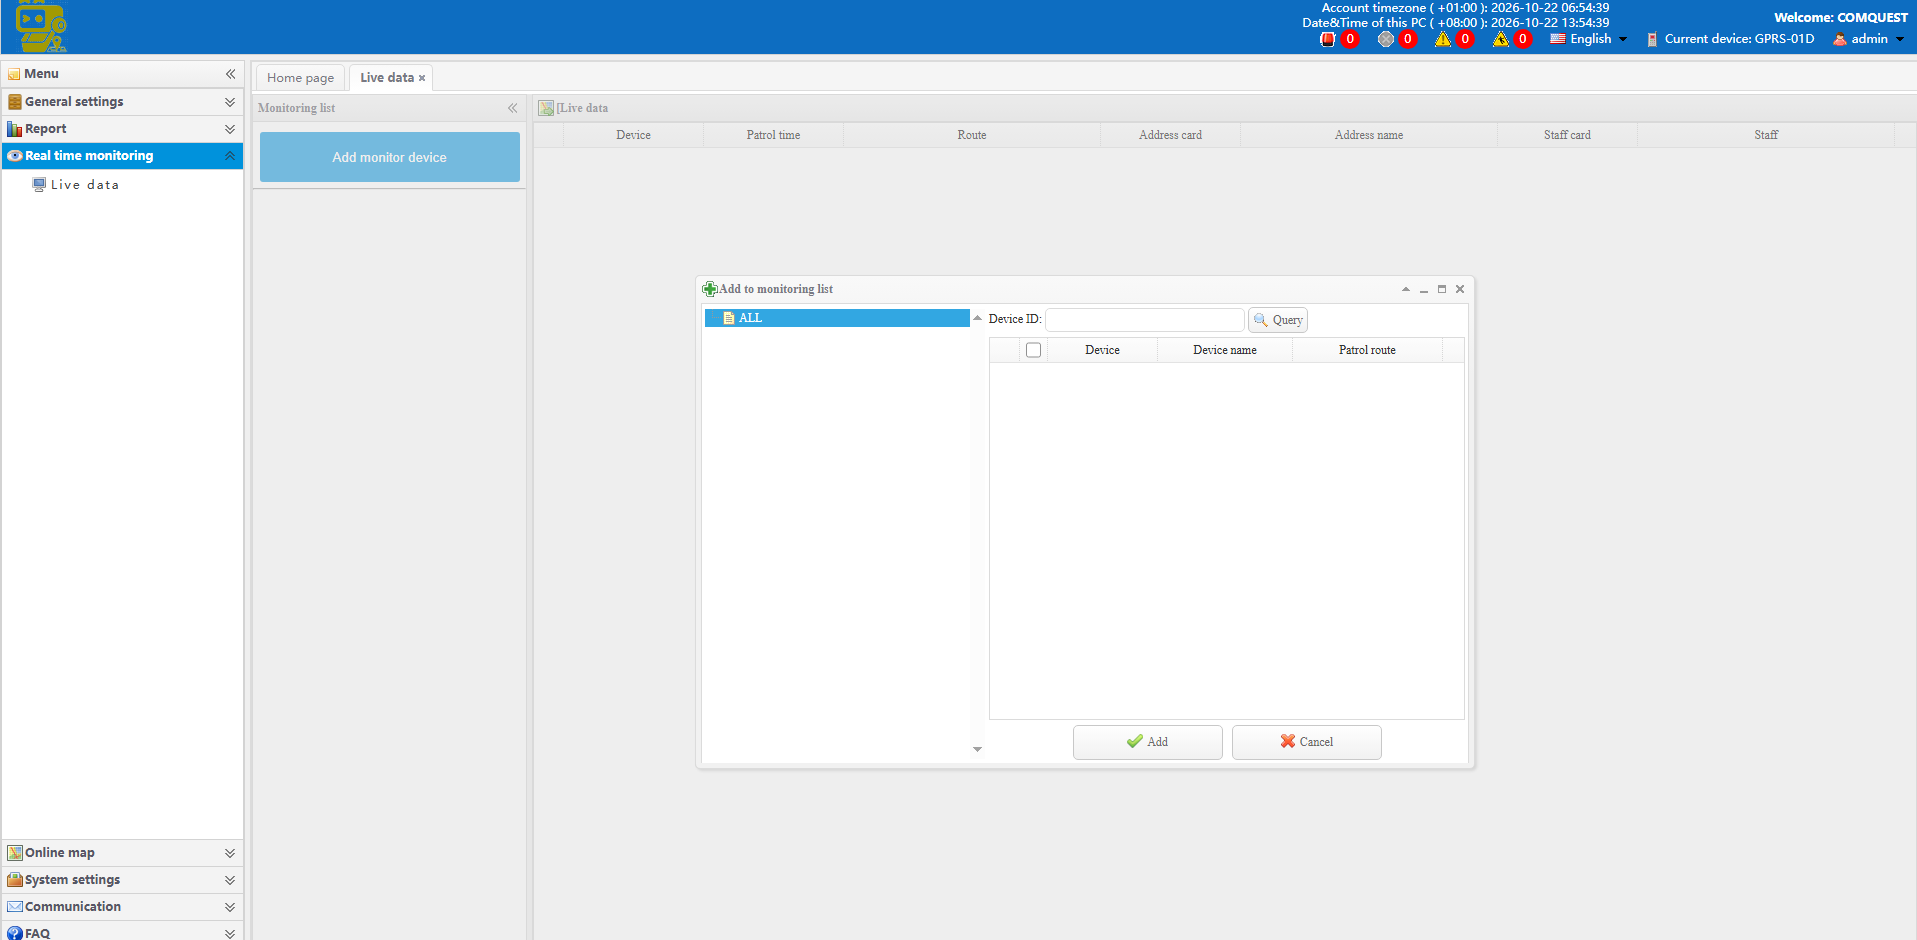
- Add the device to the monitoring list for real-time data.
- After all settings are finished, reboot the device (long-press until lights off), then restart until the green light flashes.
- Scan a tag to test GPRS upload.
Expected result: about 3× blue flash + 1 vibration. Press power once:
- Blue light in the middle — data sent successfully. Check software: Real time monitoring → Live data or Report → Raw data.
- Orange light on the right — send failed. Check network settings and SIM card.
7. Patrol working
- Officer scans staff ID card to log in (if staff cards are used).
- Walk the patrol route according to the schedule.
- At each checkpoint, approach the RFID area with the reader.
- Confirm blue light flashes (about 3 times) with one vibration.
- Continue until the round is complete.
8. Reports
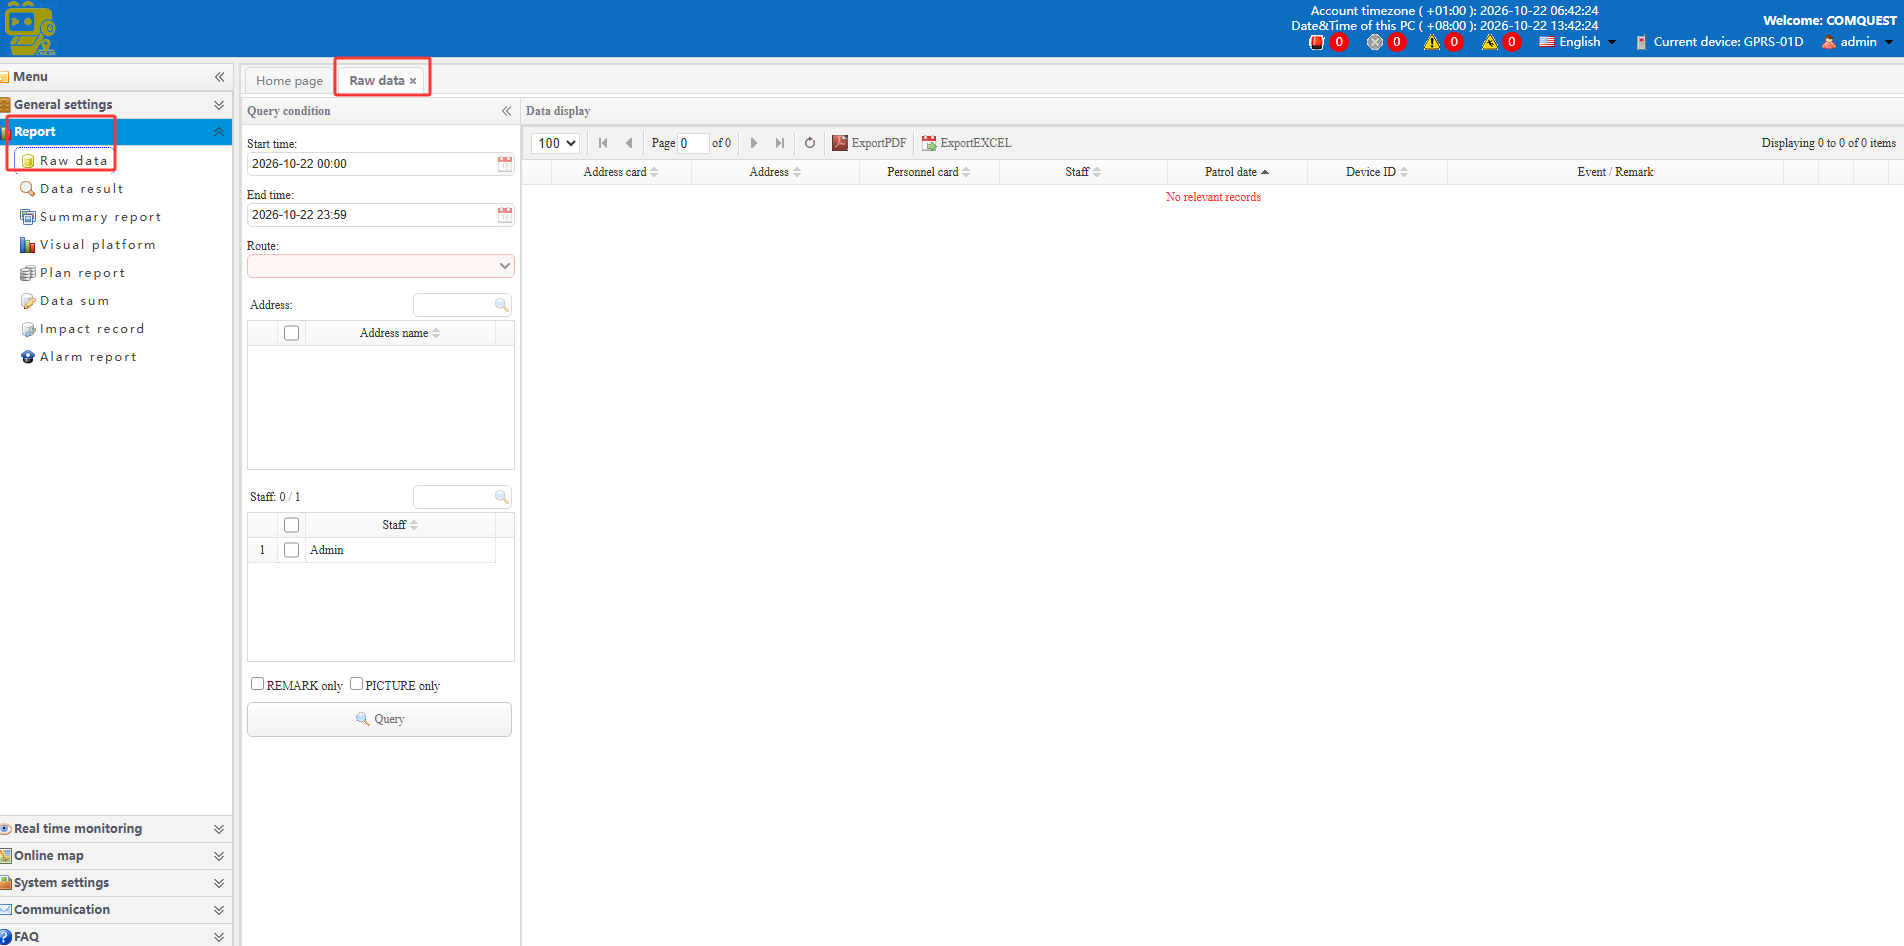
8.1 Raw data
All records downloaded by USB or transferred by GPRS appear here.
How to query: select start & end time and the route, then Query.
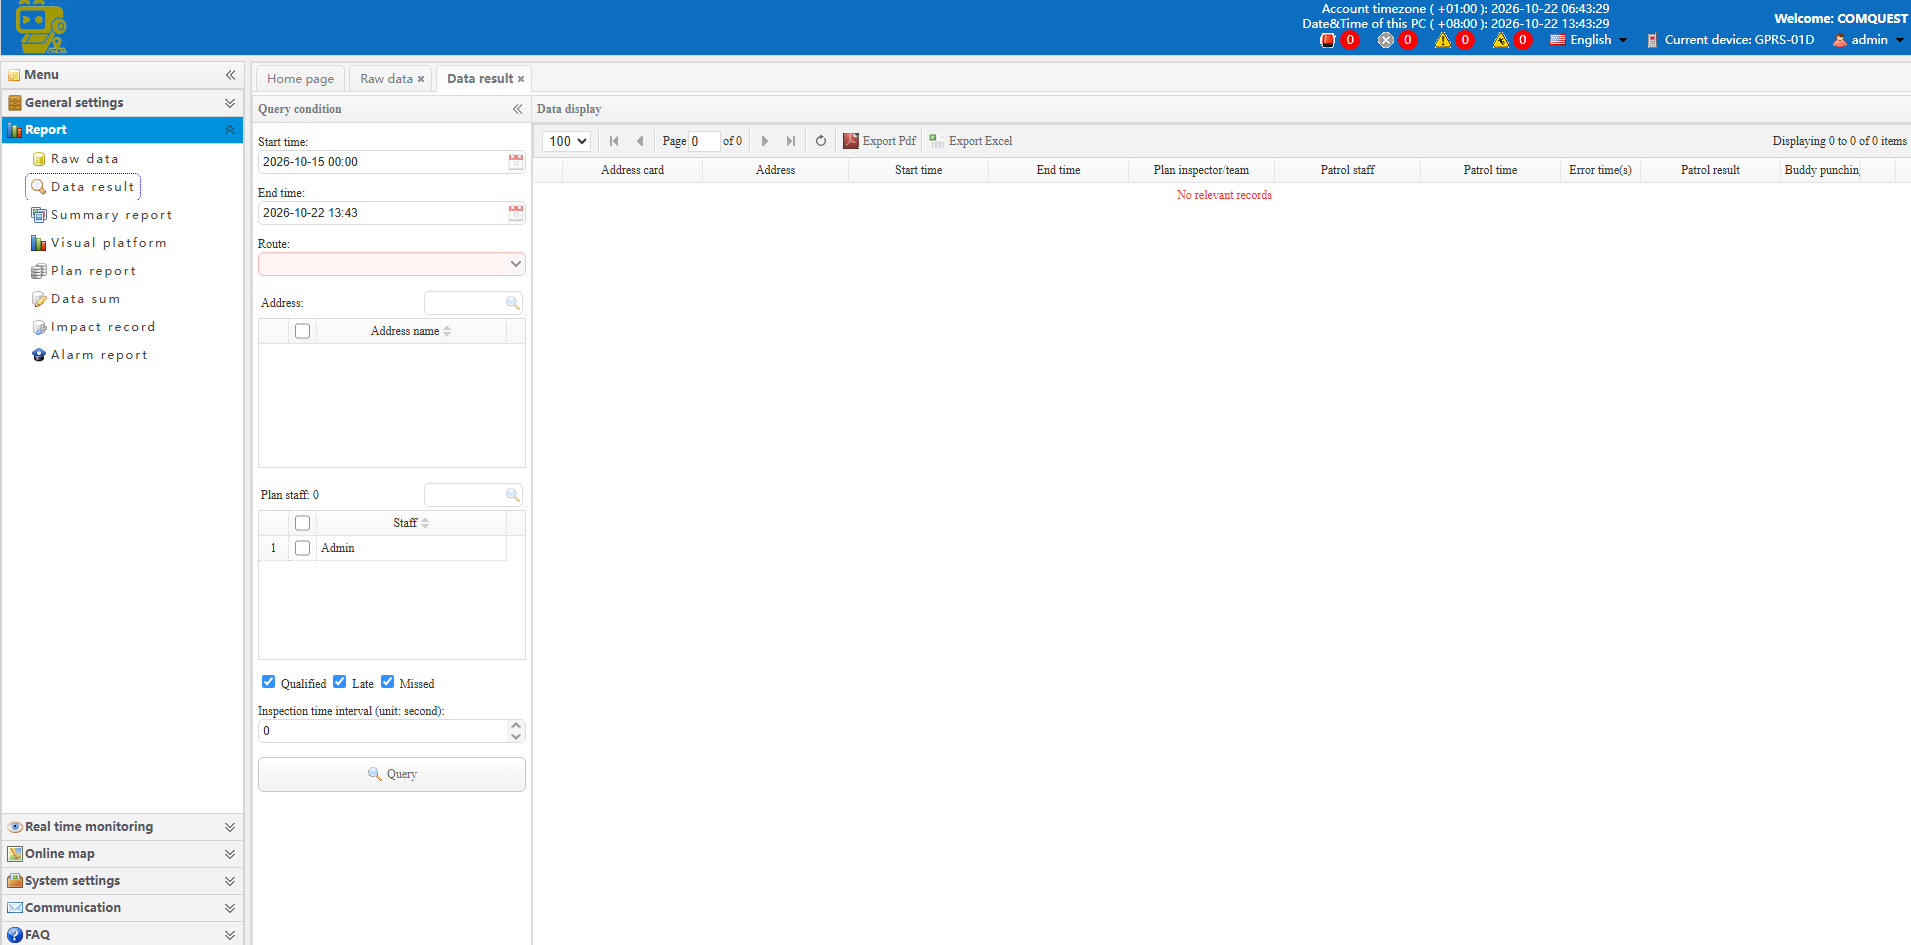
8.2 Data result
Compares actual patrols with the schedule and marks results: Qualified / Late / Missed.
Example: Patrol period 08:00–12:00 (240 minutes), rest 20 minutes, allowable error 5 minutes, maximum error 10 minutes →
- 07:55–12:05 → Qualified
- 07:50–07:55 and 12:05–12:10 → Late
- Other periods → Missed
8.3 Summary report
Quick percentage view per route (one or more): qualified / missed / late / buddy-help rates. Useful for managers to check site performance against company standards (for example, ≥ 90% qualified). Unfold a row to see which periods were missed and who was on duty.
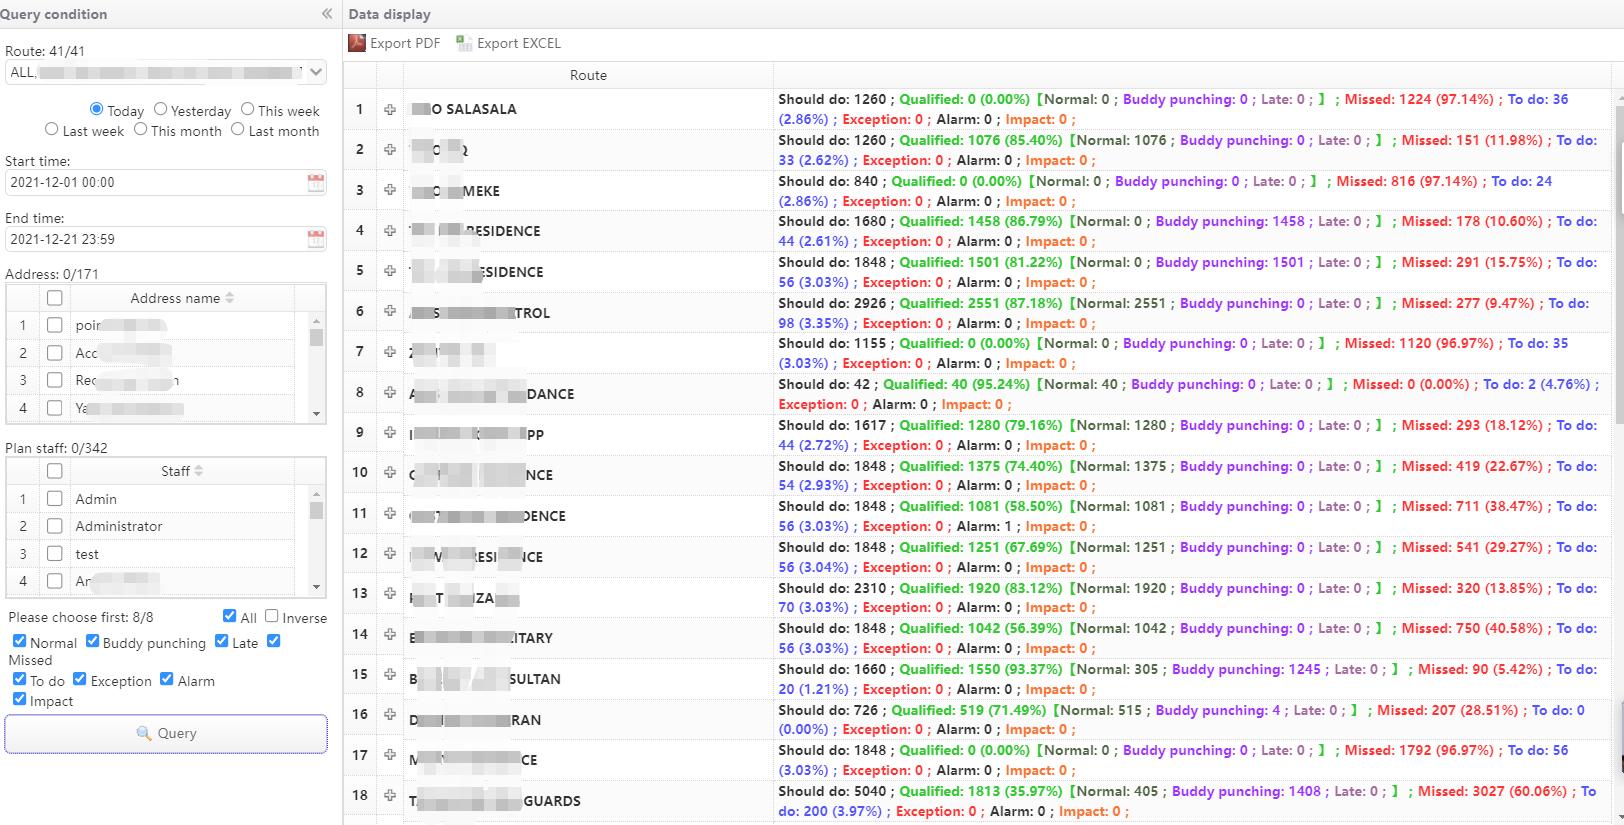
9. Report troubleshooting
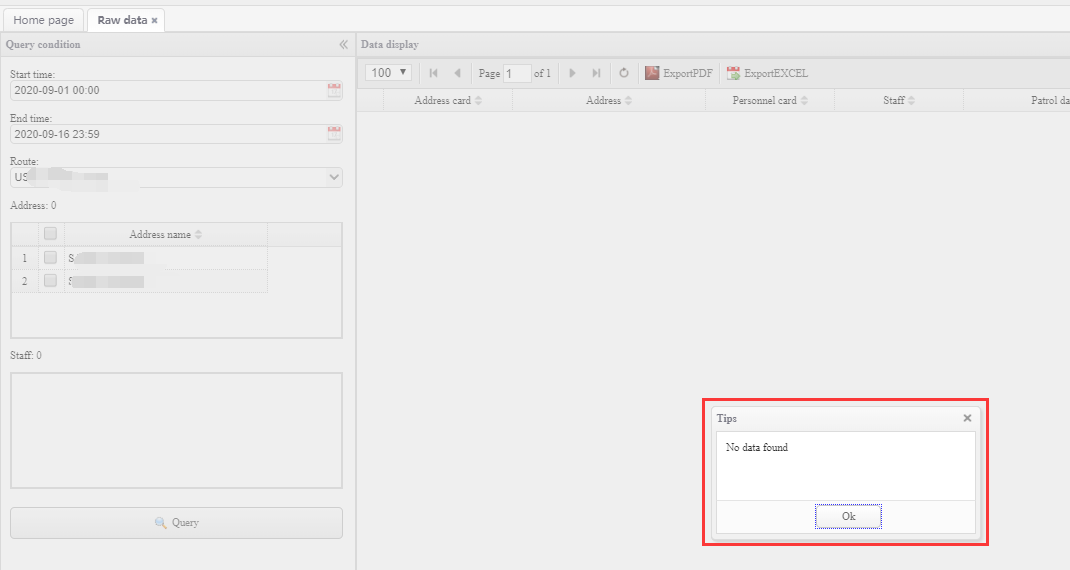
9.1 “No data found” in Raw Data
Method: Confirm the query date range is correct; try a longer period.
9.2 “No data found” in Data Result
Method: Clear / untick staff filters. If all staff under the account remain selected, the query may find no matching result.
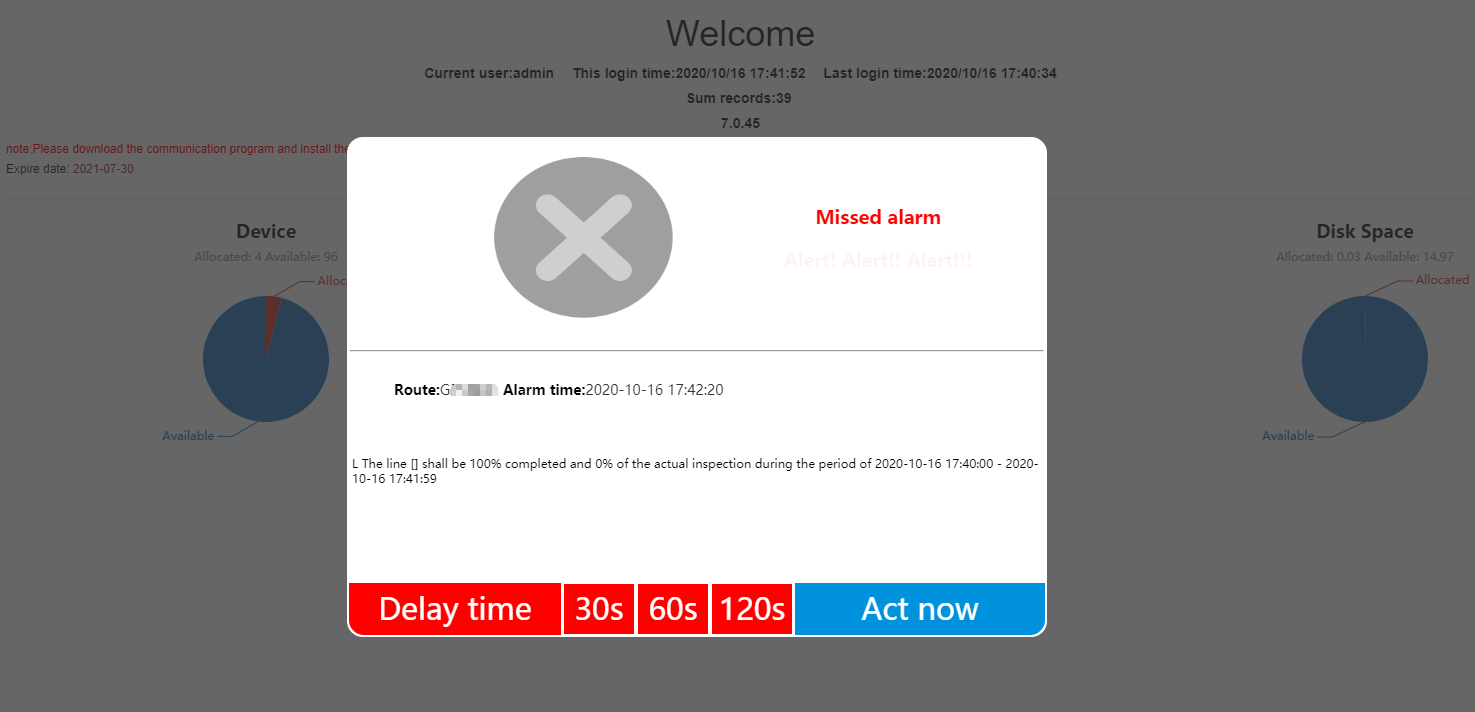
10. Missed patrol notification
After each scheduled round ends, the system can send alerts / emails based on finish rate.
Example schedule:
- 08:00–09:00 — 1st round → notify at 09:00
- 10:30–13:00 — 2nd round → notify at 13:00
- 13:30–15:00 — 3rd round → notify at 15:00
If a route has 10 tags, you may set finish-rate thresholds such as 50% / 60% / 80% / 100%. When finished tags are below the threshold, an alert is sent automatically.
10.1 Alert notification
Enable on-screen / system alert for missed or incomplete rounds.
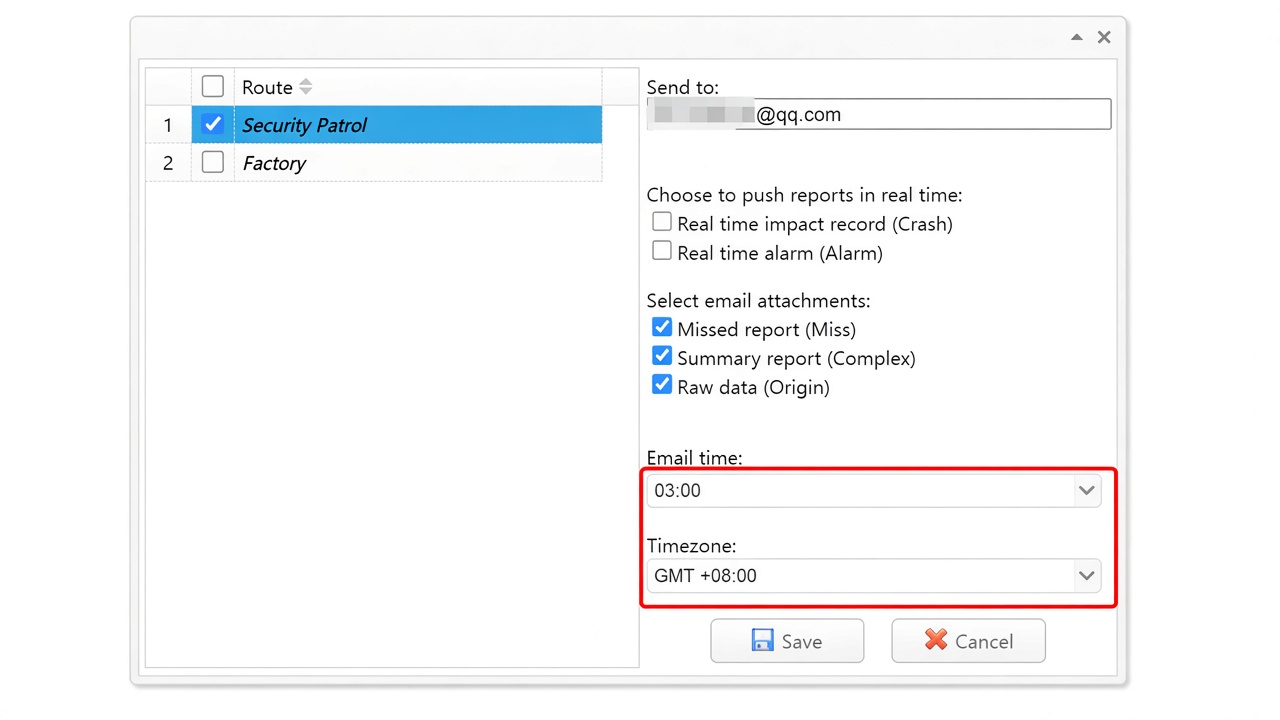
10.2 Email notification
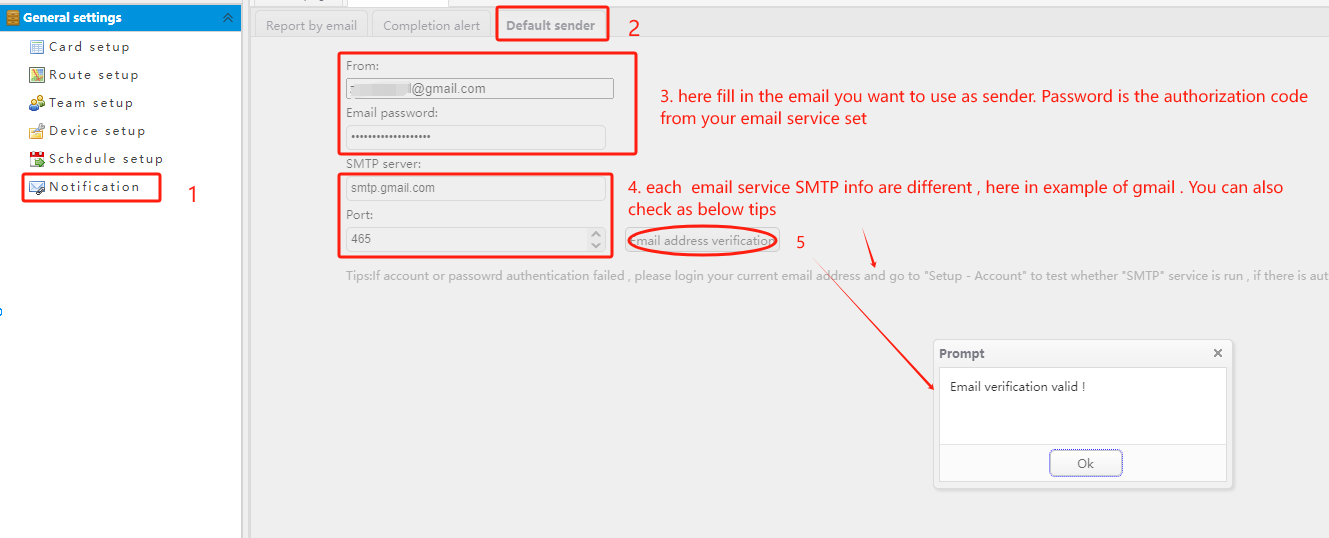
- Create default sender email. Note: password is usually the email authorization code from your mailbox security settings (not the normal login password).
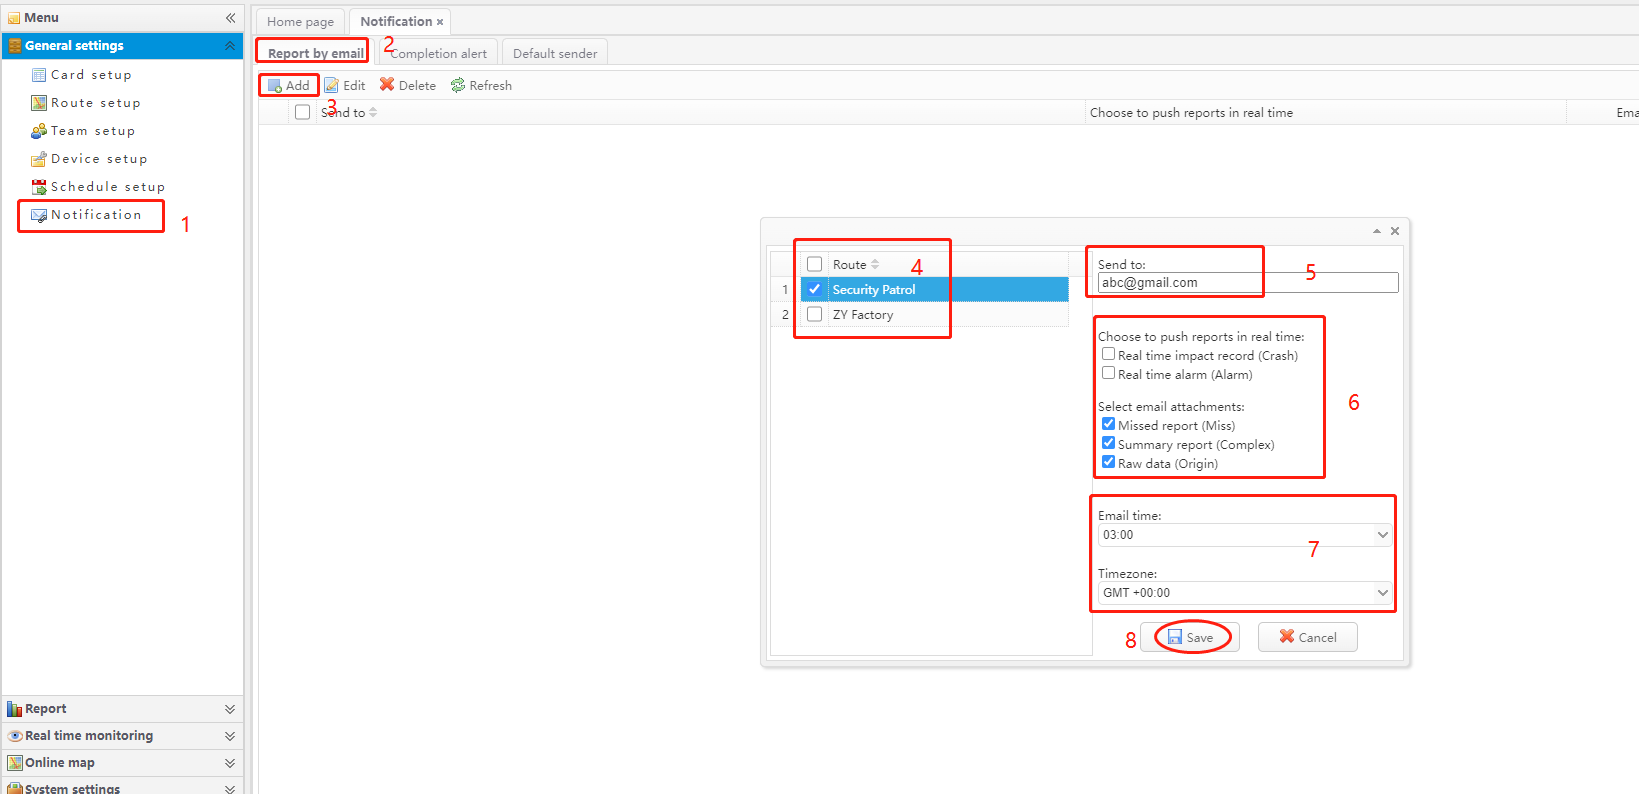
- Create receiver email(s), select related route(s), and choose report attachments (Missed / Summary / Raw data, etc.).
- Set email send time and timezone, then Save.

11. How to cancel / handle software alerts
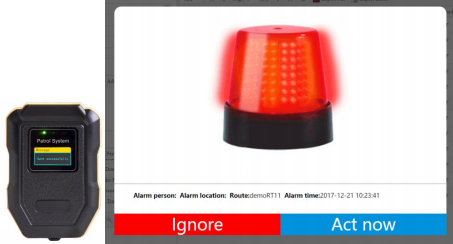
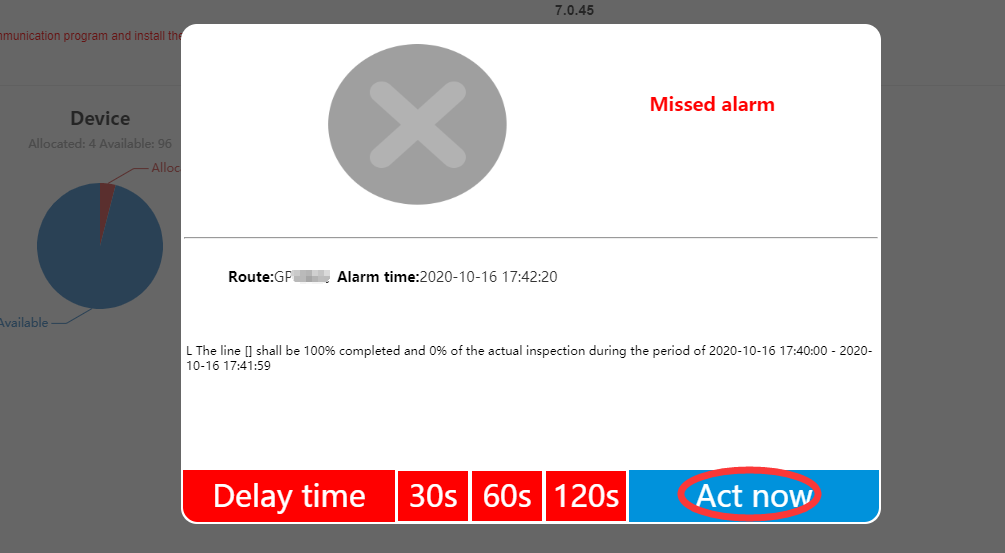
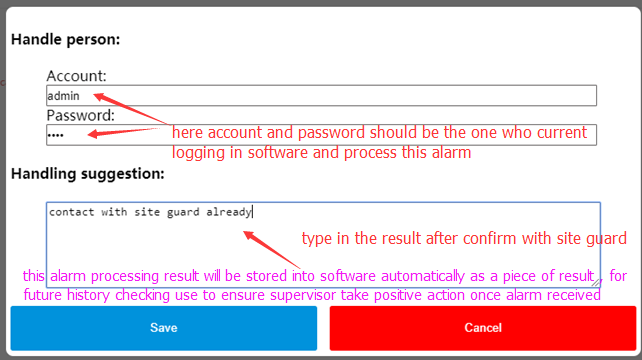
When an alert occurs, a window pops up automatically. You may click Delay (30s / 60s / 120s) to postpone the next reminder. The alarm remains listed until you click Act now and process it.
This helps supervisors respond early to SOS or missed patrols and contact site officers before the issue repeats.
12. Contact
Tel: +86 755 83418779 | Fax: +86 755 88257909
Web: www.epordo.com
Email: sophia@securiticn.com | WhatsApp: +86 186 6533 2487
This manual follows the original GPRS-01D operating logic and software screens. UI labels in screenshots match the software language (English). For project-specific server URL or account details, contact your EPORDO sales representative.