
GPRS-310F Multifunctional Touch-Screen Guard Tour System
RFID checkpoint reading, fingerprint login, GPS locating, camera evidence, SOS alarm, and real-time GPRS upload to EPORDO Cloud Guard Tour software.
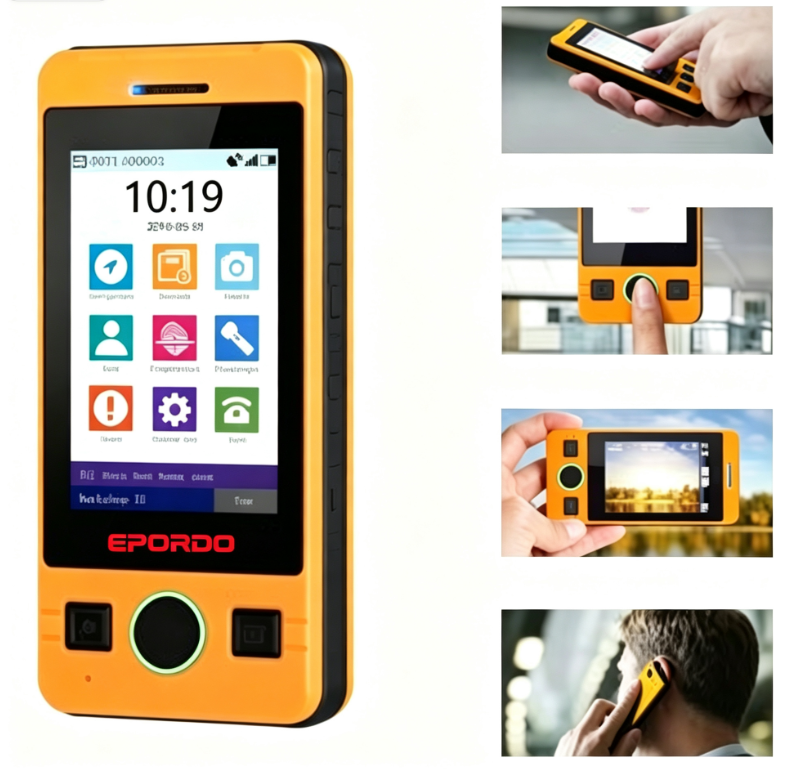
Device overview
GPRS-310F is a rugged handheld guard tour terminal with a capacitive touch screen, RFID reader, fingerprint sensor, GPS, camera, and cellular (GPRS) upload to EPORDO Cloud Guard Tour software.
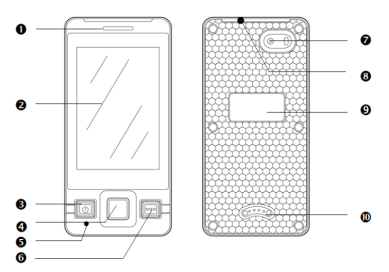
Front & rear parts
- LED working indicator
- Touch screen and menu icons
- Power / Exit button
- Fingerprint sensor (also used as OK / torch on home screen)
- Microphone
- Camera / flashlight
- RFID reading area
- Product label area
- Magnetic pogo-pin USB / charging contacts
- Status / sensor area
Tip: On the home screen, press the center button to turn the flashlight on or off.
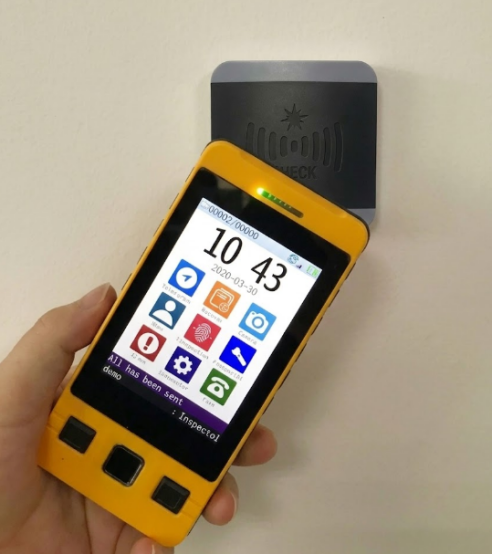
Figure 1 — Home screen while reading a checkpoint tag
Specifications
| LCD screen | 3.5″ TFT capacitive touch screen |
|---|---|
| Supported cards | 125 kHz EM ID card / tag |
| Working indication | Vibration + LED + LCD |
| Fingerprint capacity | 20 pcs or 150 pcs (option) |
| Items per checkpoint | Up to 30 inspection items |
| Patrol data capacity | 10,000 logs |
| Camera | Flashlight + 2.0 MP camera |
| Image storage | TF card, 8 GB |
| Impact record capacity | 32,000 logs |
| Locating method | GPS satellite |
| Communication | GPRS real-time upload to EPORDO Cloud; magnetic pogo-pin USB (driver-free) |
| Battery | 3,000 mAh built-in rechargeable lithium battery |
| Power consumption | 100–120 mA |
| IP rating | IP65 |
| Working humidity | 30%–95% |
| Working temperature | −20 °C to +70 °C |
| Size | 138 × 66 × 20 mm |
| Weight | 150 g |
System configuration
Typical project package (contents may vary by order):
- GPRS-310F handheld terminal × 1
- USB magnetic / pogo-pin communication & charging cable × 1
- Power adapter × 1
- Checkpoint tags (Address cards) — quantity as ordered
- Staff ID cards — quantity as ordered
- EPORDO Cloud Guard Tour account (activated by EPORDO)
- User manual (this document)
A valid Micro-SIM with GPRS/data service is required for real-time upload. Insert the SIM before first use in the field.
Cloud software: GPRS-310F works with EPORDO Cloud Guard Tour only (not the free offline PC Guard Tour Software). Portal: http://89.117.53.190:16883/Index.aspx. First year free; from the second year, USD 20 per device per year.
Device operation
4.1 Reading checkpoints & data transmission
- During patrol, the officer first scans a staff ID card (or logs in with fingerprint) to confirm identity.
- At each checkpoint, hold the RFID area of the device within about 3–5 cm of the tag on the home screen. The device detects the checkpoint automatically.
- Enter the patrol result for each scheduled item / task if required.
- When scanning is finished, records are stored on the device and uploaded to the connected server in real time via GPRS.
How to check whether data was sent successfully
On the home screen status area, a counter such as 00039/00008 means
total records: 39 and unsent records: 8.
If the display shows 00039/00000, all 39 records have been sent.
4.2 Send SOS alarm
- From the home screen, tap the Alarm icon.
- When the alarm is sent successfully, the device shows “Sent successfully”.
- At the same time, the central software displays a flashing alarm icon and plays an alert sound.
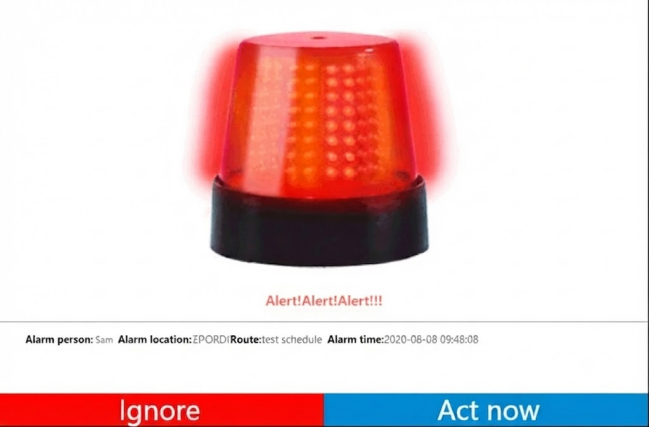
Figure 2 — Software alarm popup after an SOS is received
4.3 SIM card installation
- Remove the bottom cover screws on the device.
- Insert a Micro-SIM following the slot direction and notch orientation.
- Close and secure the cover before use.
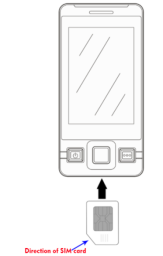
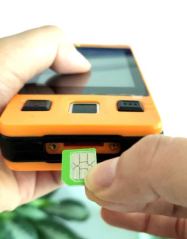
Figure 3 — SIM card direction and installation
4.4 Fingerprint registration (on device)
- Open Fingerprint → Register inspector.
- Place the same finger lightly on the sensor three times to enroll. A fingerprint ID is created when registration succeeds.
- Follow on-screen tips. Cover the metal fingerprint frame fully and try slightly different angles during enrollment.
Important: Do not register a manager fingerprint first. Manager fingerprints can lock further fingerprint registration. Enroll regular inspectors first.
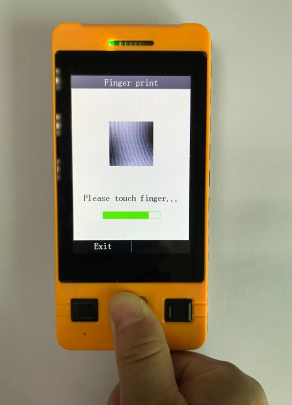
Figure 4 — Fingerprint enrollment on the device
Cloud software setup
5.1 Cloud portal & license
GPRS-310F is managed in EPORDO Cloud Guard Tour. Open the cloud portal in a web browser (no offline “Free PC Guard Tour Software” is used for this model):
Cloud login:
http://89.117.53.190:16883/Index.aspx
Use the company name / user / password provided by EPORDO after account activation.
| Software | EPORDO Cloud Guard Tour |
|---|---|
| Portal URL | http://89.117.53.190:16883/Index.aspx |
| Year 1 | Free (included with the device) |
| From Year 2 | USD 20 per device / year |
On first use on each PC, download and install the small communication program from the cloud home page (Download button). This client only bridges USB setup between the PC and the device; all configuration and reports stay in the cloud.
5.2 Basic settings
5.2.1 Item setup
GPRS-310F supports user-defined inspection items (tasks) under each checkpoint. Hierarchy example: site → address (checkpoint) → task list → options.
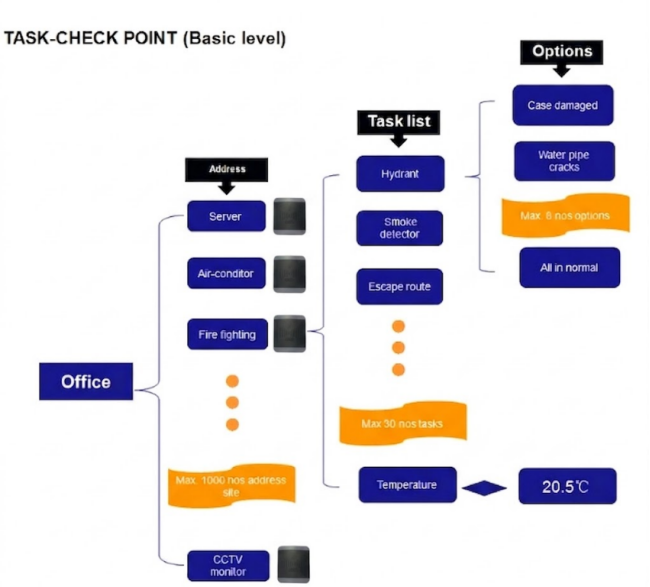
Figure 5 — Task / checkpoint structure (max. 30 tasks per address; max. 8 options per logical item)
- Task list: patrol items such as Hydrant, Smoke detector, Escape route.
- Numeric type: results entered as numbers (temperature, voltage, person count, etc.). Assign a Unit (°C, pcs, m³…).
- Logical type: results selected from predefined options (e.g. All in normal / Case damaged). Configure Options.
Path: Item Setup → add item name, logical options, and unit one by one.
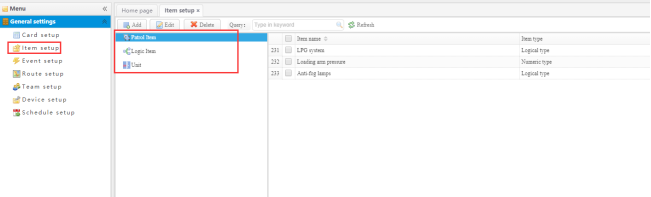
Figure 6 — Item setup
5.2.2 Card setup
Address card / checkpoint
- Each checkpoint tag has a globally unique ID.
- Enter the 8-digit card ID and a clear name.
- Type must be Address card.
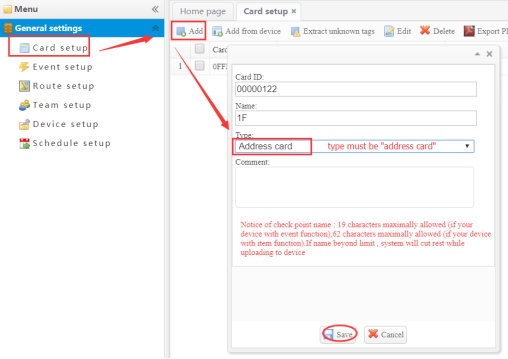
Figure 7 — Add Address card
Staff card
- Required for fingerprint binding and staff identification.
- Card ID may be a fictitious 8-digit number; enter the staff name.
- Type must be Staff card.
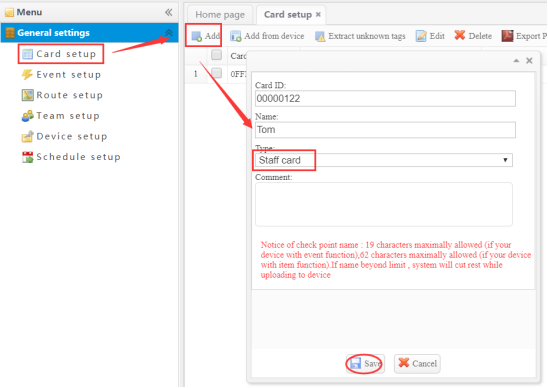
Figure 8 — Add Staff card
Checkpoint name length: up to 19 characters for event-function devices, or up to 62 characters for item-function devices. Longer names are truncated when uploaded.
5.2.3 Route setup
- Go to General setup → Route setup → All → Add.
- Enter the route name and click Save.
- Add checkpoints to the route. Optionally attach inspection items to each checkpoint (up to 30 items per point).
- For logical items, add options on the right. For numeric items, add the unit on the right.
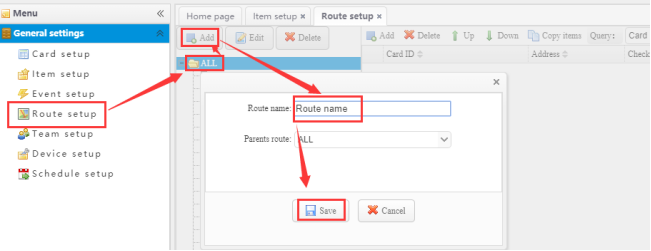
Figure 9 — Create route and add checkpoints / items
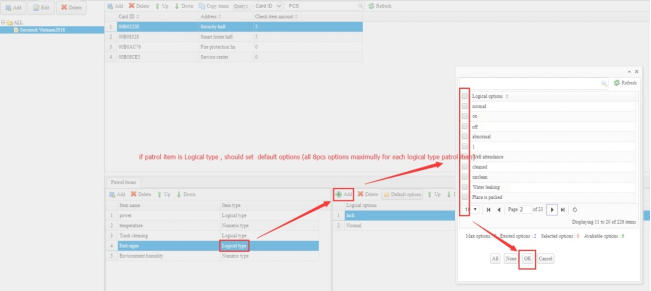
Figure 10 — Logical options for a logical-type patrol item (max. 8 options)
5.3 Communication (USB setup with cloud)
- Open http://89.117.53.190:16883/Index.aspx and log in with your cloud account.
- Select the correct device model in the top bar (use GPRS-310F for this product).
- On first use on a PC, click Download to install the communication program (required once per PC).
- Connect the device to the PC with the USB magnetic cable, then click Start COMM.
- In the communication client, bind the device to your route: enter the serial number / license key, give the device a clear name, set the time zone, and click Save.
- Open Network configuration and set the cloud server IP/domain, port, and APN so patrol data uploads over GPRS to the cloud.
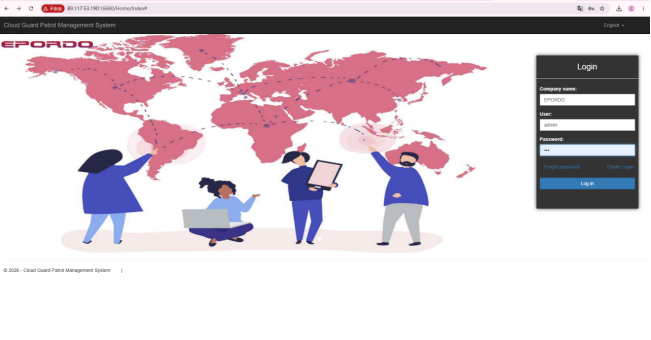
Figure 11 — Cloud software login
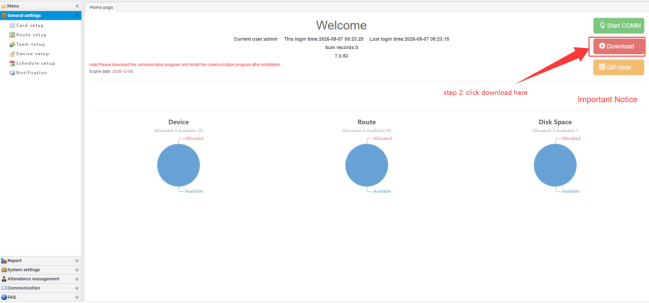
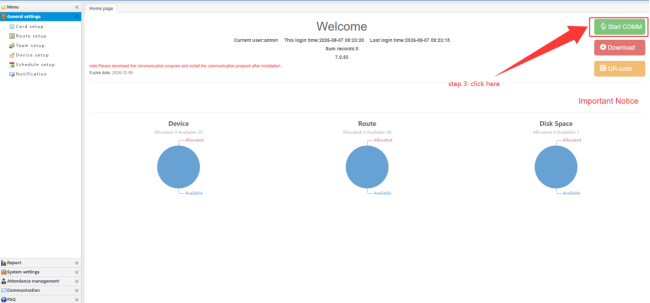
Figure 12 — Download messaging client, then Start COMM
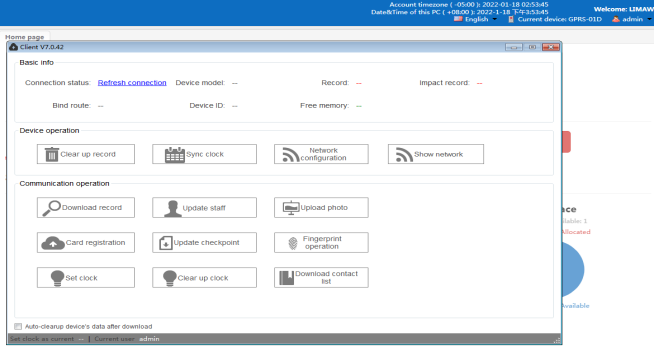
Figure 13 — Communication client (download records, update staff/checkpoint, fingerprint, sync clock)
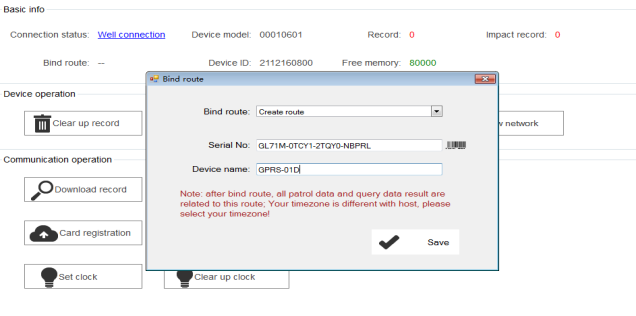
Figure 14 — Bind device serial number to a route (enter your own key and name the device GPRS-310F)
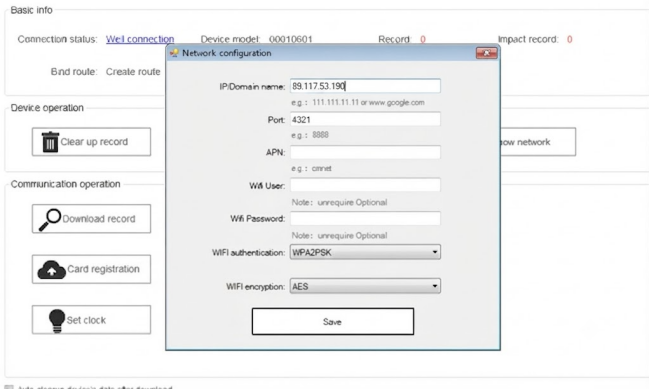
Figure 15 — Network configuration (IP/domain, port, APN)
5.4 Upload clock, card & personnel data
- Update staff — so staff names appear when an ID card is read. Without this step, the device may show “unknown name”.
- Update checkpoint — so checkpoint names and patrol items appear when a tag is read. Without this step, the device may show “unknown point”.
- Sync clock — synchronize device time with the PC / server if the clock is wrong.
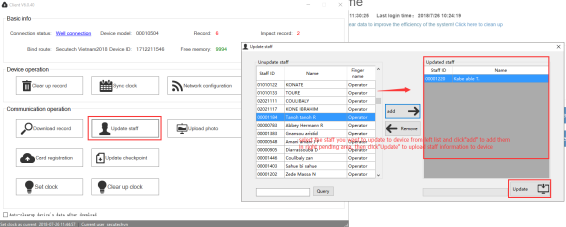
Figure 16 — Update staff to device
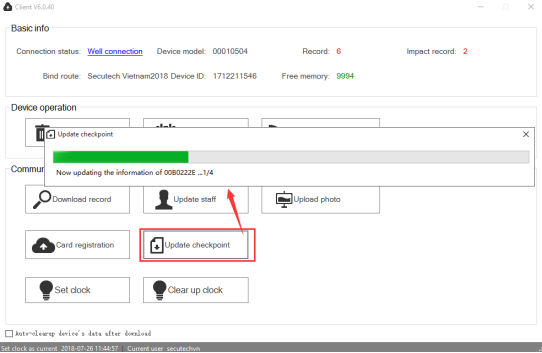
Figure 17 — Update checkpoint
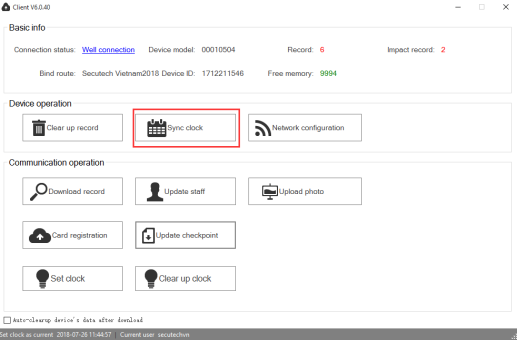
Figure 18 — Sync clock
5.5 Upload fingerprint from cloud to device
- Open Fingerprint operation in the communication client.
- Click Bind to relate each fingerprint ID to the matching staff card created under Card setup.
- When prompted “Fingerprint and staff info has changed, update to device now?”, click Yes.
Warning: When updating fingerprints to the device, only the fingerprints in the selected “Updated staff” list are kept. Fingerprints not included in that update can be lost on the device.
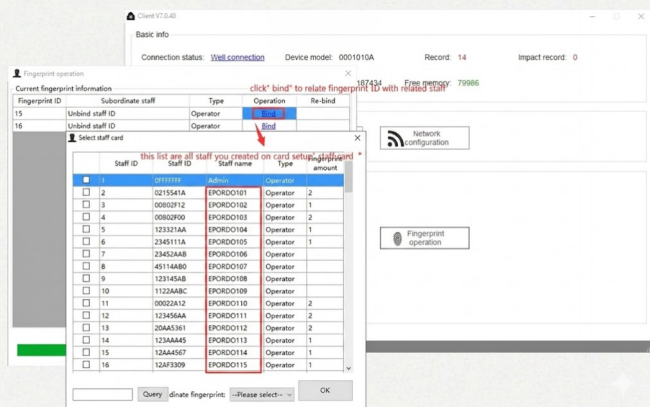
Figure 19 — Bind fingerprint ID to staff
5.6 Activate inspectors on the device
After fingerprints are uploaded, activate the regular user list on the device:
- Tap User → Active inspector.
- Tick the staff who will work (maximum 16 at a time).
- Tap OK.
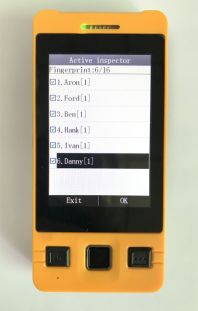
Figure 20 — Active inspector on the device
Go on patrol
- Log in with fingerprint: User → Set current inspector.
- At each site, hold the checkpoint tag near the RFID area.
- Enter results for the scheduled item list. Take a photo if an exception needs evidence.
- When finished, tap Exit / OK to save. Logs are uploaded automatically via GPRS.
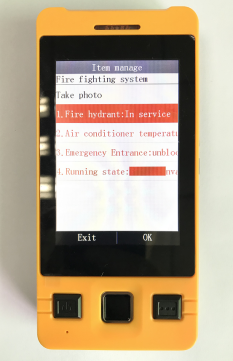
Figure 21 — Enter patrol item results (with optional Take photo)
Report query
Raw Data
All records downloaded from the device are listed here (route, address, card ID, time, staff, device ID, etc.). Export to Excel or PDF as needed.
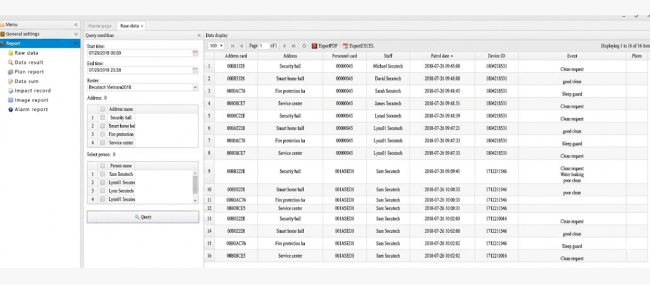
Figure 22 — Raw Data query
Data Result
Results compared with the schedule, marked as Late, Missed, or Qualified.
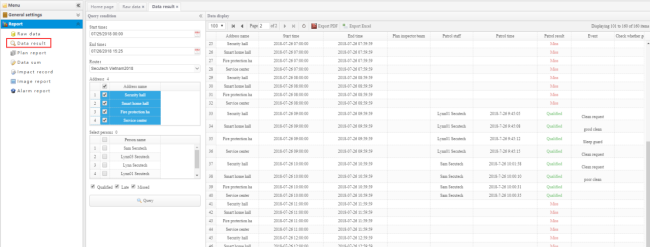
Figure 23 — Data Result query
How to reset the device to default mode
- In Card manager, add a fictitious checkpoint with ID 00000001 and name unknown spot.
- Create a route named Unknown route and add that card to the route.
- Go to Device setup, select the target device, click Edit, and assign it to Unknown route.
- Open Start COMM. When prompted “Route already changed, updating to device now?”, click Yes. The device returns to default mode.
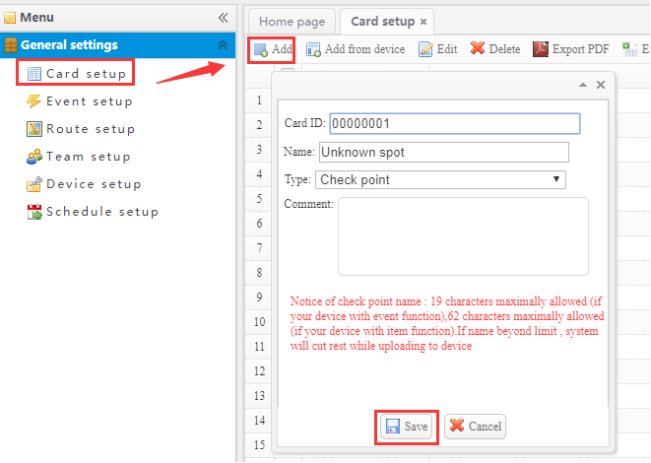
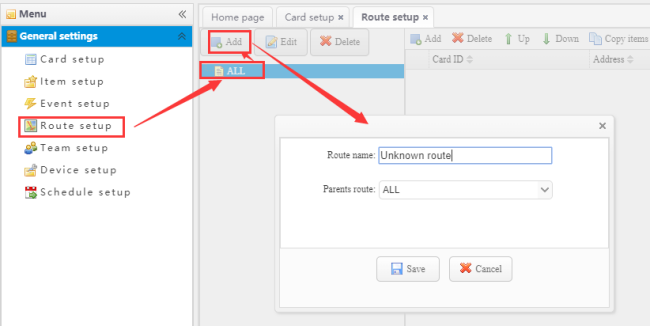
Figure 24 — Create unknown card and Unknown route
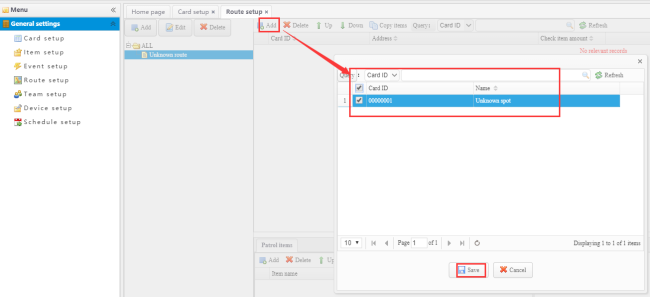
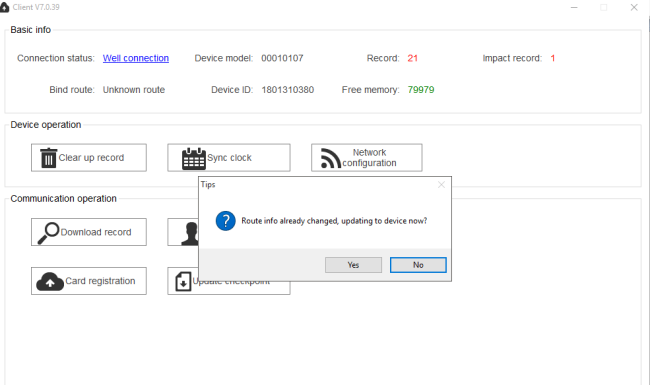
Figure 25 — Assign Unknown route and confirm update
EPORDO contact
Shenzhen EPORDO Co., Ltd — Smart Office · Smart Home · Smart Hotel. Sales and technical support for overseas distributors and end customers.

Cloud software: http://89.117.53.190:16883/Index.aspx
License: Year 1 free · From Year 2 USD 20 / device / year
Tel: +86 755 8825 7909 / 8341 8779
WhatsApp (Sales): +86 186 6533 2487 · WeChat: wy884422
WhatsApp (Tech): +86 158 1550 1089
Skype: efocus003@hotmail.com
Email: sophia@securiticn.com · epordo003@foxmail.com
Address: Block D, GuoShengJinXingLiangChuangShiDai, No.147 YingTai Street, Dalang, LongHua, Shenzhen, China