EPORDO Cloud Attendance Software Manual
A clear, step-by-step guide for administrators and HR teams. Set up once in the cloud, enroll faces/fingerprints on the device, then manage attendance anytime from PC, tablet, or phone.
1. What is EPORDO Cloud Attendance?
EPORDO Internet Cloud Attendance is a web-based time attendance system hosted on the cloud. Your devices sync attendance data in real time. Bosses, HR, and employees can log in from anywhere.
Cloud software
Open in any browser. No local server, no PC software install, no fixed public IP required.
Cloud devices
Power on the terminal, connect network/Wi‑Fi, and it talks to the cloud automatically.
Employee portal
Staff check their own report, apply leave / overtime / supplement, and do location clock-in.
Who should use it?
- Offices, factories, and chain stores with one or many branches
- Companies that need remote management across cities or countries
- Teams that want paperless daily/weekly/monthly attendance reports
Main links
2. 10-Minute Quick Start (Recommended Order)
Follow this order. Skipping steps is the most common reason devices do not show employee names.
- Register with Device SN Find the cloud device SN sticker on the back/cover of the machine. Create your admin account.
- Complete System Setting Company data → Organizational Structure (departments) → Region setting → Device manage.
- Add staff in software first Add employees in Personnel manage → Employee archives (name, Enroll ID, department, mobile).
- Enroll face / fingerprint on the device On the machine, find the employee name / Enroll ID that already came from the cloud, then register biometrics.
- Set shift & punch windows Prefer Depart shift assign. Tell staff both office hours and allowed punch-in/out time.
Need a printable version? Open Quick-Start Checklist. Prefer to watch? See the video tutorials playlist.
3. Golden Rule (Read Before Setup)
After you receive the cloud device: configure software first, then go to the device and enroll face/fingerprint for the employee who already exists in software.
Do NOT create name / Enroll ID only on the hardware. If the department of the employee does not match the department assigned to the device, the name will not appear on that machine.
| Do this | Avoid this |
|---|---|
| Add staff in cloud → wait for auto sync → enroll biometrics on device | Typing new users only on the terminal keypad |
| Assign device to the same department(s) as the staff who use it | Staff in Dept A, device only linked to Dept B |
| Tell staff both Shift time and Punch in/out window | Only telling them “work 9–18” without punch window |
4. Create Account & Login
Admin portal: https://24hoursonlinesys.com/#/login
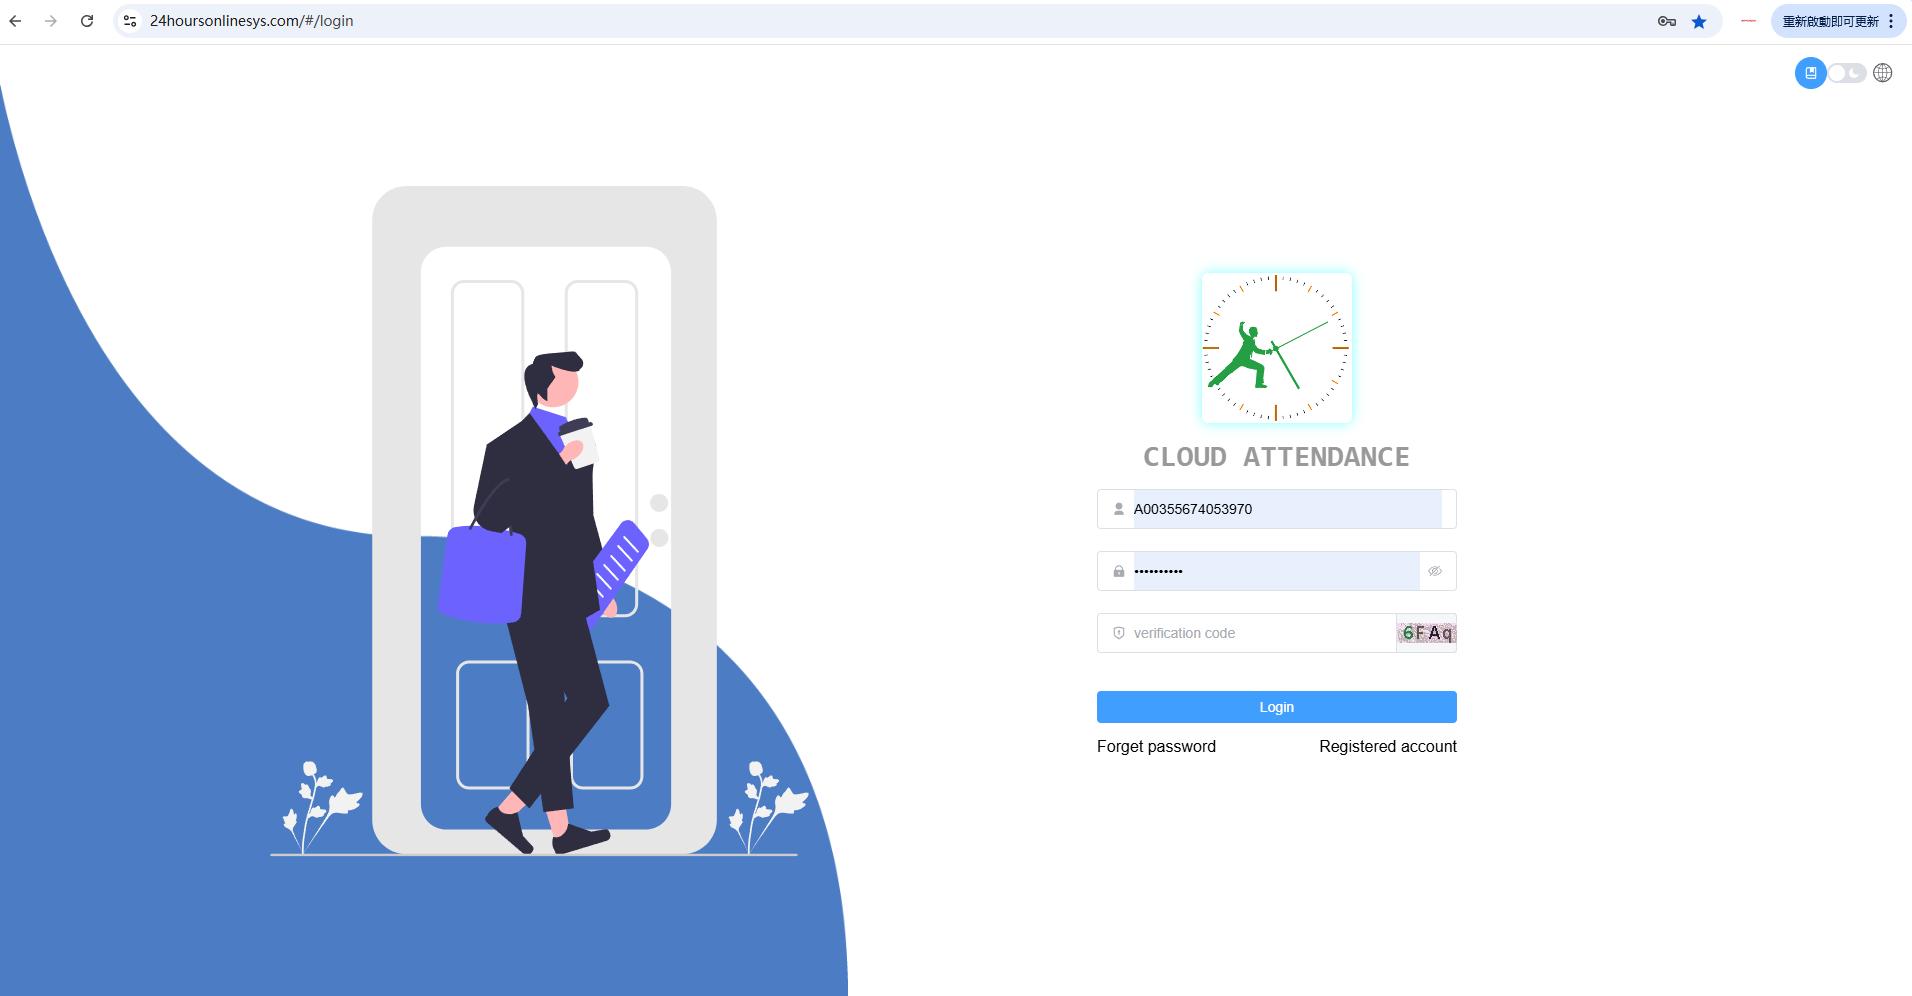
4.1 Register (10 steps)
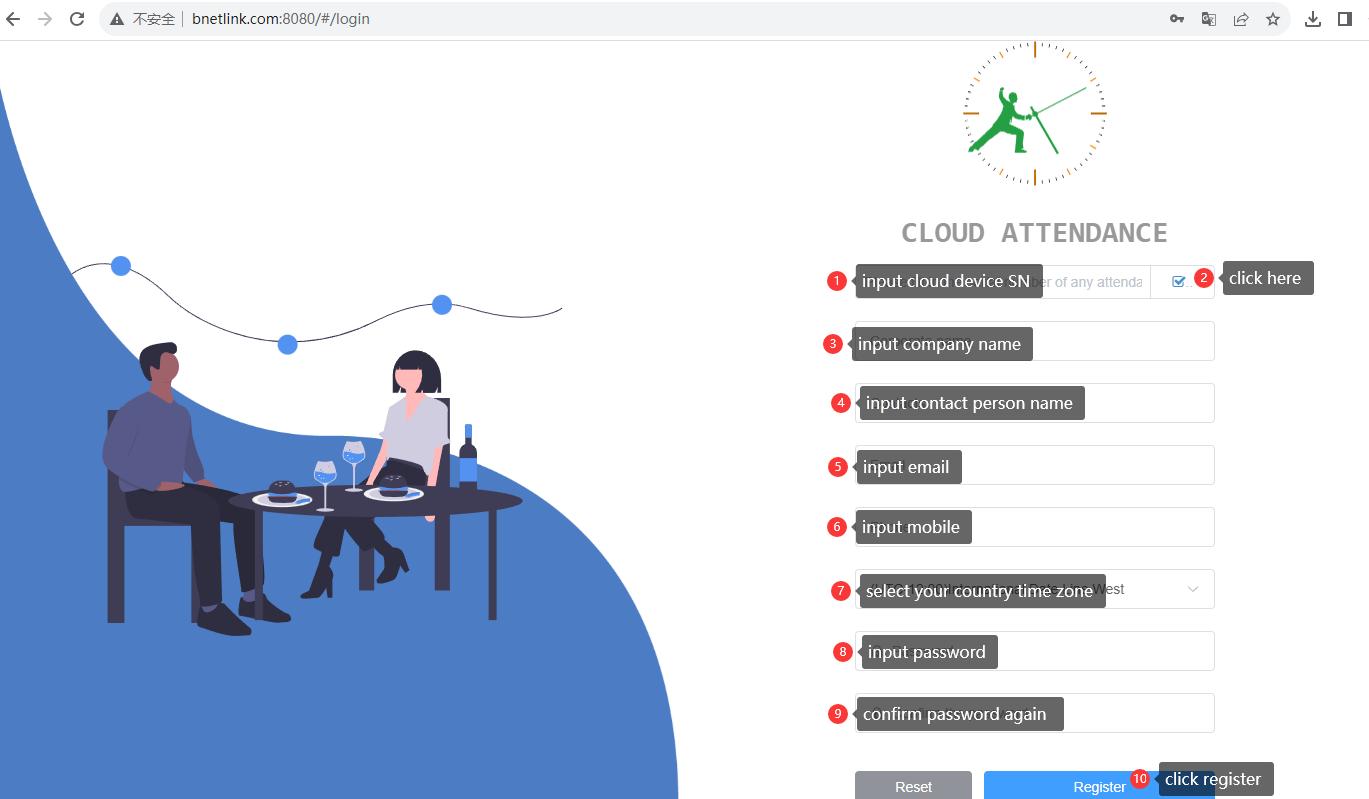
- Input cloud device SN (from sticker on device cover).
- Click the checkbox / verify icon next to the SN field.
- Company name
- Contact person name
- Mobile number
- Country / time zone
- Password
- Confirm password
- Click Register
13500001111 → username A13500001111).
5. System Setting (Do These First)
Path: top menu System Setting.
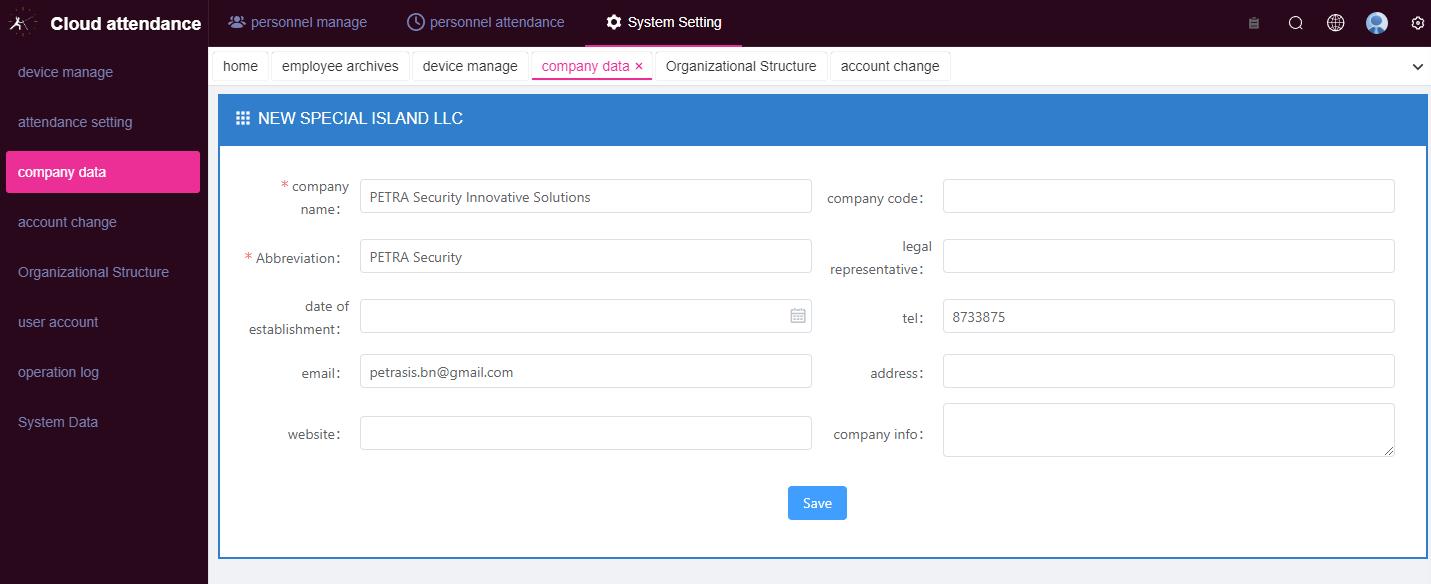
5.1 Company data
Enter company name and abbreviation, then click Save.
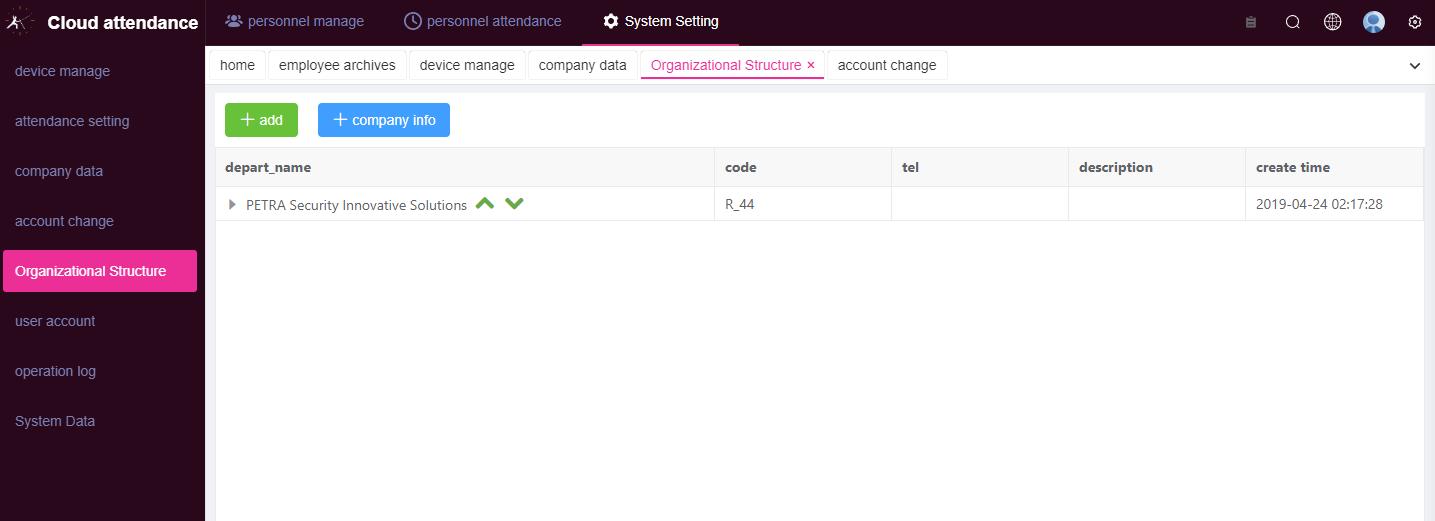
5.2 Organizational Structure (required)
Create departments before adding staff. Click + add for more departments.
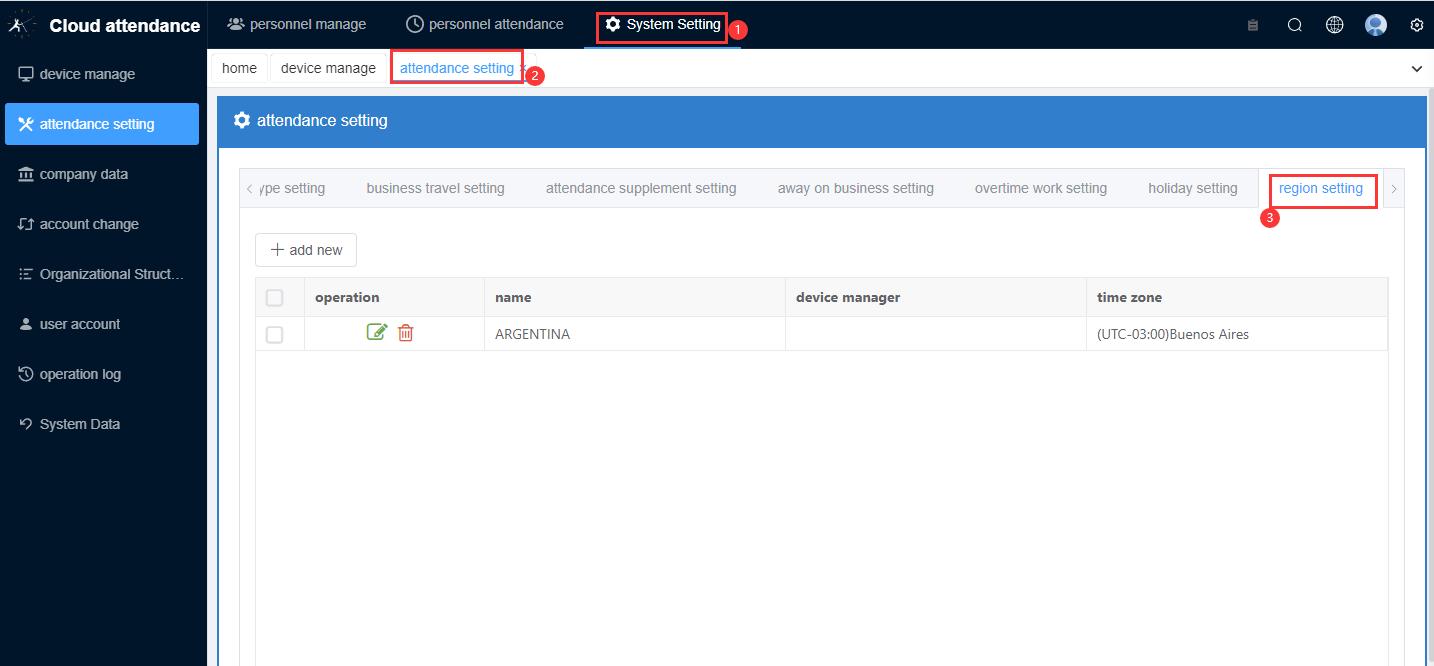
5.3 Attendance Setting → Region setting (required)
Create a region, give it a clear name, and select the correct time zone.
5.4 Device Management
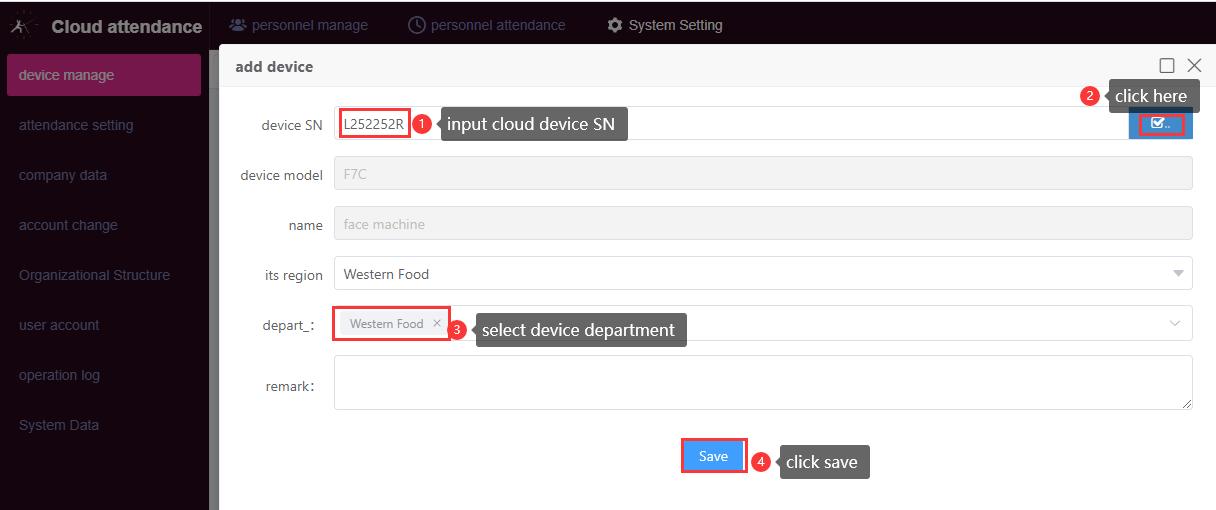
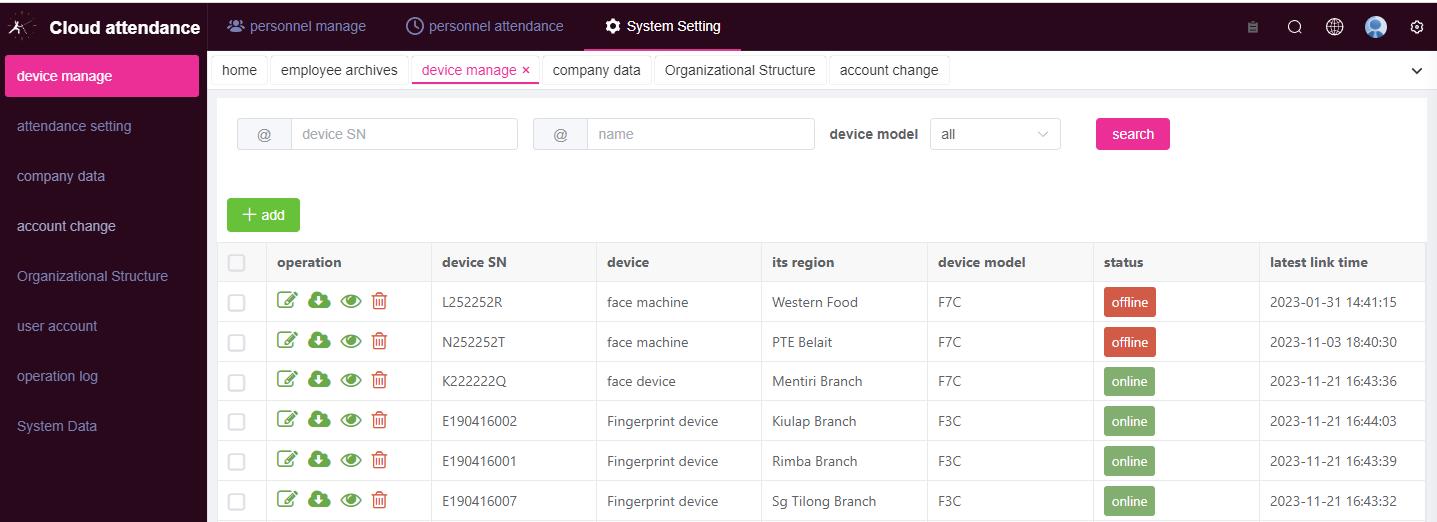
Add every cloud device. Assign region and device department (which departments can use this machine). This setting is critical.
6. Personnel Manage — Add Employees
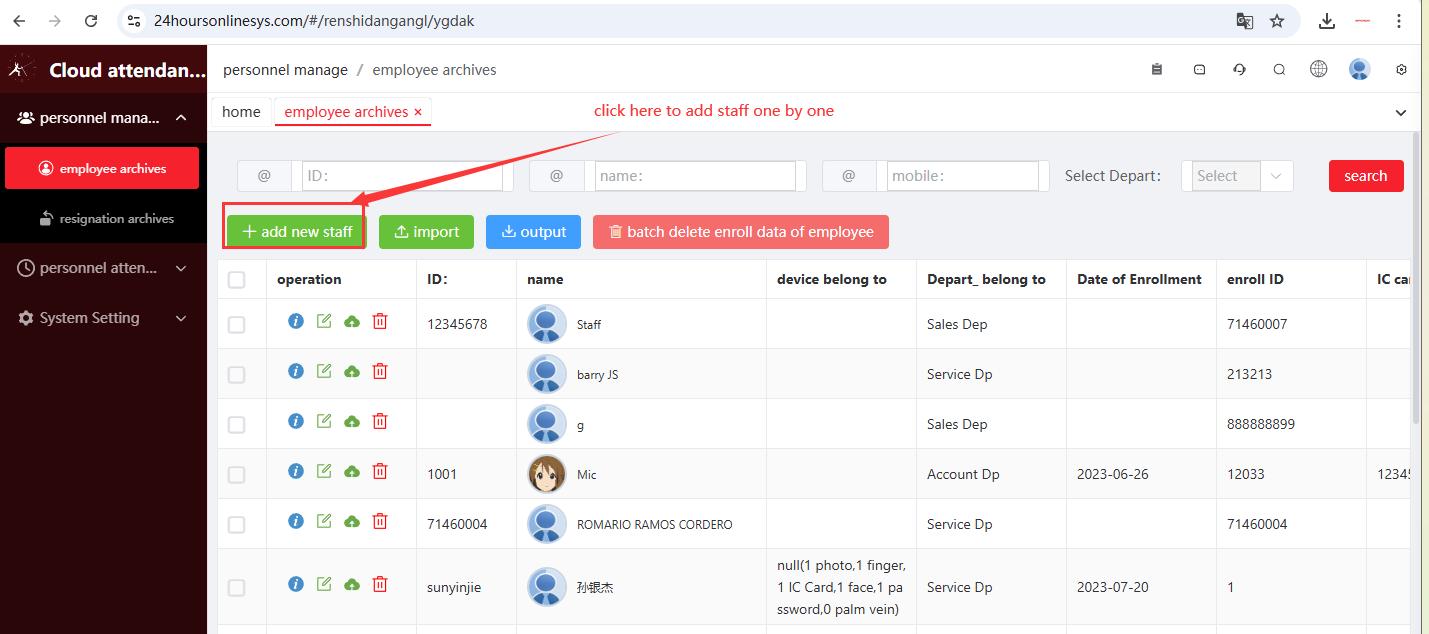
Path: Personnel manage → Employee archives.
6.1 Add one by one
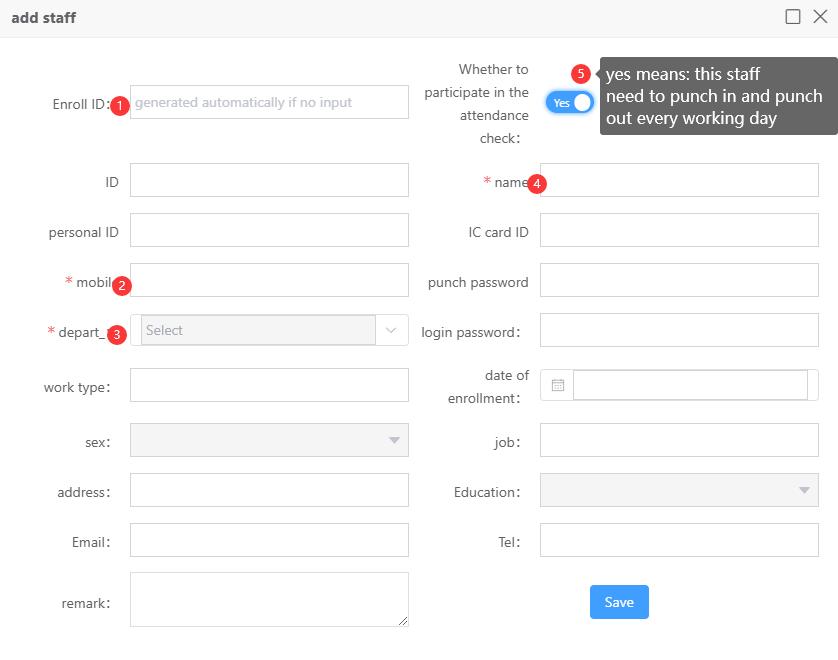
| Field | Why it matters |
|---|---|
| Enroll ID | Unique ID sent to the device. Leave blank to auto-generate, or set your own unique number. |
| Name | Shown on device and in reports. |
| Department | Must match (or be covered by) the device’s department setting. |
| Mobile | Used later as employee portal username. |
| Login password | Password for employee portal login. |
| Participate in attendance | Set to Yes if this person must punch in/out. |
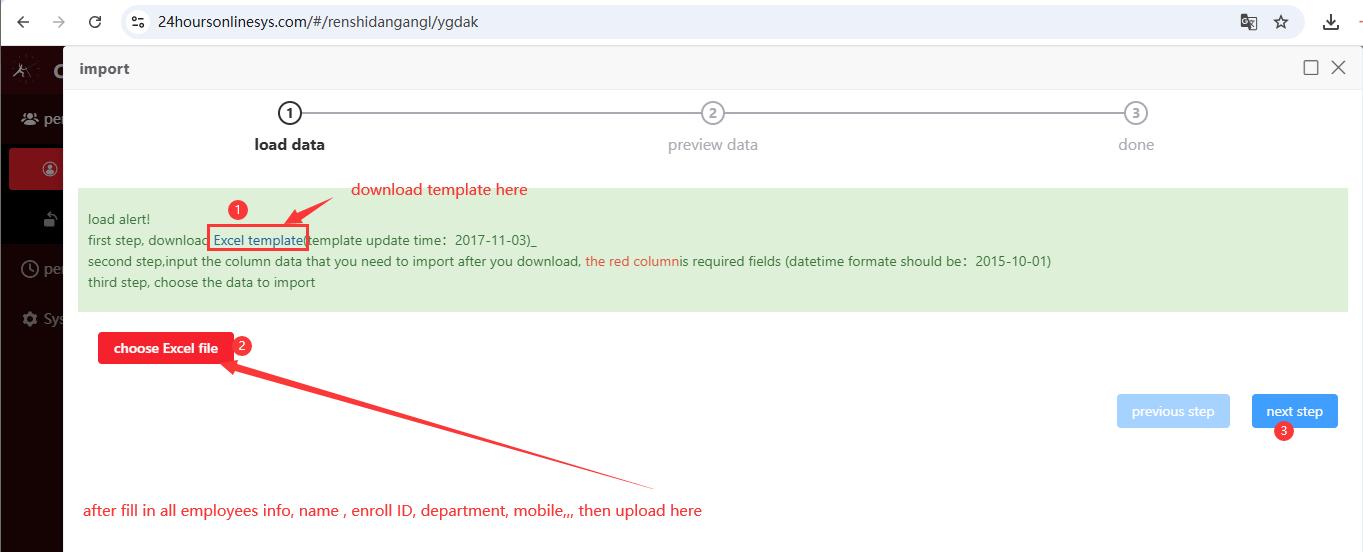
6.2 Batch upload (Excel)
- Click Import.
- Download the Excel template.
- Fill Name, Enroll ID, Department, Mobile (and other needed columns). Red columns are required.
- Choose the Excel file → Next step → finish upload.
6.3 Photo, details, and Issue Staff
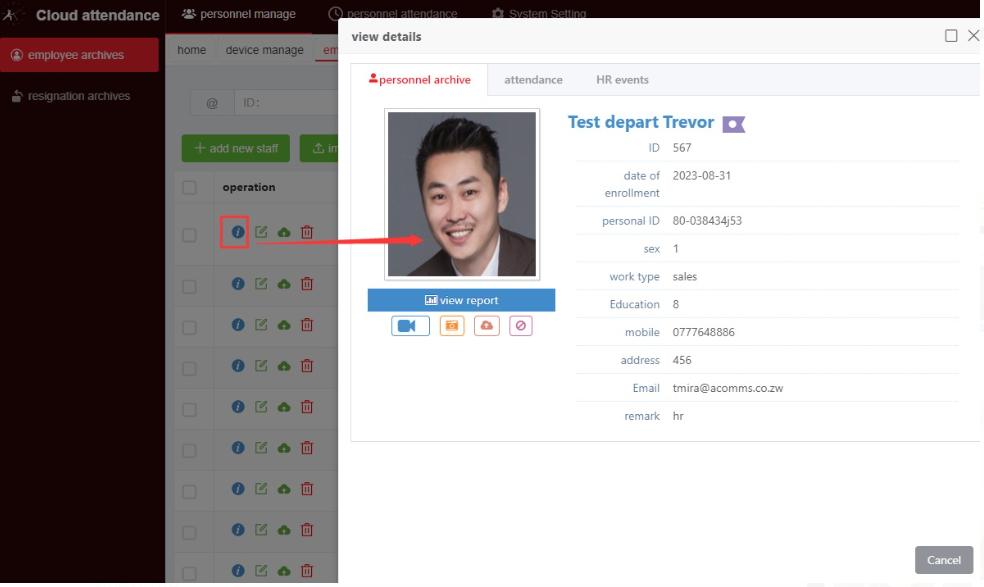
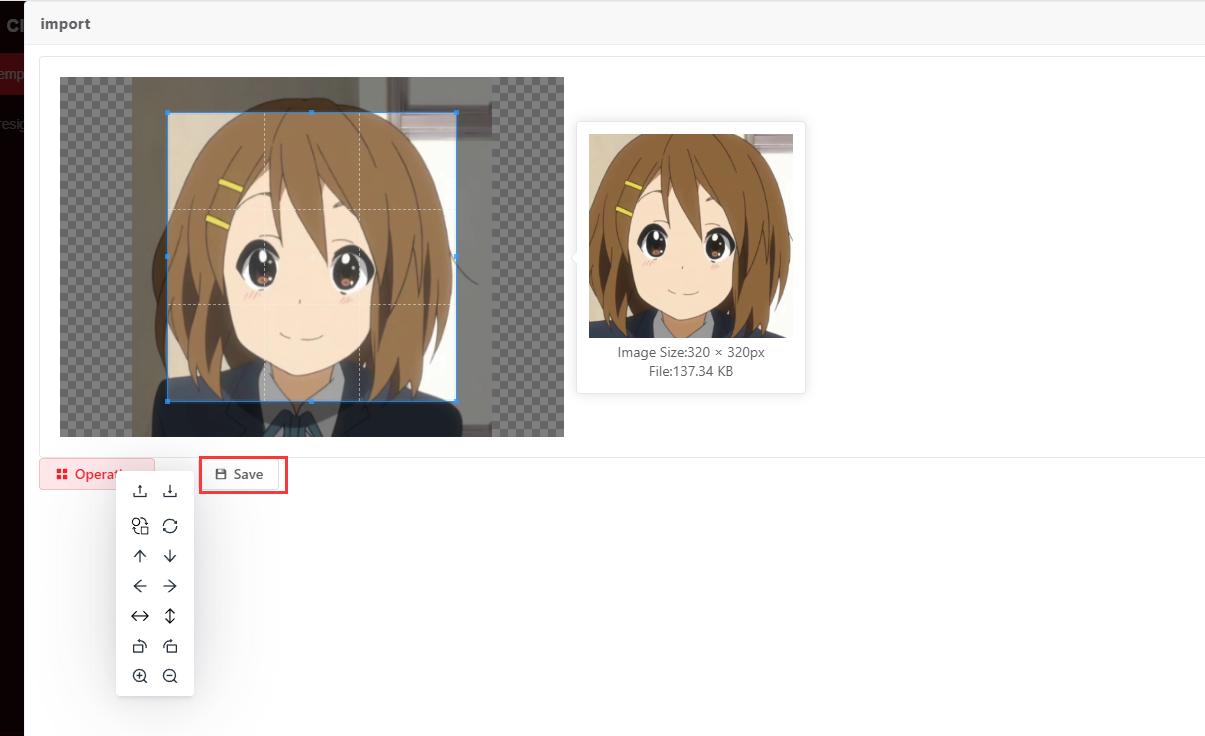
Click the blue i (View) icon to open employee details. You can upload a photo and review attendance / HR event tabs.

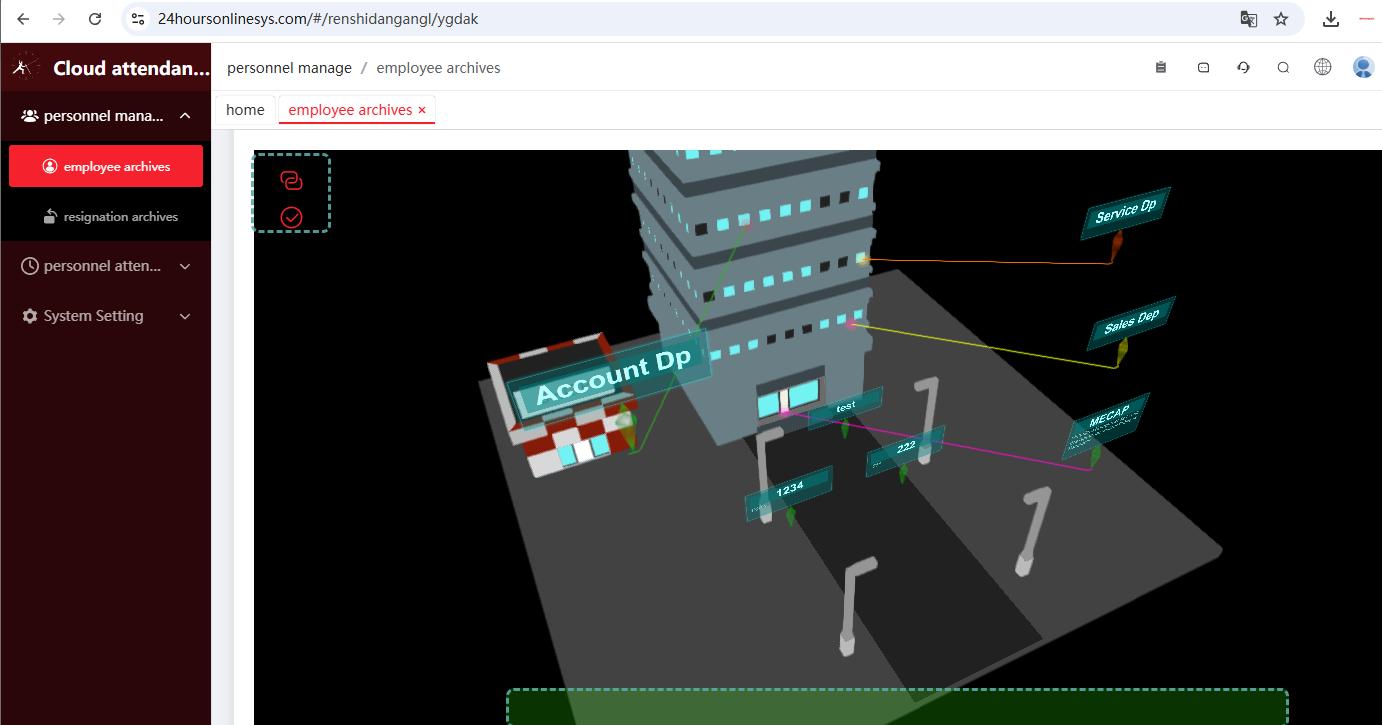
6.4 3D organization view
Scroll down in Employee archives to explore the interactive 3D organization chart (zoom / rotate).
7. Enroll Face / Fingerprint on the Device
- Confirm the device is Online in Device manage.
- On the terminal, find the employee by name / Enroll ID (already pushed from cloud).
- Register face, fingerprint, card, or password as needed.
- Ask the employee to punch once; then check Attendance record in software.
- Is the employee’s department the same as the device department?
- Is the device online?
- Try the Issue staff / sync button, then refresh the device user list.
8. Shift Setting (Working Time)
Path: Personnel attendance → Shift manage.
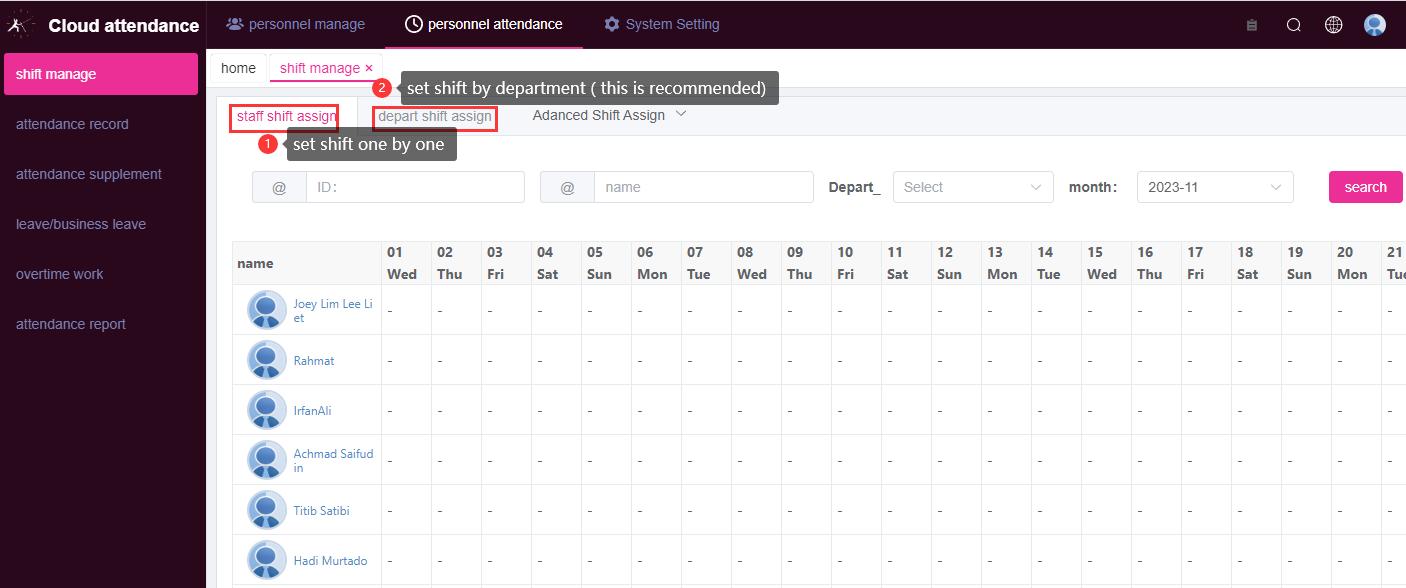
8.1 Two times you must understand
| Term | Meaning | Example |
|---|---|---|
| Shift time (office working time) | Official work period used for late / early / hours calculation | 06:00 – 14:00 |
| Punching in & out time | Allowed window when staff must verify on the device to create IN/OUT | In 04:00–09:20 · Out 10:40–20:40 |
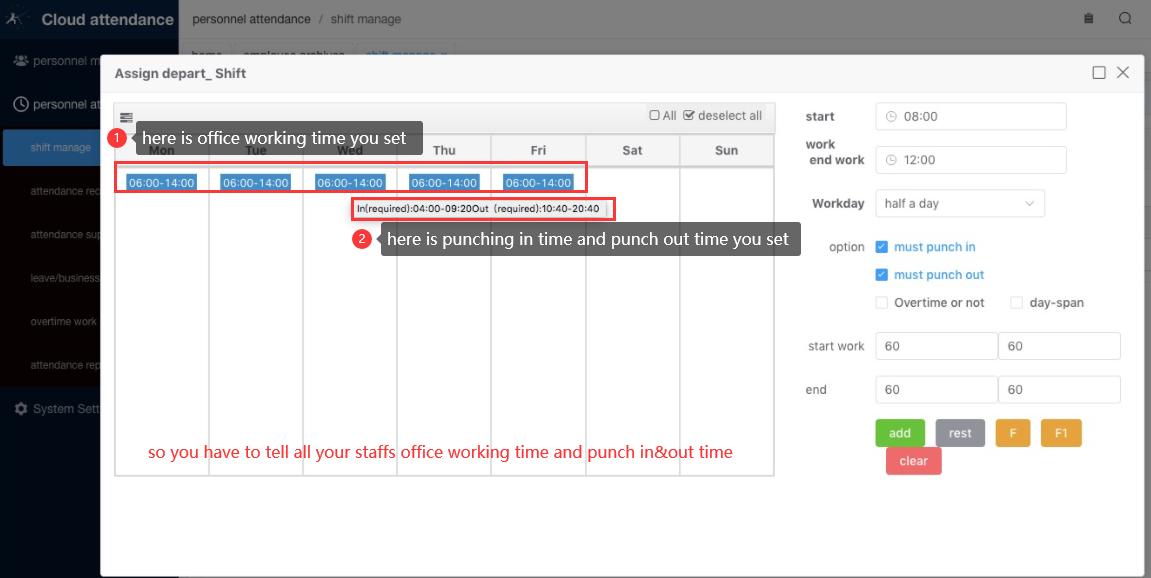
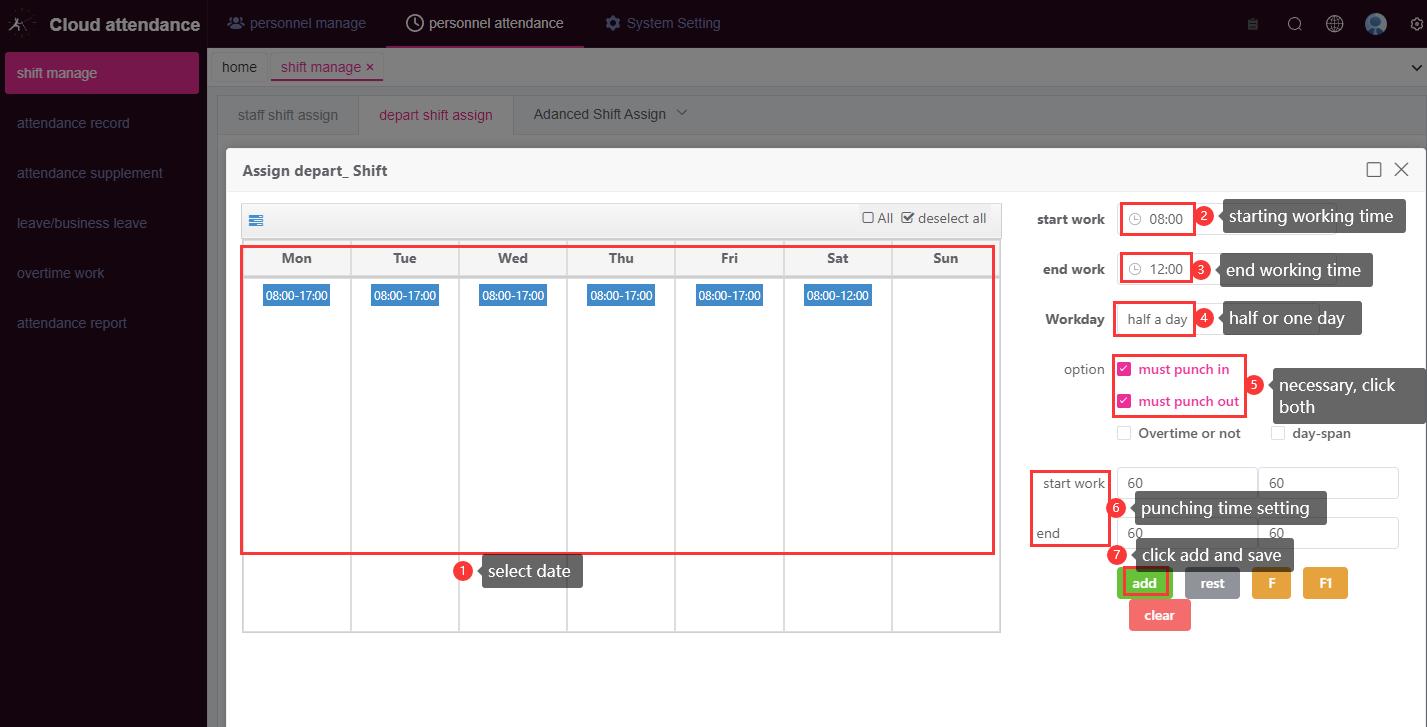
Detailed introduction (normal / fixed shift): Normal Shift Setting Guide
8.2 Free shifts: F1 and F
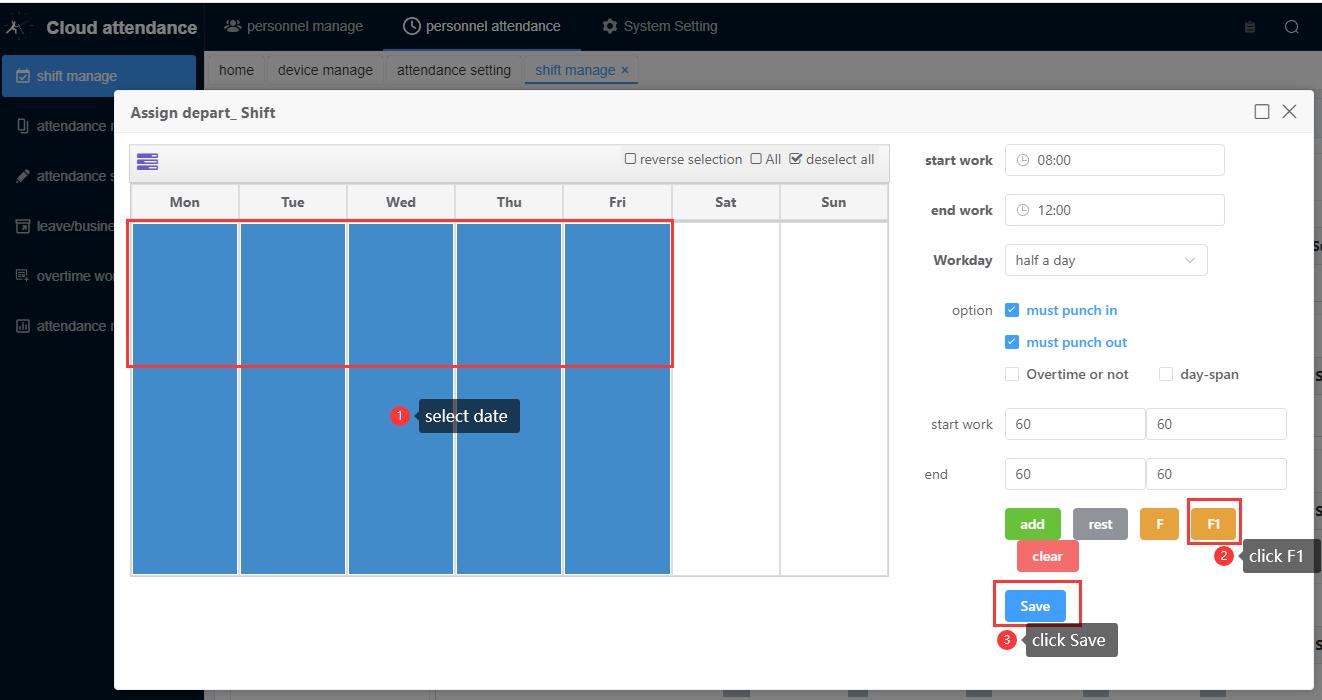
F1 — Free shift (1 pair)
No fixed office hours. First verification = Punch In, last verification = Punch Out. Working hours = last − first.
Steps: select dates → click F1 → Save.
F — Free shift (up to 4 pairs)
Also no fixed hours. System calculates up to 4 In/Out pairs per day (1st In, 2nd Out, 3rd In, 4th Out…).
Use when staff may leave and return several times a day.
More detail: Shift Types Guide.
9. Attendance Records & Reports
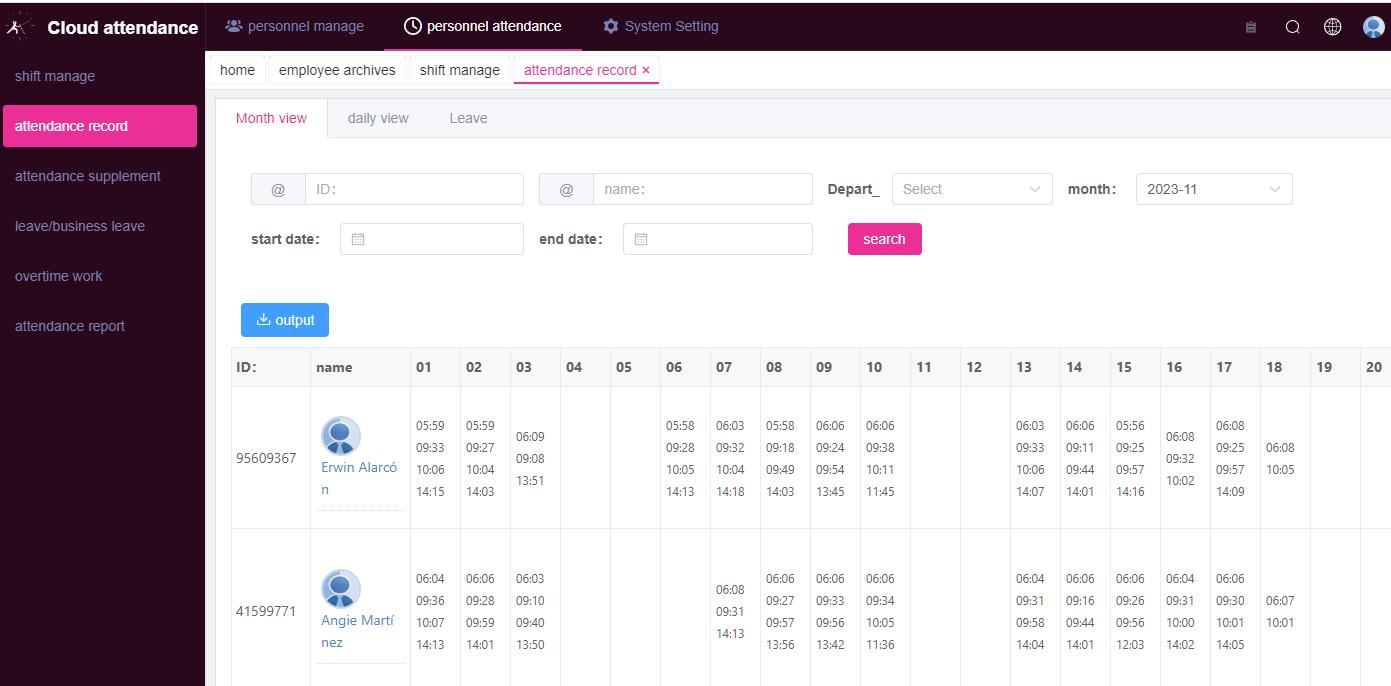
9.1 Attendance records (raw punches)
Path: Personnel attendance → Attendance record. Every successful punch on the device appears here.
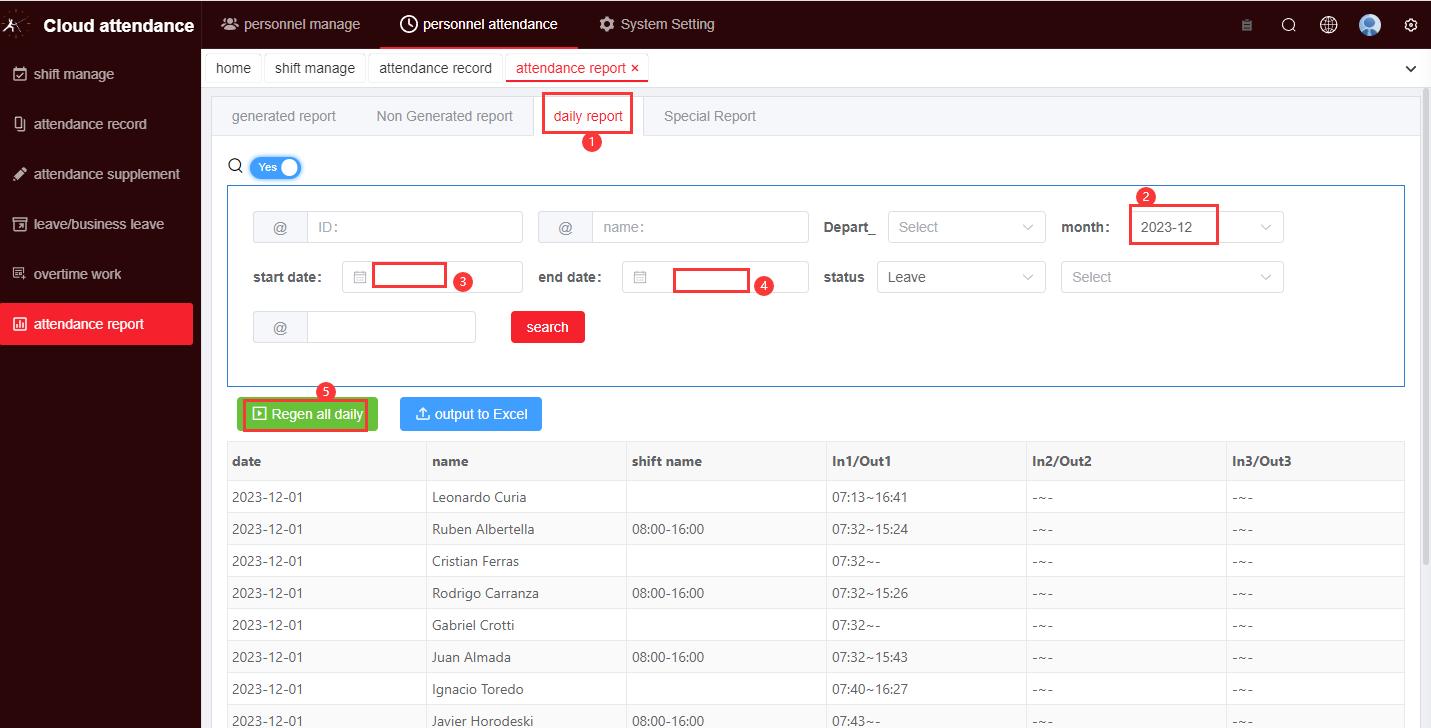
9.2 Daily report
Path: Attendance report → Daily report. If you did not change shift settings after go-live, daily reports usually generate automatically. If you changed shift / punch windows later, regenerate manually.
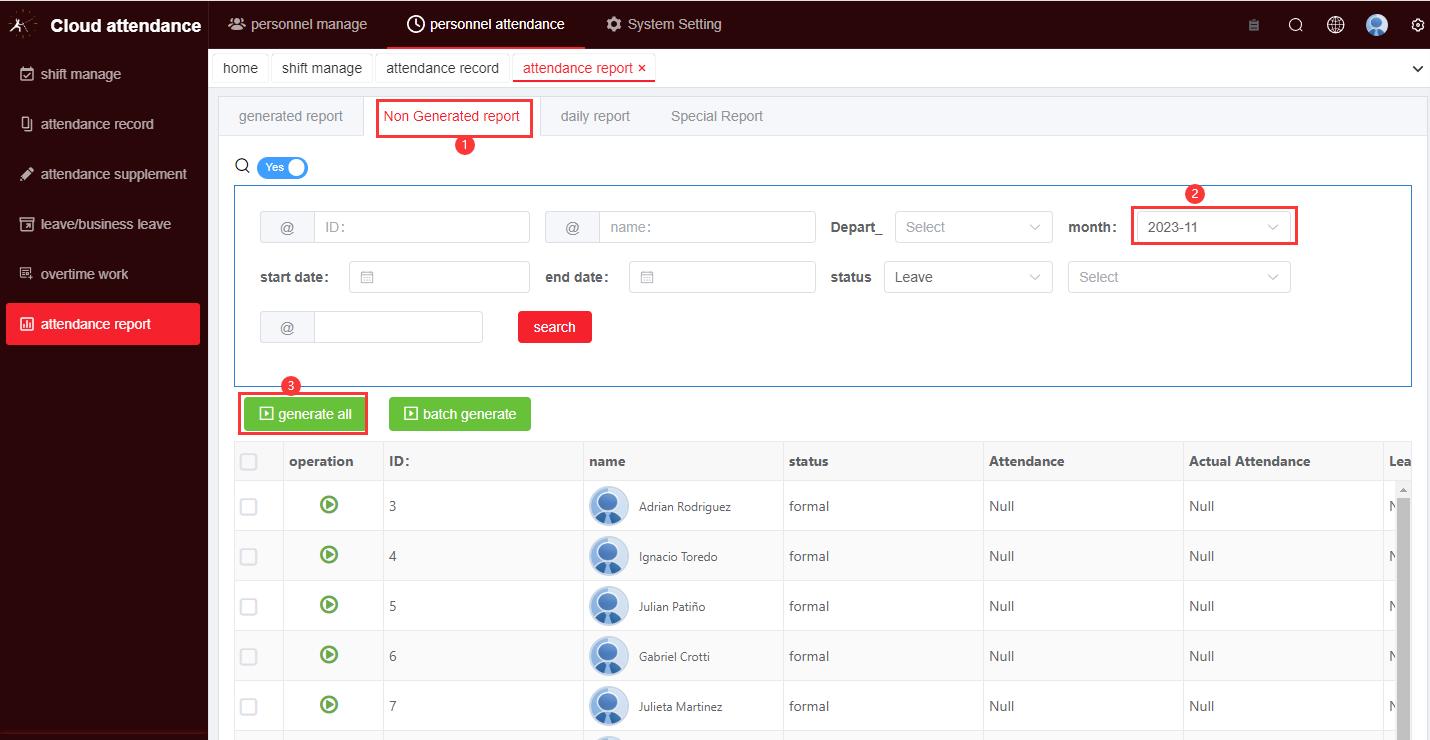
9.3 Non-generated → Generated
- Open Non Generated report.
- Select month.
- Click Generate all (or batch generate).
- Open Generated report to review / export Excel / open individual staff report.
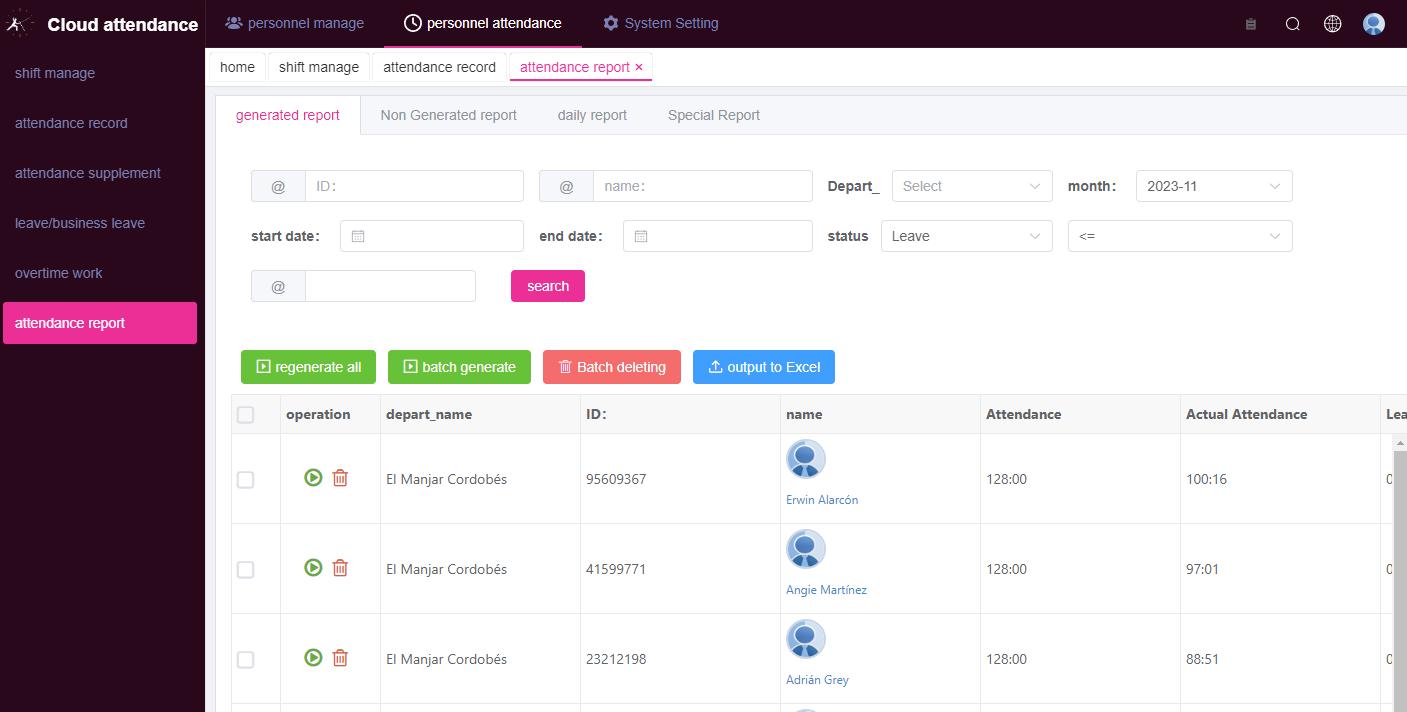
9.4 Weekly Attendance Report (2026)
Besides monthly reports, 2026 adds a Weekly Report for markets that pay / settle weekly. Use it from the attendance report area when weekly payroll cycles are required.
10. Location Management (New in 2026)
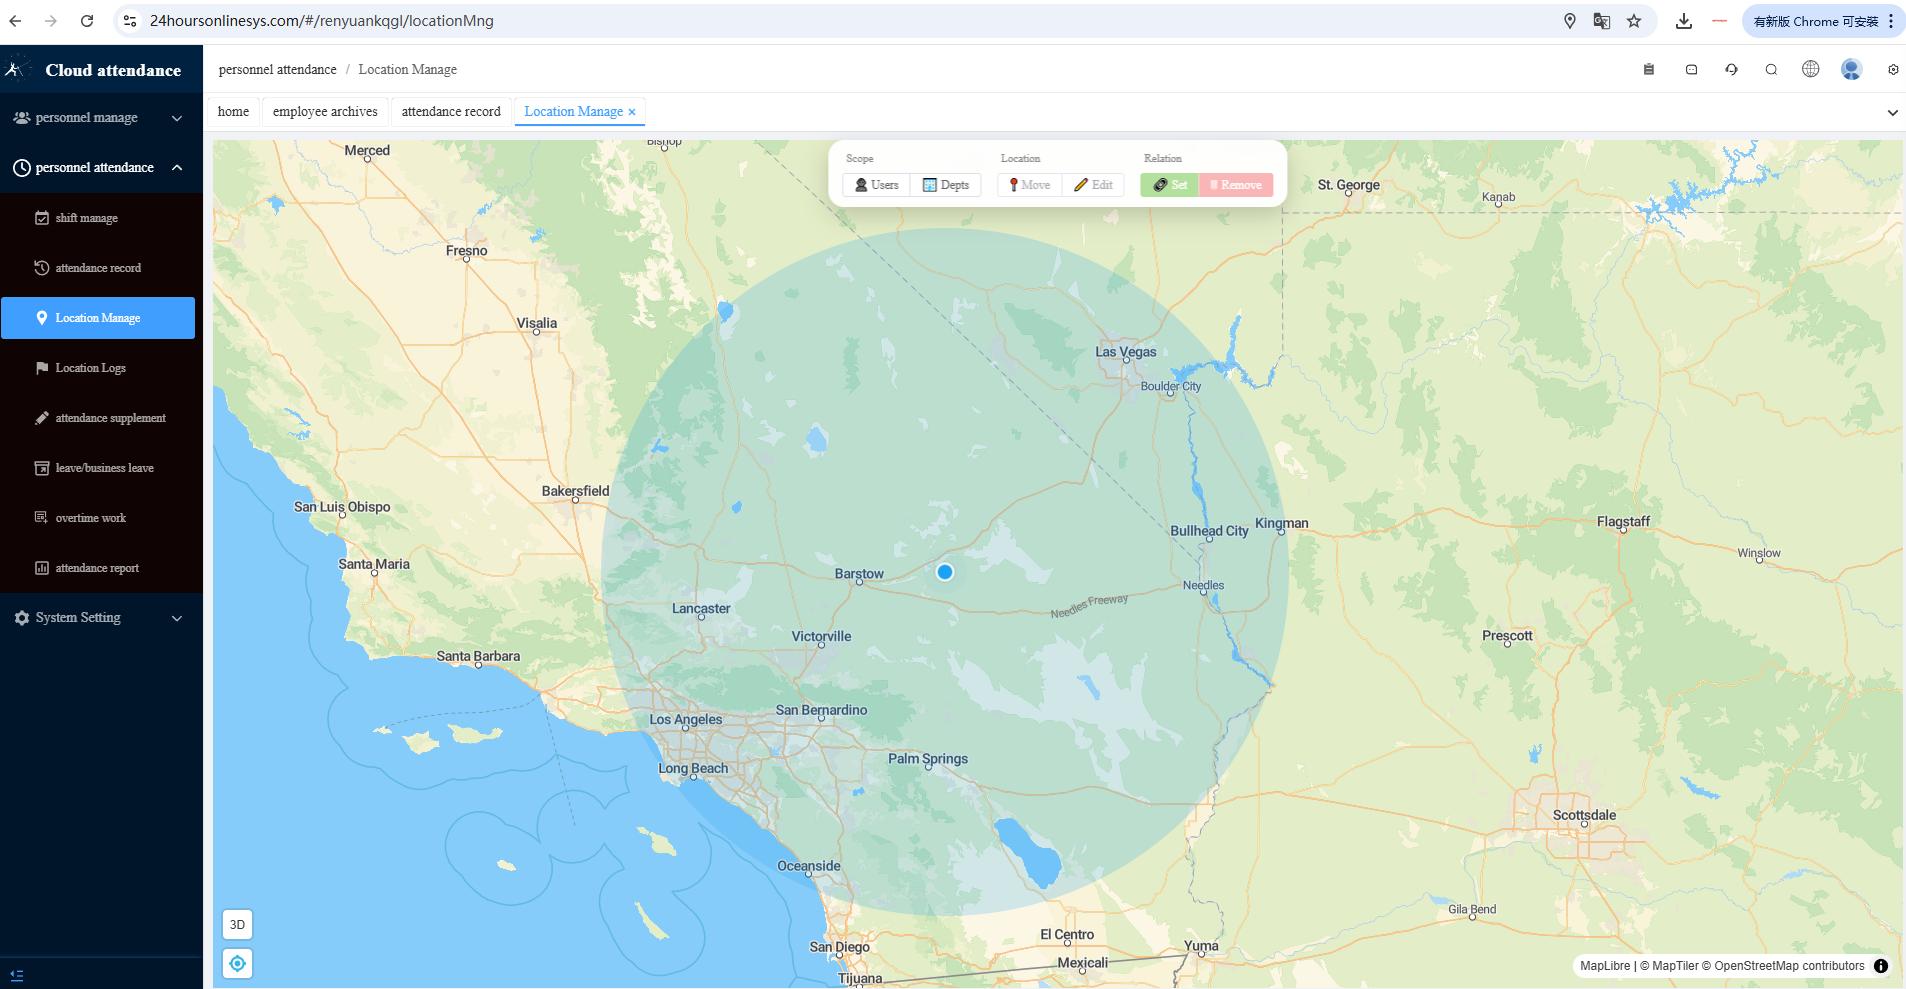
For outdoor / remote staff: define a geofence, require clock-in with or without photo, and review location logs on the map.
10.1 Location Manage (Admin)
Path: Personnel attendance → Location Manage.
- Find the work site on the map and set the attendance zone (circle).
- Scope: assign to specific Users or Departments.
- Use Move / Edit to adjust; Set / Remove to bind or unbind.
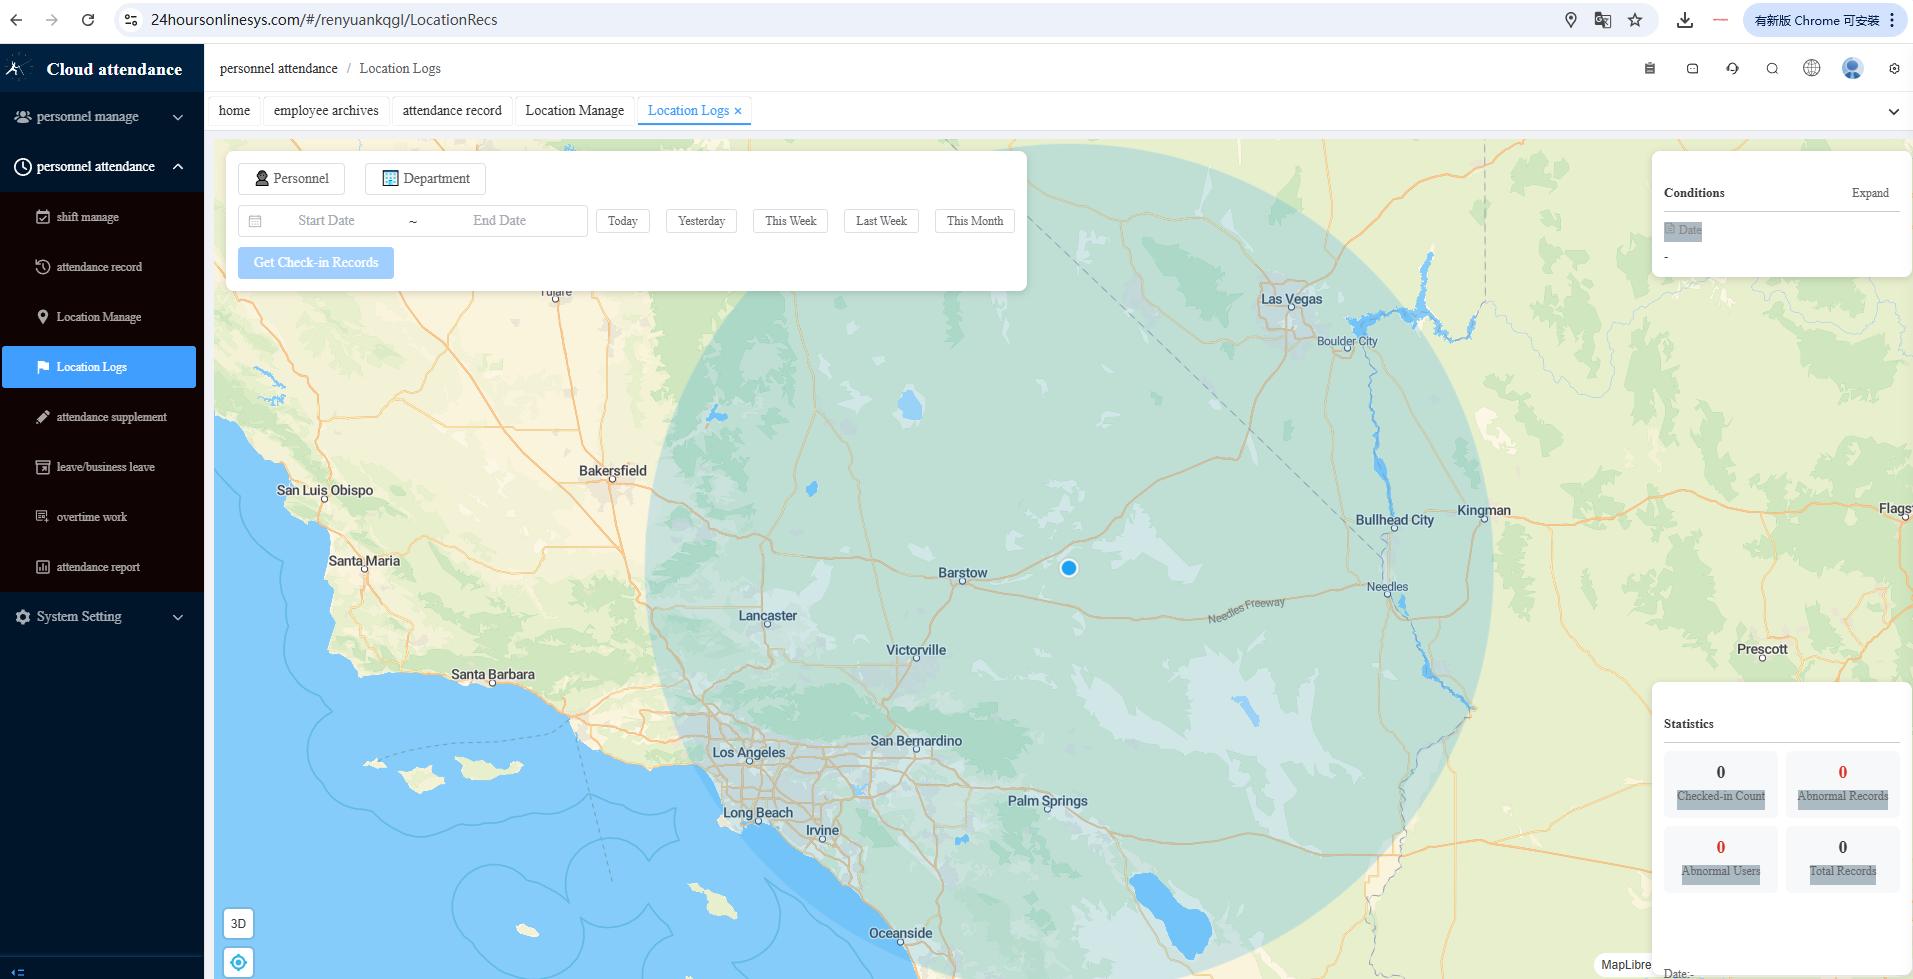
10.2 Location Logs
Filter by person/department and date, then click Get Check-in Records. Review abnormal check-ins in Statistics.
11. Employee Portal
Employee link: https://24hoursonlinesys.com/#/employee
11.1 Username & password
In admin software, open Employee archives → Edit for that staff:
- Username = Mobile number
- Password = Login password field
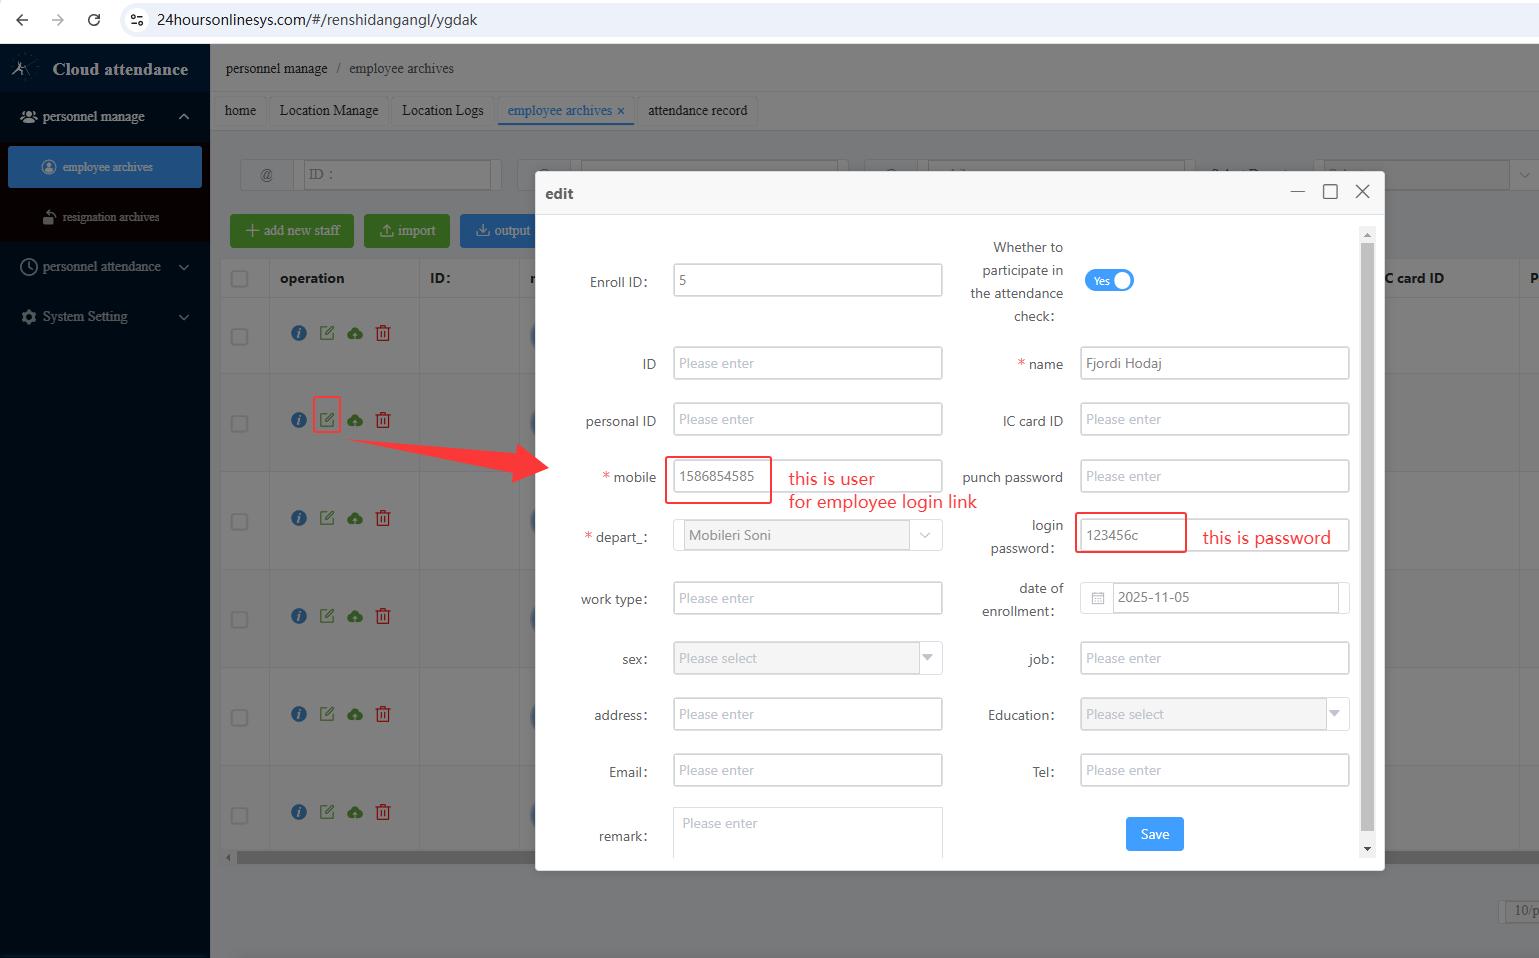
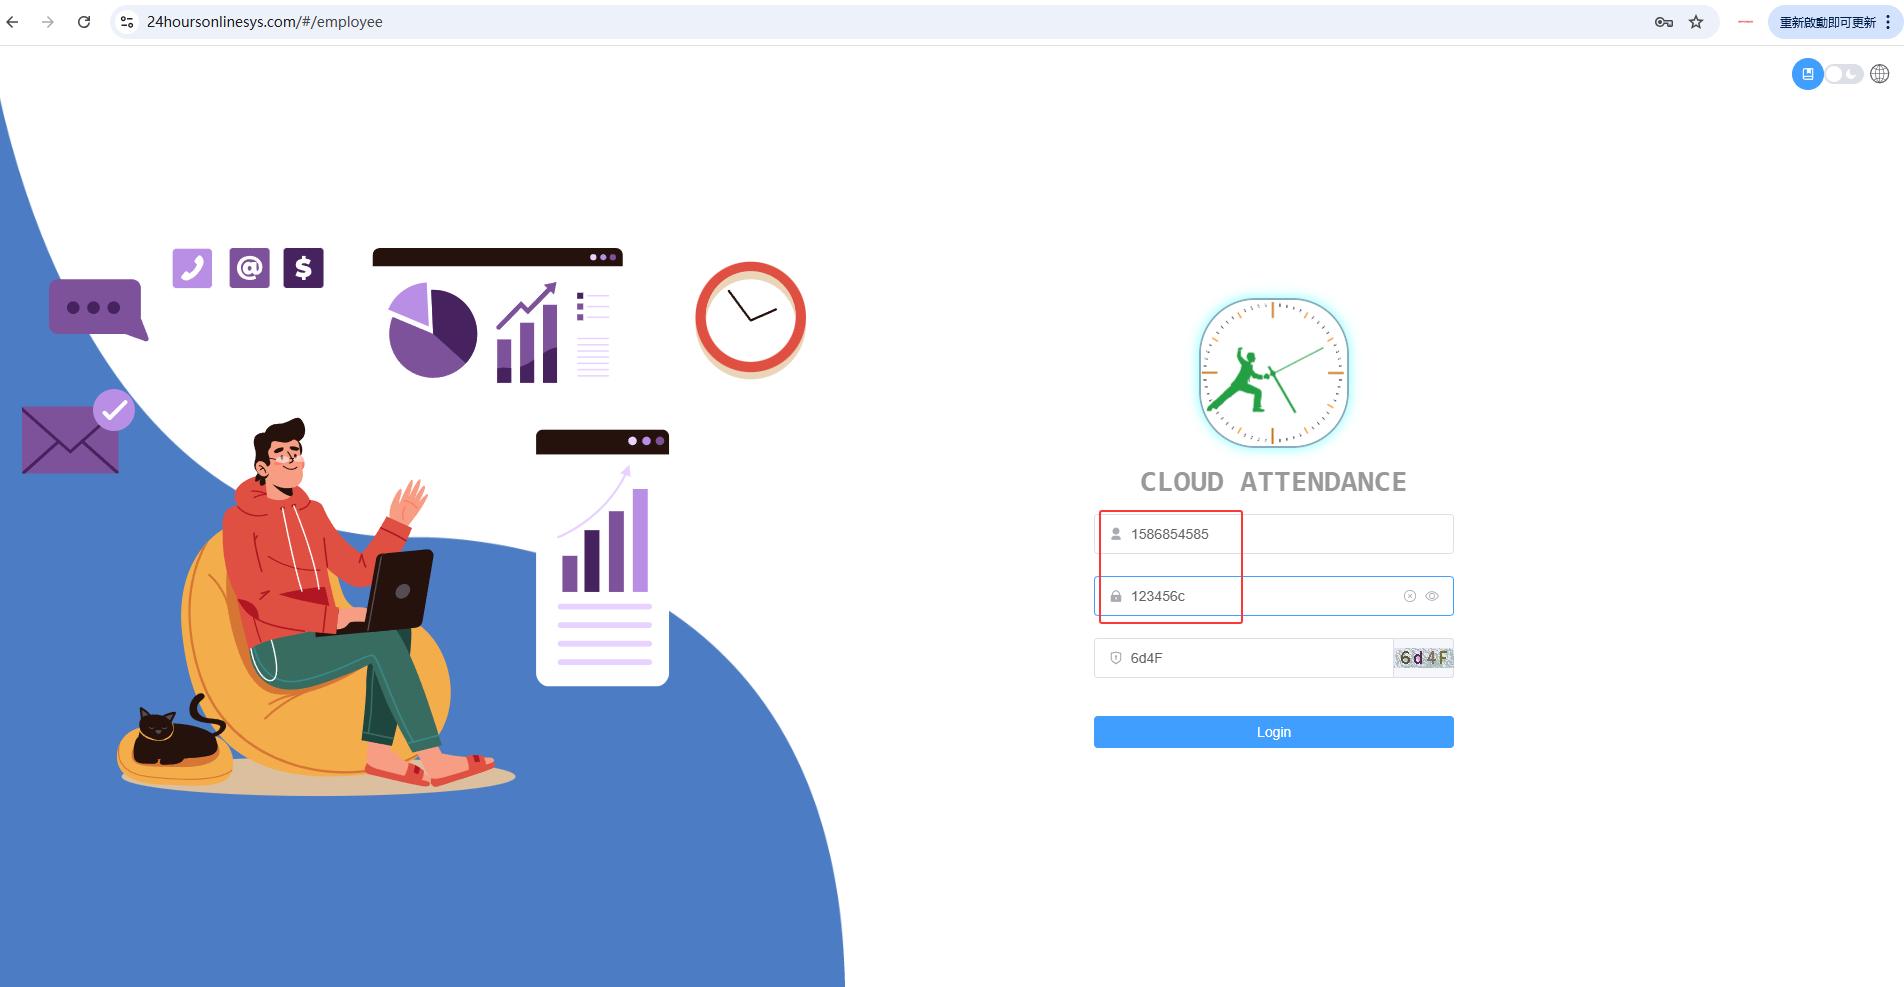
Detailed introduction (employee login): Employee Login Guide
11.2 What employees can do
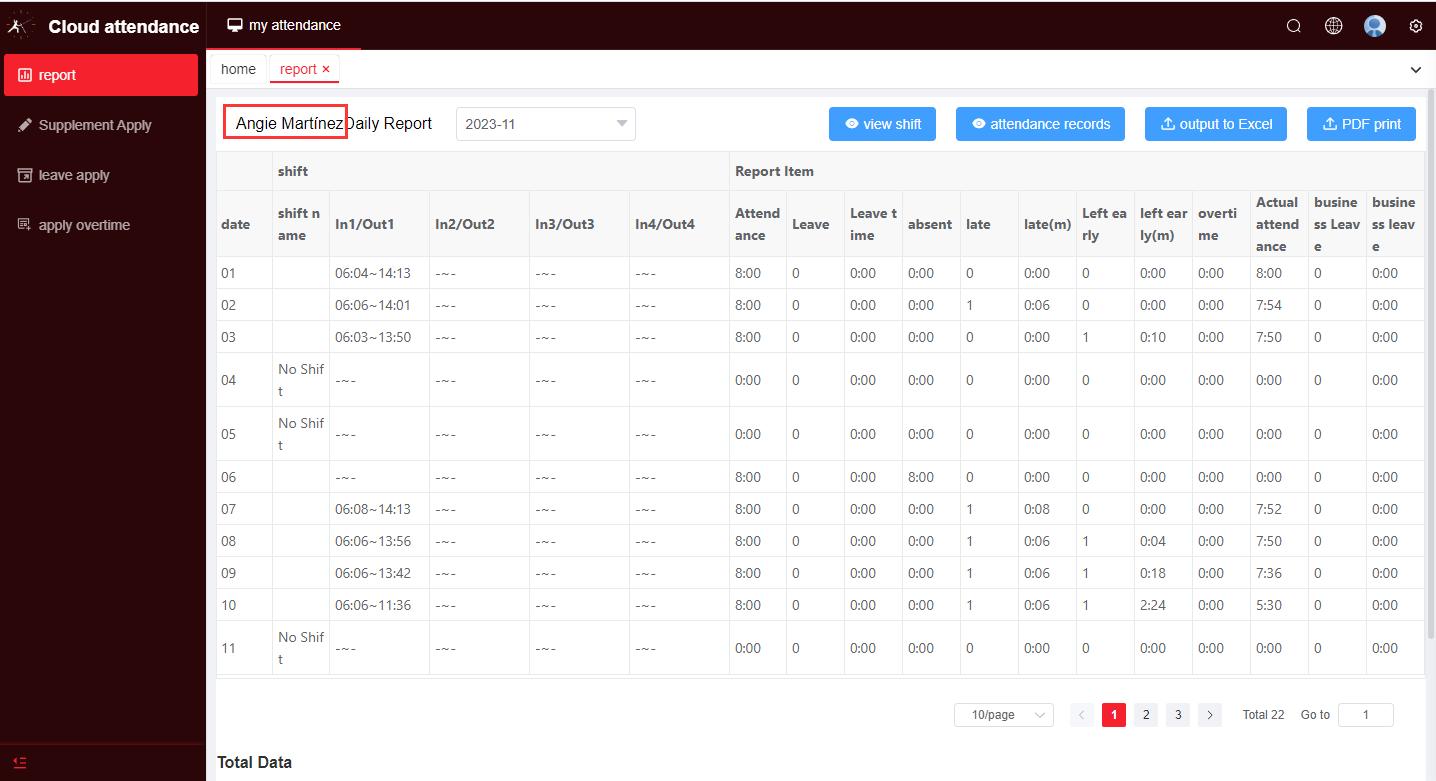
View report
Daily attendance, late / early / absent / overtime totals. Export Excel or PDF.
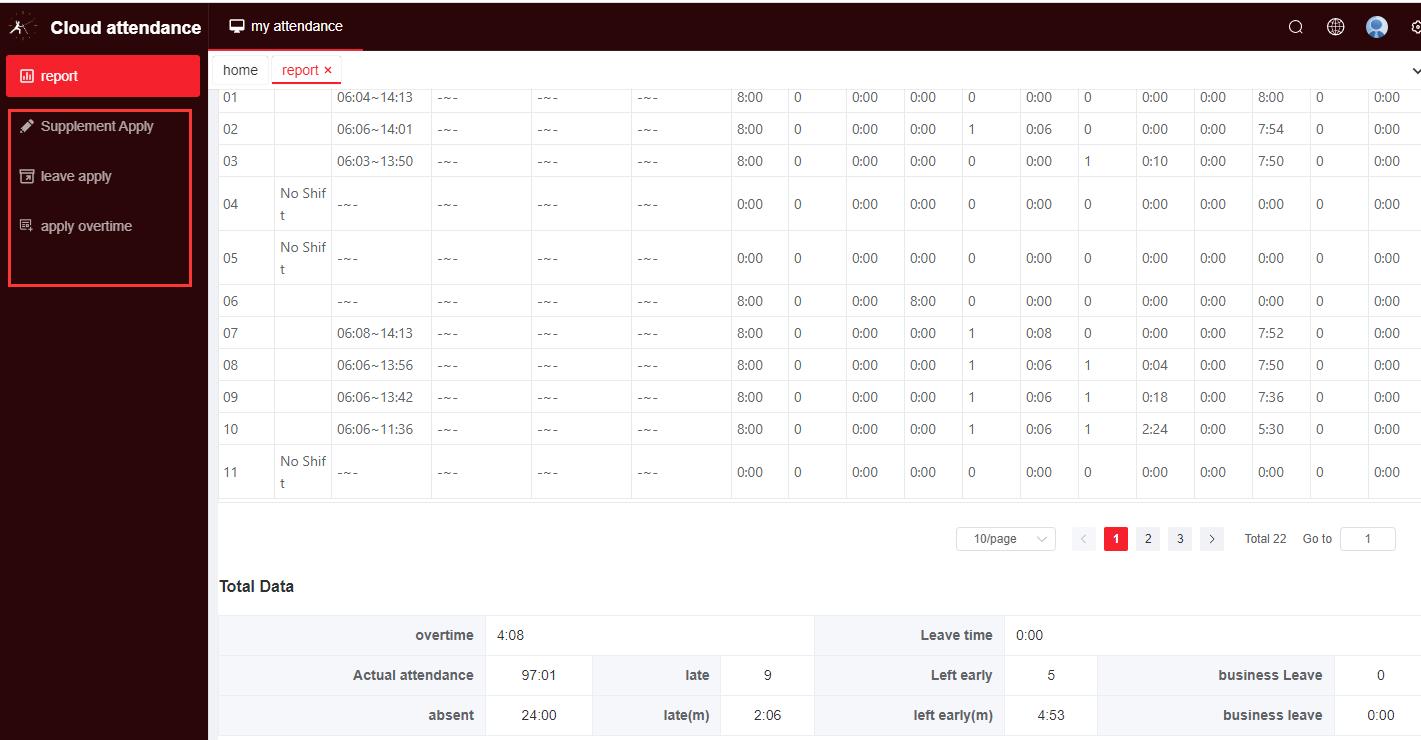
Apply online
Supplement apply, leave apply, overtime apply — from phone or PC.
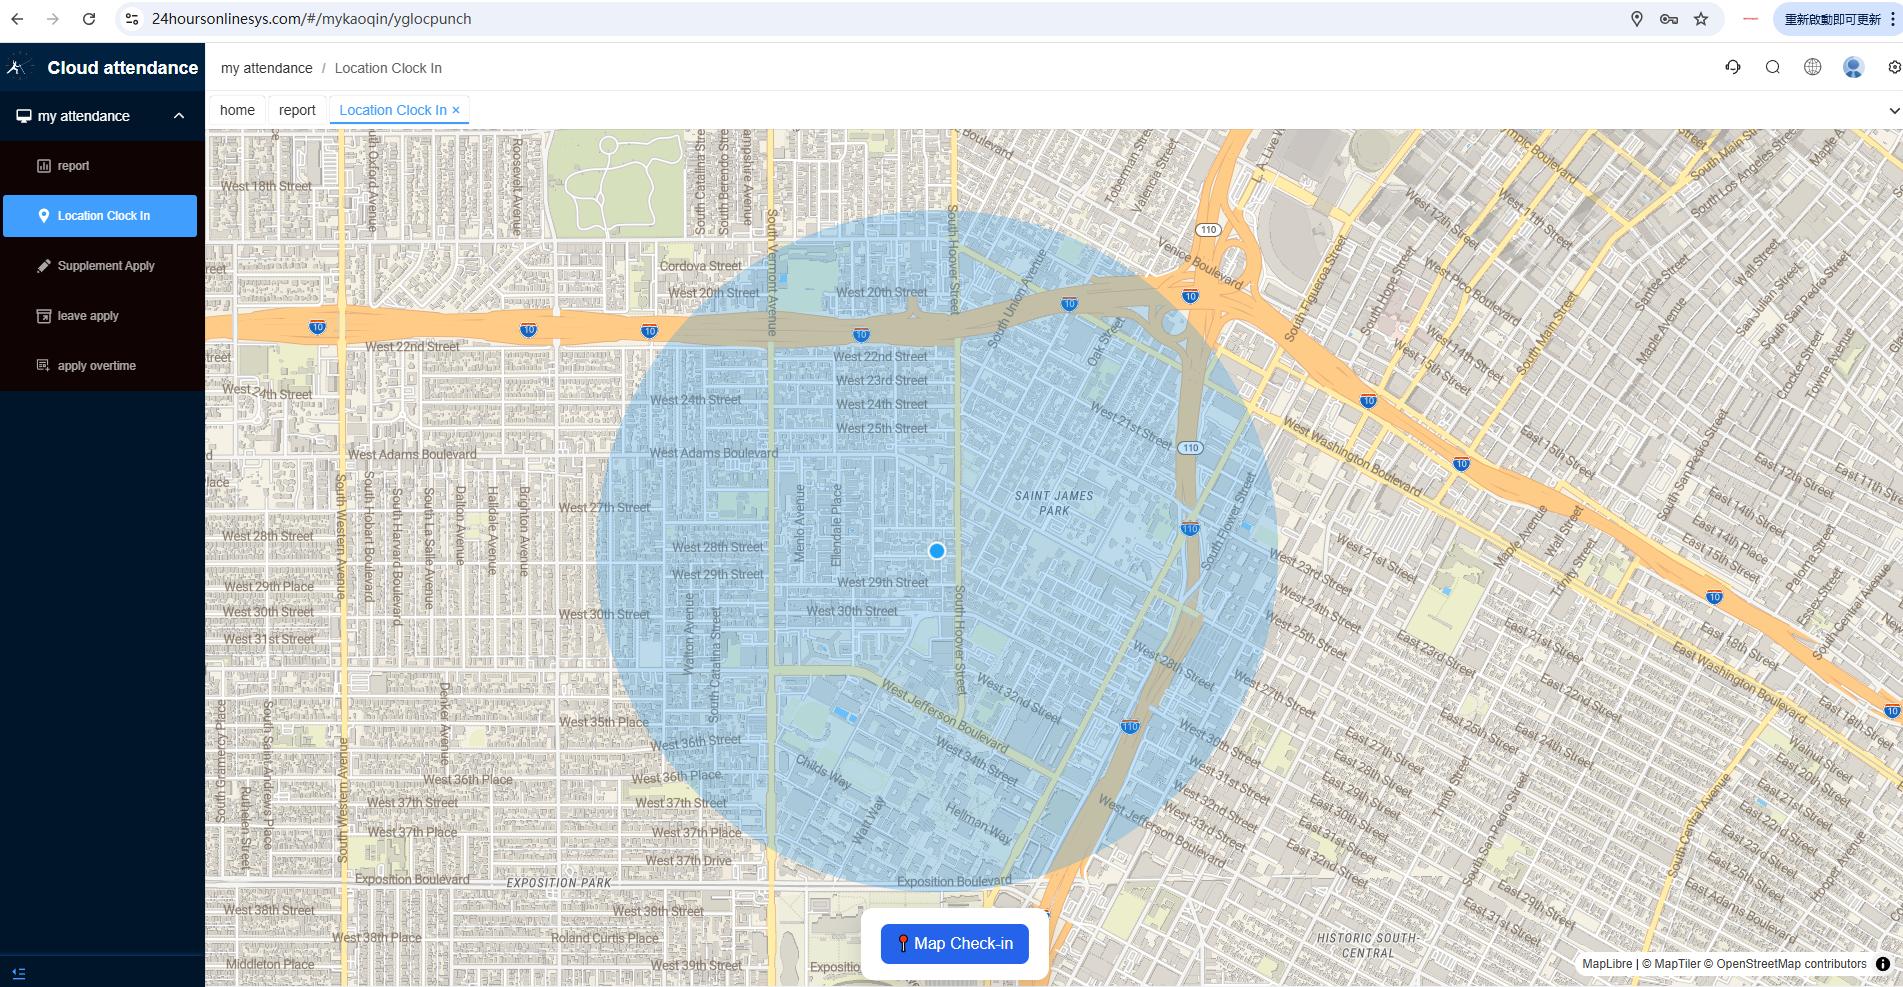
Location clock-in
When outside the office, clock in inside the allowed map zone (photo optional per policy).
Detailed introduction (overtime rules): Overtime Rules Guide
12. FAQ & Troubleshooting
| Problem | What to check |
|---|---|
| Cannot register account | Device SN correct? Checkbox / verify icon clicked? Network OK? |
| Device always Offline | Cable/Wi‑Fi, DNS, firewall; reboot device; confirm SN added in Device manage. |
| Employee name not on device | Created in cloud? Department matches device department? Try Issue staff sync. |
| Punches exist but report empty / wrong | Shift + punch window set? Staff punched inside the window? Regen daily / generate report. |
| Employee cannot login portal | Mobile + login password filled in Edit form? Using employee URL (not admin URL)? |
| Location check-in fails | GPS allowed in browser? Inside geofence circle? User/department assigned in Location Manage? |
Full FAQ document: FAQ.html
13. Support & Documents in This Package
Contact
EPORDO China Attendance Dept.
WhatsApp: 0086 18665332487 / 15815501089
Shenzhen EPORDO Co., Ltd · 2026